Love You App: Texting and Persistence
In this lesson, we discuss a one-click love message app that sends a text to your significant other(s). In the process, you'll learn about the Texting component and user-generated, persistent data.
Texting Component
-
key properties: PhoneNumber and Message
-
key method: SendMessage
-
key event: MessageReceived
Demo: Love You App with custom message.
Description: one click method of texting your special loved one.
-
Add a label, a textbox, a submit button, a send button, a Texting component, and a TinyDB component.
-
Put default text in label and put a hint in the Textbox
-
In blocks editor, send button sends the text in label.
-
Submit button a) change contents of label, and 2) blank out textbox.
-
Run the app to show that it works. Then explain that if you close and re-run the app, the entered response is gone.
-
Note: you can send/process texts using wifi and Google Voice, without cell services. Check out this tutorial
Try it, Part 1. Create your own one-click send-a-message app.
Your app should allow a message to be sent to a phone numbers with a single click. It should have the following features:
- a Texting component
-
A label for the love message
a textbox and submit button for changing the message
- a send button
- The user can customize the message by entering it in textbox and clicking submit. The label should change, and the textbox should be blanked out (so that the hint re-appears)
- Click send to send the text
Persistence
-
The data stored in variables and component properties is called transient data.
-
Transient data dies (is de-allocated) when an app is closed. If you reopen the app, it won't be there.
-
Persistent data is database data. It lives even after an app is closed. If you reopen the app, you can access the persistent data.
-
TinyDB component in App Inventor
-
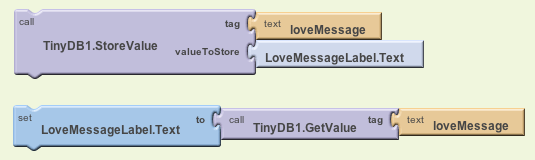
TinyDB lets you store and retrieve persistent data in a database on your phone. You tag the data, which means to give it a name it in the database. Here are some sample blocks:
-
StoreValue puts data in the database, GetValue retrieves data from the database.
-
Notice that the tag is the same so it will get the previously entered data.
-
In the Love You App, when should you call StoreValue? When would you call GetValue to retrieve the data from the database?
-
Careful: with persistent data, you need to think about the first time the app is run. What will be in the database then?
Demo 2. Adding persistence to your app
-
Add in code for storing/retrieving from TinyDB. Retrieve in Screen.Initialize. You can store on the send (or a separate button). Careful: TinyDB doesn't work with live testing. To test, download the app to your phone (Package for Phone | Show Barcode or Download to connected phone)
-
Note that the default message is squashed on first run of the app. Check for this in Screen.Init (check if the length of the text returned is 0).
Try it, Part 2. Add persistence to your app
-
Add a TinyDB component
-
In the SubmitButton.Click event, add a call to TinyDB.StoreValue. Tag the data with "loveMessage".
-
In Screen.Initialize, call TinyDB.GetValue and put the result in the love message label
-
To test the persistence, you must download the app to your phone (Package | Download to Connected Phone). Do this and test by 1) changing the message, 2) closing the app, and 3) re-opening the app. Your custom message should be there.
Try It, Part 3: Add more lovers to your app
-
Let the user send the text to three numbers with a single click.
-
To test, ask three of your classmates for their numbers. You can also test by opening three emulators. The number for an emulator is at top, e.g., 5546
- Let the user change the three numbers. Add three labels for the phone numbers, and three PhoneNumberPicker components.
- Modify the app so the three chosen phone numbers are persistent
-
Extra credit: Let the user choose as many phone numbers as desired, instead of just three. You'll need a list for this, see chapter 19 in the book.
