
Point your phone at the sky, and Google Sky Map tells you which stars you're looking at. Tilt your phone, and you can control the game you're playing. Take your phone on your daily walk, and a breadcrumb app records your route. All of these apps are possible because the mobile devices we carry have high-tech sensors for detecting our location, orientation, and acceleration.
In this chapter, you'll revisit the App Inventor components LocationSensor, OrientationSensor, and AccelerometerSensor. Along the way, you'll learn about the global positioning system (GPS); orientation measures like pitch, roll, and yaw; and some math for processing accelerometer readings.
Until the popularization of the smartphone, computing was on desktop lockdown. Yes, laptops are mobile, but not in the same sense as the tiny devices we now carry around in our pockets. Computing has left the lab and the office, and is now taking place out in the world.
One significant effect of carrying our computing with us is a new, very interesting piece of data for every app: a current location. Knowing where people are as they move about the world has far-reaching implications and the potential to help us greatly in our lives. It also has the potential to invade our privacy and be a detriment to humanity.
The "Android, Where's My Car?" app (Chapter 7) is an example of a location-aware app that provides a personal benefit. It lets you remember a previous location so you can get back to it at a later time. That app is private-your location information is stored only in your phone's database.
The same idea can be applied to groups. For instance, a group of hikers might want to keep track of one another's whereabouts in the wilderness, or a group of business associates might want to find one another at a large conference. Such apps are starting to appear in the marketplace, with two of the most popular being Google's Latitude (www.google.com/latitude), and Facebook's Places (www.facebook.com/ places). Due to the public's privacy concerns, these apps faced criticism on their launch.
Another type of location-aware app uses augmented-reality tools. These apps use your location and the phone's orientation to provide overlay information that augments the natural setting. So you might point a phone at a building and see its price on the real-estate market, or you might walk near an exotic plant in a botanical garden and have an app tell you its species. Early players in this genre include Wikitude, Layar, and Google Sky Map.
Wikitude even allows users to add data to the mobile cloud through its website, http://wikitude.me. At the site, you pull up a map to geotag the information you post. Later, when you or someone else uses Wikitude's mobile app at that location, your information appears.
To create a location-aware app, you first need to understand how the global positioning system (GPS) works. GPS data comes from a satellite system maintained by the US government. As long as you have an unobstructed sight line to at least three satellites in the system, your phone can get a reading. A GPS reading consists of your latitude, longitude, and altitude. Latitude is how far north or south you are of the equator, with values for north being positive and south being negative. The range is –90 to 90. Figure 23-1 shows a Google map of a spot near Quito, Ecuador. The latitude shown on the map is –0.01-just barely south of the equator!
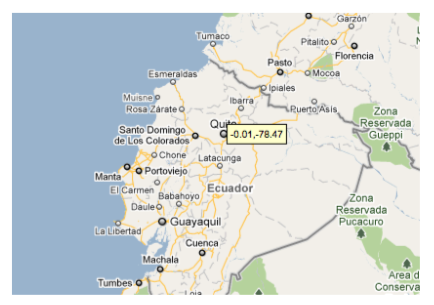
Figure 23-1. Quito, Ecuador, is on the equator
Longitude is how far east or west you are of the Prime Meridian; east coordinates have positive values and west coordinates are negative. The most well-known place it runs through is Greenwich, a town near London that is the home of the Royal Observatory. The map in Figure 23-2 shows Greenwich and its longitude of 0.0.
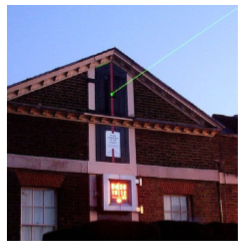
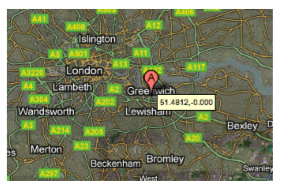
Figure 23-2. The Royal Observatory in Greenwich shoots a beam of light along the Prime Meridian
Longitude values range from –180 to 180. Figure 23-3 shows a spot in Russia, very close to Alaska, that has a 180.0 longitude. You might say that a location like this is halfway around the world from Greenwich (0.0 longitude).
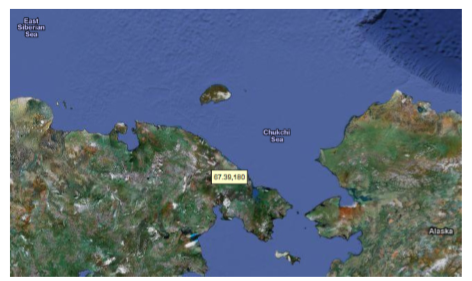
Figure 23-3. A point near the Russian–Alaskan border has longitude 180
App Inventor provides the LocationSensor component for accessing GPS information. The component has properties for Latitude, Longitude, and Altitude. It also communicates with Google Maps, so you can get a reading for your current street address.
LocationSensor.LocationChanged, pictured in Figure 23-4, is the key event handler for the LocationSensor.
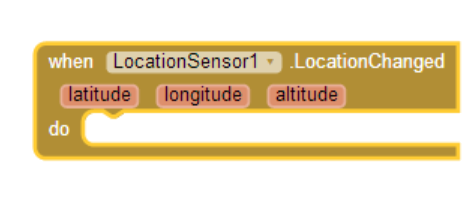
Figure 23-4. The LocationSensor1.LocationChanged event handler
This event is triggered the first time the sensor gets a reading and each subsequent time the phone is moved enough so that new data is read. There's often a delay of quite a few seconds before an app's first reading, and sometimes the device can't get a reading at all. For instance, if you're indoors and not connected to WiFi, the device might not get a reading. Your phone also has settings that allow you to turn GPS reading off to save battery life; this is another potential reason the component can't get a reading. For these reasons, you shouldn't assume that the LocationSensor properties have a valid setting until the LocationSensor.LocationChanged event occurs.
One way to deal with the unknowns in location sensing is to create a variable lastKnownLocation, initialize it to "unknown,"and then have the LocationSensor.LocationChanged event handler change the value of that variable, as shown in Figure 23-5.
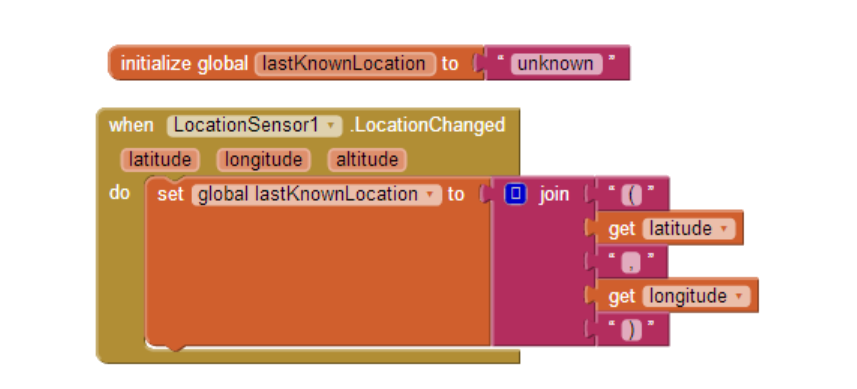
Figure 23-5. The value of the lastKnownLocation variable changes whenever the location changes
By programming the LocationSensor.LocationChanged event handler in this way, you can always display the current location or record it in a database, with "unknown" appearing until the first reading. This strategy is used in No Texting While Driving (Chapter 4); that app autoresponds to SMS texts and includes either "unknown" or the last reading taken in the response.
You can also ask explicitly whether the sensor has a reading using the LocationSensor.HasLongitudeLatitude block pictured in Figure 23-6.
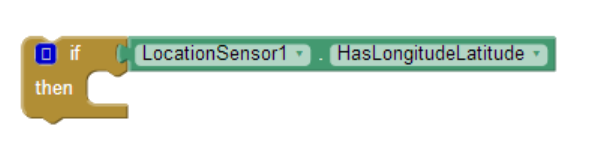
Figure 23-6. Testing whether the sensor has a reading with the HasLongitudeLatitude block
One common use of the LocationChanged event is to check whether the device is within a boundary, or a set area. For example, consider the code in Figure 23-7, which vibrates the phone each time a new reading shows that a person has moved farther than 0.1 longitude from the Prime Meridian.
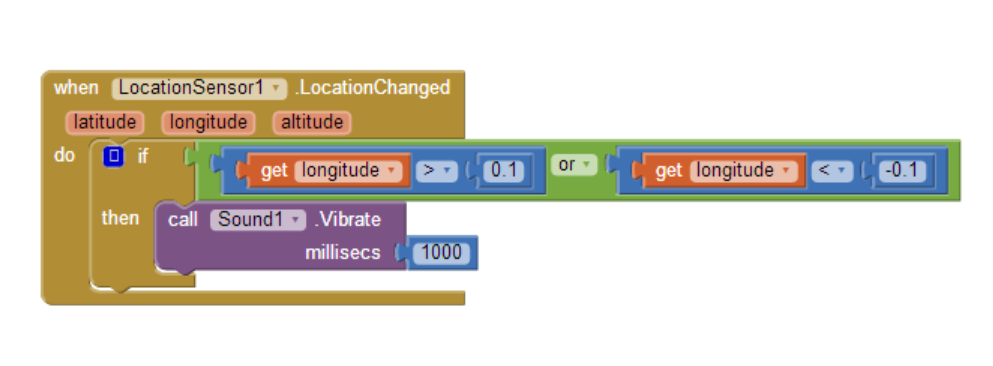
Figure 23-7. If a reading isn't close to the Prime Meridian, the phone vibrates
Such boundary checking has numerous applications; for example, warning parolees if they're nearing a legally specified distance from their home, or alerting parents or teachers if a child leaves the playground area. If you'd like to see a slightly more complex example, see Chapter 18's discussion of conditional blocks.
An Android device can determine its own location in a number of ways. The most accurate method-within a few meters-is through the satellites that make up the GPS maintained by the US government. You won't get a reading, however, if you're inside and there are skyscrapers or other objects in the way; you need a clear path to at least three satellites in the system.
If GPS isn't available or the user has disabled it, the device can obtain its position through a wireless network. You have to be near a WiFi router, of course, and the position reading you'll get is the latitude/longitude of that WiFi station
A third way a device can determine positioning is through Cell ID. Cell ID provides a location for the phone based on the strength of signals from nearby cell phone towers. It is generally not very accurate unless you have numerous cell towers near you. However, it does use the least amount of battery power compared to GPS or WiFi connectivity.
The OrientationSensor is used for game-like apps in which the user controls the action by tilting the device. It can also be used as a compass to find out which direction (north/south, east/west) the phone is pointing.
The OrientationSensor has five properties, all of which are unfamiliar to most people other than aeronautical engineers:
Roll (Left–Right)
&tbsp;Roll is 0 degrees when the device is level, increases to 90 degrees as the &tbsp; device is tilted up onto its left side, and decreases to −90 degrees when &tbsp;the device is tilted up onto its right side.
Pitch (Up–Back)
&tbsp;Pitch is 0 degrees when the device is level, increases to 90 degrees as the &tbsp; device is tilted so its top is pointing down, and increases further to 180 &tbsp; degrees as it is turned over. Similarly, as the device is tilted so its &tbsp;bottom points down, Pitch decreases to −90 degrees and then down to &tbsp; −180 degrees as it is turned all the way over.
Yaw (Compass)
&tbsp;Yaw is 0 degrees when the top of the device is pointing north, 90 degrees &tbsp;when it is pointing east, 180 degrees when it is pointing south, and 270 &tbsp;degrees when it is pointing west.
Magnitude (Speed of a rolling ball)
&tbsp;Magnitude returns a number between 0 and 1 that indicates how much the &tbsp; device is tilted. Its value indicates the force exerted by a ball rolling &tbsp; on the surface of the device.
Angle (Angle of a rolling ball)
&tbsp;Angle returns the direction in which the device is tiled. That is, it tells &tbsp;the direction of the force that would be exerted by a ball rolling on the surface of the device.
The OrientationSensor also provides the OrientationChanged event, which is triggered every time the orientation changes. To explore these properties further, write an app that illustrates how the properties change as the user tilts the device. Just add five heading labels, and five other labels to show the current values of the properties in the preceding list. Then add the blocks shown in Figure 23-8.
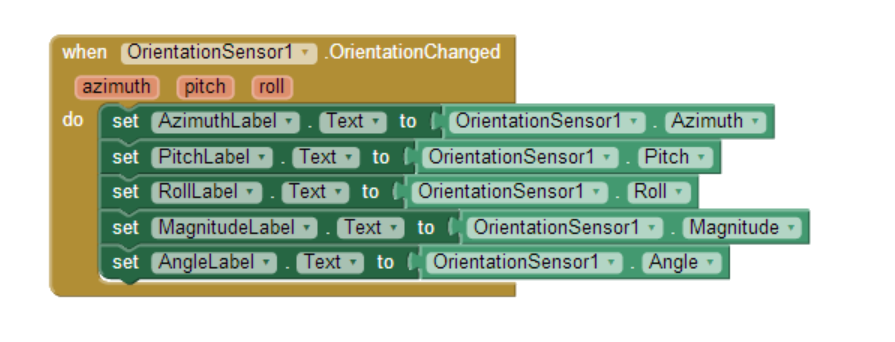
Figure 23-8. Blocks to display the OrientationSensor data
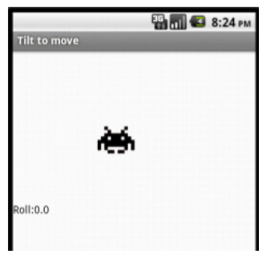
Figure 23-9. A user interface for exploring how "roll" can be used to move an image
Now let's try to move an image left or right on the screen based on the user tilting the device, like you might do in a shooting or driving game. Drag out a Canvas and set the Width to "Fill parent" and the Height to 200 pixels. Then add an ImageSprite or Ball within the Canvas, and add a Label named RollLabel under it to display a property value, as shown in Figure 23-9.
The OrientationSensor's Roll property will tell you if the phone is tilted left or right (i.e., if you hold the phone upright and tilt it slightly to the left, you'll get a positive reading for the roll; if you tilt it slightly right, you'll get a negative reading). Therefore, you can let the user move an object with an event handler like the one shown in Figure 23-10.
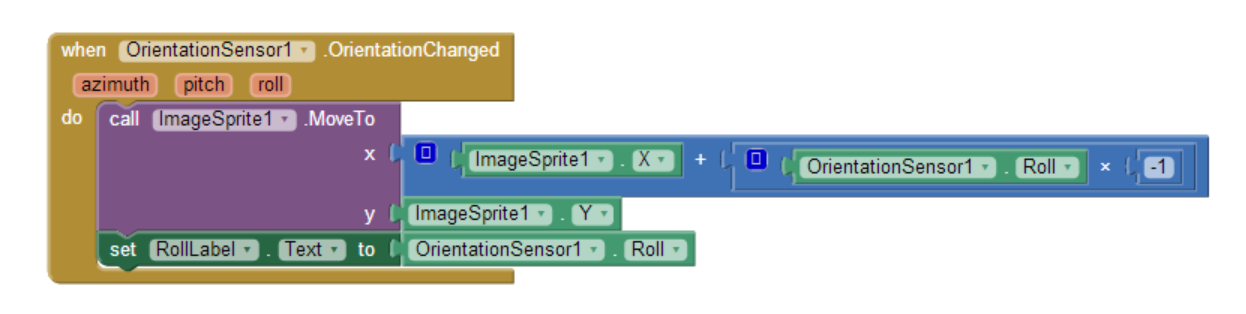
Figure 23-10. Responding to changes in the Roll property with the OrientationChanged event
The blocks multiply the roll by –1, as tilting left gives a positive roll and should move the object left (thereby making the x coordinate smaller). For a review of how the coordinate system works in animated apps, see Chapter 17.
Note that this app works only when the device is in portrait mode (upright), not in landscape mode. As is, if you tilt the phone too far, the screen will autorotate into landscape mode and the image will stay marooned on the left side of the screen. The reason is that if the device is on its side, it is tilted left and thus will always get a positive reading for the roll. A positive roll reading, as shown in the blocks in Figure 23-10, will always make the x coordinate smaller.
If App Inventor provided the capability, you could either (1) lock the phone so it didn't autorotate for this app, or (2) find out the phone's mode and modify your formula for moving the object based on that setting. Such capabilities will certainly be added to the system, but you should instruct your users on how the app works currently.
The example in the previous section moves the image left or right. If you want to allow for movement in any direction, you can use the Angle and Magnitude properties of the OrientationSensor. These are the properties used to move the ladybug in the game described in Chapter 5.
In Figure 23-11, you can see the blocks for a test app that lets the user tilt the device to move a character in any direction (you need two labels and an image sprite for this example).
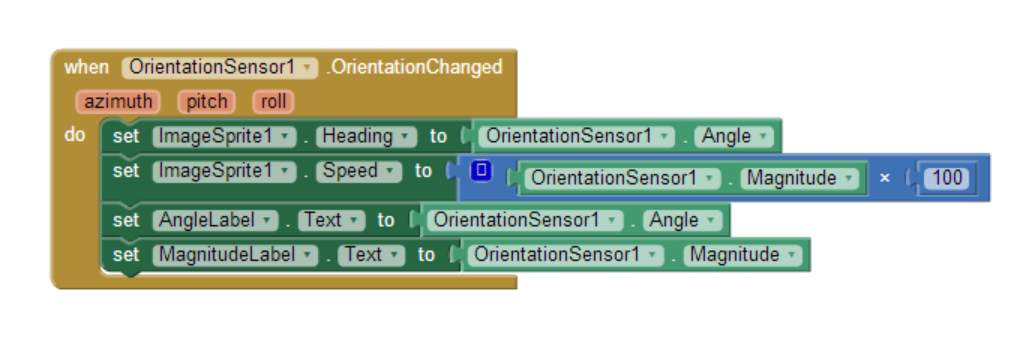
Figure 23-11. Moving a character using angle and magnitude
Try this one out. The Magnitude property, a value between 0 and 1, denotes how much the device is tilted. In this test app, the image moves faster as the magnitude gets bigger.
Compass apps and apps like Google Sky Map need to know the phone's orientation in the world, east/west and north/south. Sky Map uses the information to overlay information about the constellations at which the phone is pointing.
The Yaw reading is useful for this type of orientation. Yaw is always between 0 and 360 degrees, with 0 being north; 90, east; 180, south; and 270, west. So a reading of 45 means the phone is pointing northeast, 135 means southeast, 225 means southwest, and 315 means northwest.
The blocks in Figure 23-12 are for a simple compass that displays in text which direction the phone is pointing (e.g., Northwest).
As you may have noticed, the blocks show only one of four possibilities: Northwest, Northeast, Southwest, and Southeast. As a challenge, see if you can modify it to show just a single direction (North, South, East, or West) if the reading specifies that you are pointing within a few degrees of it.
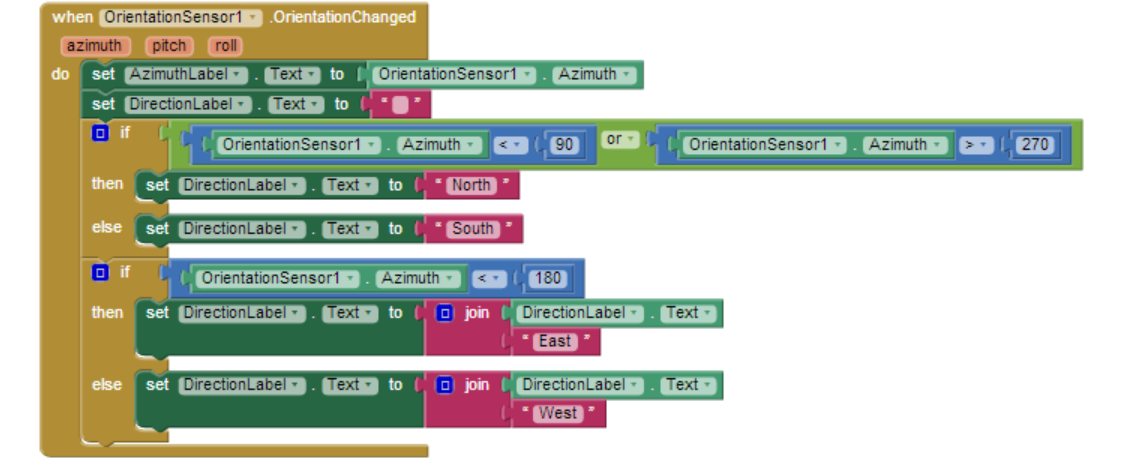
Figure 23-12. Programming a simple compass
Acceleration is the rate of change of velocity over time. If you press your foot to the gas pedal of your car, the car accelerates-its velocity increases at a particular rate.
An accelerometer-like the one in your Android device-measures acceleration, but its frame of reference is not the device at rest, but rather the device in free fall: if you drop the phone, it will register an acceleration reading of 0. Simply put, the readings take gravity into account.
If you want to know more about the physics of the matter, you'll have to consult your Einstein-related books. But in this section, we'll explore the accelerometer enough to get you started. We'll even examine an app that could help save lives!
If you've been going through the chapters and completed the app in Chapter 1 (HelloPurr), you've already used the AccelerometerSensor. In that app, you used the Accelerometer.Shaking event to make the kitty meow when the phone was shaken, as shown in Figure 23-13.
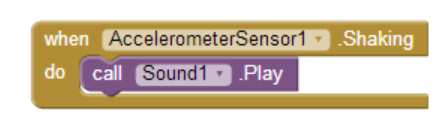
Figure 23-13. Playing a sound when the phone is shaken
Like the other sensors, the accelerometer has an event for when the readings change, AccelerometerSensor.AccelerationChanged. That event has three arguments corresponding to the acceleration in three dimensions:
xAccel
&tbsp;Positive when the device is tilted to the right (that is, its left side is &tbsp; raised), and negative when the device is tilted to the left (its right side &tbsp;is raised).
yAccel
&tbsp;Positive when the device's bottom is raised, and negative when its top is &tbsp;raised.
zAccel
&tbsp;Positive when the device display is facing up, and negative when the display &tbsp;is facing down.
We know that if all the acceleration readings are near 0, the device is free-falling to the ground. With this in mind, we can mimic a free-fall event by checking the readings in the AccelerometerSensor.AccelerationChanged event. Such blocks, with lots of testing, could be used to detect when an elderly person has fallen and automatically send an SMS message out in response.
Figure 23-14 shows the blocks for an app that simply reports that a free fall has occurred (and lets the user click a Reset button to check again).
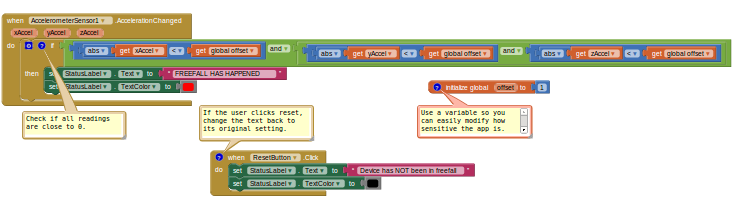
Figure 23-14. Reporting when a free fall has occurred
Each time the sensor gets a reading, the blocks check the x, y, and z dimensions to see if they're near 0 (if their absolute value is less than 1). If all three are near 0, the app changes a status label to denote that the phone is in free fall. When the user clicks the ResetButton, the status label is reset to its original state ("Device has NOT been in free fall").
If you'd like to try this app, you can download it at ***http://examples.oreilly.com/ 0636920016632.
The AcclerometerSensor's readings are calibrated to the free-fall state. If you want to instead measure the acceleration relative to its value when the phone is lying inert on a table, you need to calibrate the readings to that standard. To calibrate means to check, adjust, or determine by comparison with a standard; in this case, the standard you want is the readings when the device is lying flat.
To do this, you need the user to help you by laying the device flat on a table and then clicking a Calibrate button. When the user clicks the button, the app records the readings for the flat surface. Those readings can then be used later, in AccelerationChanged events, to offset the new readings and tell you if the device is moved rapidly in some dimension.

Figure 23-15. Calibrating the acceleration readings
Figure 23-15 shows a sample app that lets the user calibrate the readings and then detects acceleration.
You can download and install this app from ***http:// examples.oreilly.com/0636920016632/. Run it, set the phone on a table, and click Calibrate. The readings will appear in the "Readings when flat" area. If you raise the phone slowly, the readings in the "Significant accelerations" area won't change. But if you raise the phone rapidly, the "No" reading for Z will change to "Yes," as shown in Figure 23-15. Similarly, if you move the phone rapidly across the table, you'll get a significant acceleration for X or Y. Figure 23-16 shows the blocks for getting the initial calibration.
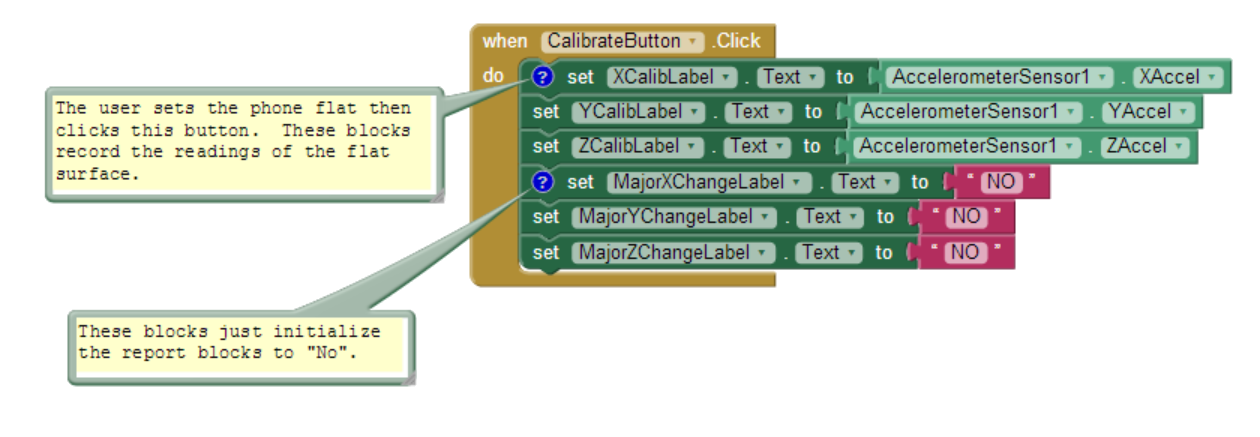
Figure 23-16. Getting the initial calibration
These blocks take the readings and place them in three labels: XCalibLabel, YCalibLabel, and ZCalibLabel. The blocks also initialize the labels that will be used to report accelerations later, after this calibration step.
The accelerometer should get a reading of zAccel around 9.8 when the phone is flat, and xAccel and yAccel readings of around 0. But the calibration step tells us exactly how the accelerometer is working. Once the calibration readings are set, your app can detect changes in the x, y, or z dimensions by measuring new readings offset from the old (similar to the boundary-checking app covered in Chapter 18). Figure 23-17 provides the blocks for detecting acceleration using the calibrated readings.
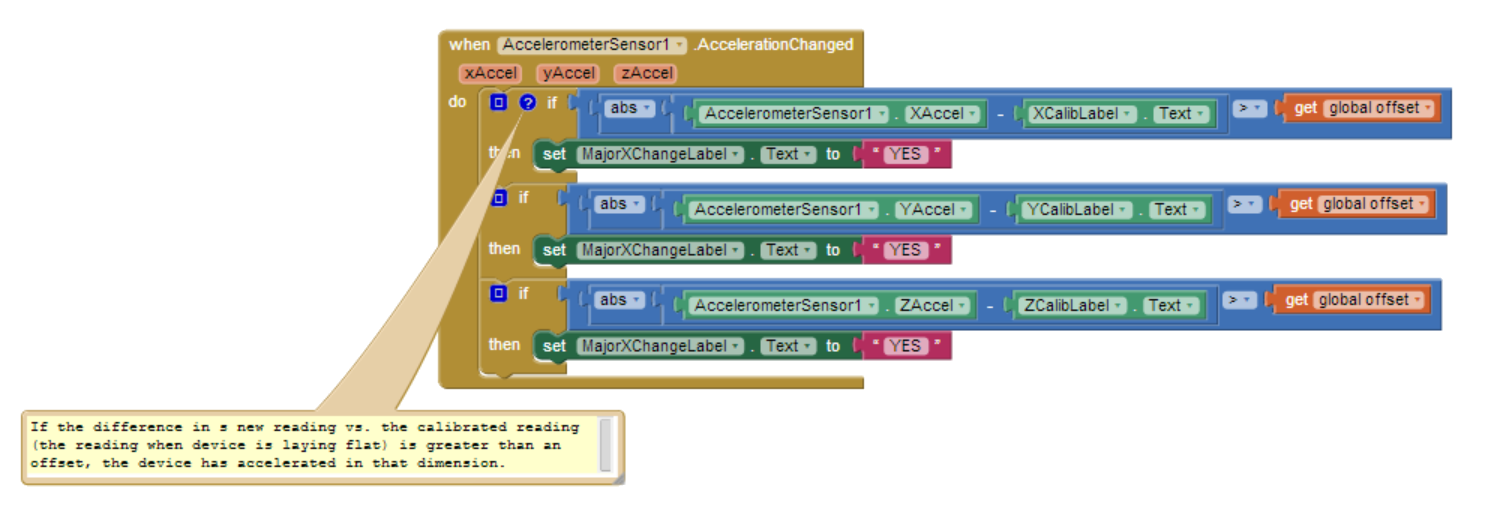
Figure 23-17. Detecting acceleration using the calibrated readings
These blocks will be triggered if the device is moved. They check the new accelerometer readings to see if they are significantly different (within 3) of those taken when the phone was lying flat. Suppose that our calibration step had put a 9.0 in ZCalibText. If you slowly lift the phone, the new readings will remain close to 9, and no change will be reported. But if you rapidly lift the phone, the reading will become significantly higher, and the blocks will report a change.
Sensors are of great interest in mobile apps because they allow your users to truly interact with their environments. By taking computing mobile, you are opening up (almost literally) a whole world of opportunities in user experiences and app development. However, you'll need to think carefully about how, where, and when you use sensors in your apps. Many people have privacy concerns, and they might not use your app if they're worried about what you're doing with their sensor data. But with all the options in games, social networking, travel, and more, the possibilities for positive implementations are nearly endless.