
In this chapter, you'll build an app that lets you create your own custom guide for a dream trip to Paris. And since a few of your friends can't join you, we'll create a companion app that lets them take a virtual tour of Paris as well. Creating a fully functioning map app might seem really complicated, but App Inventor lets you use the ActivityStarter component to launch Google Maps for each virtual location. First, you'll build an app that launches maps for the Eiffel Tower, the Louvre, and Notre Dame Cathedral with a single click. Then you'll modify the app to create a virtual tour of satellite maps that are also available from Google Maps.

This chapter introduces the following App Inventor components and concepts:
Create a new project in App Inventor and call it "ParisMapTour". The user interface for the app has an Image component with a picture of Paris, a Label component with some text, a ListPicker component that comes with an associated button, and an ActivityStarter (non-visible) component. You can design the components using the snapshot in Figure 6-1.
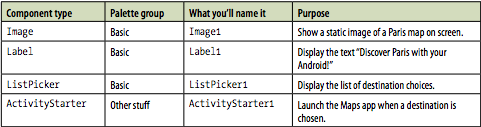
The components listed in Table 6-1 were used to create this Designer window. Drag each component from the Palette into the Viewer and name it as specified.
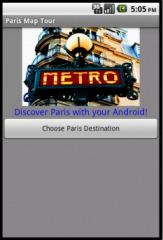
Figure 6-1. The Paris Map Tour app running in the emulator
Table 6-1. Components for the Paris Map Tour
ActivityStarter is a component that lets you launch any Android app-a browser, Google Maps, or even another one of your own apps. When a user launches another app from your app, he can click the back button to return to your app. You'll build ParisMapTour so that the Maps application is launched to show particular maps based on the user’s choice. The user can then hit the back button to return to your app and choose a different destination.
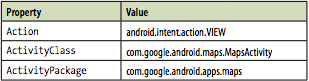
ActivityStarter is a relatively low-level component in that you'll need to set some properties with information familiar to a Java Android SDK programmer, but foreign to the other 99.999% of the world. For this app, enter the properties as specified in Table 6-2, and be careful—even the upper-/lowercase letters are important.
Table 6-2. ActivityStarter properties for launching Google Maps
In the Blocks Editor, you'll set one more property, DataUri, which lets you launch a specific map in Google Maps. This property must be set in the Blocks Editor instead of the Component Designer because it needs to be dynamic; it will change based on whether the user chooses to visit the Eiffel Tower, the Louvre, or the Notre Dame Cathedral.
We'll get to the Blocks Editor in just a moment, but there are a couple more details to take care of before you can move on to programming the behavior for your components:
In the Blocks Editor, you'll need to define a list of destinations, and two behaviors:
Open the Blocks Editor and create a variable with the list of Paris destinations using the blocks listed in Table 6-3.
Table 6-3. Blocks for creating a destinations variable
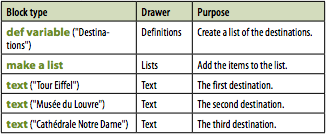 The destinations variable will call the make a list function, into which you can plug the text values for the three destinations in your tour, as shown in Figure 6-2.

Figure 6-2. Creating a list is easy in App Inventor
The purpose of the ListPicker component is to display a list of items for the user to choose from. You preload the choices into the ListPicker by setting the property Elements to a list. For this app, you want to set the ListPicker's Elements property to the destinations list you just created. Because you want to display the list when the app launches, you’ll define this behavior in the Screen1.Initialize event. You'll need the blocks listed in Table 6-4.
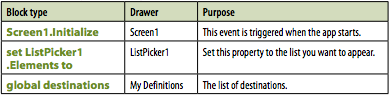
Table 6-4. Blocks for launching the ListPicker when the app starts
Screen1.Initialize is triggered when the app begins. As shown in Figure 6-3, the event handler sets the Elements property of ListPicker so that the three destinations will appear.
Figure 6-3. Put anything you want to happen when the app starts in a Screen1.Initialize event handler

Test your apps.First, you'll need to restart the app by clicking "Connect to Device. . ." in the Blocks Editor. Then, on the phone, click the button labeled "Choose Paris Destination." The list picker should appear with the three items.
Next, you'll program the app so that when the user chooses one of the destinations, the ActivityStarter launches Google Maps and searches for the selected location.
When the user chooses an item from the ListPicker component, the ListPicker.AfterPicking event is triggered. In the event handler for AfterPicking, you need to set the DataUri of the ActivityStarter component so it knows which map to open, and then you need to launch Google Maps using ActivityStarter.StartActivity. The blocks for this functionality are listed in Table 6-5.
Table 6-5. Blocks to launch Google Maps with the Activity Starter
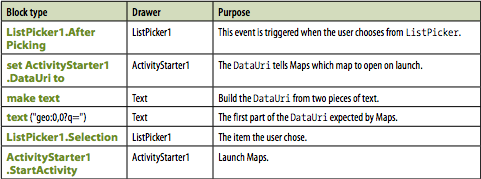
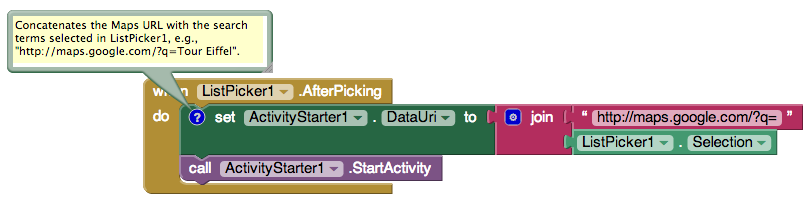
Figure 6-4. Setting the DataURI to launch the selected map
Since you already set the other properties of the ActivityStarter so that it knows to open Maps, the ActivityStarter1.StartActivity block launches the Maps app and invokes the search proscribed by the DataUri.
Test your app. Restart the app and click the "Choose Paris Destination" button again. When you choose one of the destinations, does a map of that destination appear? Google Maps should also provide a back button to return you to your app to choose again-does that work? (You may have to click the back button a couple of times.)
Now let's spice up the app and have it open some great zoomed-in and street views of the Paris monuments so your friends at home can follow along while you’re away. To do this, you'll first explore Google Maps to obtain the URLs of some specific maps. You'll still use the same Parisian landmarks for the destinations, but when the user chooses one, you'll use the index (the position in the list) of her choice to select and open a specific zoomed-in or streetview map.
Before going on, you may want to save your project (using Save As) so you have a copy of the simple map tour you’ve created so far. That way, if you do anything that causes issues in your app, you can always go back to this working version and try again.
The first step is to open Google Maps on your computer to find the specific maps you want to launch for each destination:
Using this scheme' Table 6-6 shows the URLs you'll use.
Table 6-6. Virtual Tour URL's for Google Maps
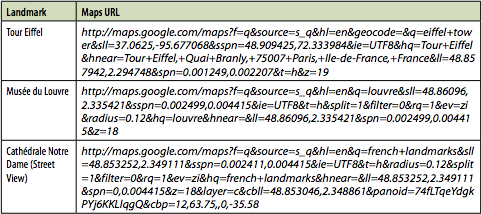
To view any of these maps, paste the URLs from Table 6-6 into a browser. The first two are zoomed-in satellite views, while the third is a street view.
You can use these URLs directly to launch the maps you want, or you can define cleaner URLs using the Google Maps protocols outlined at http://mapki.com. For example, you can show the Eiffel Tower map using only the GPS coordinates found in the long URL in Table 6-6 and the Maps geo: protocol:
geo:48.857942,2.294748?t=h&z=19
Using such a DataUri, you'll get essentially the same map as the map based on the full URL from which the GPS coordinates were extracted. The t=h specifies that Maps should show a hybrid map with both satellite and address views, and the z=19 specifies the zoom level. If you're interested in the details of setting parameters for various types of maps, check out the documentation at http://mapki.com.
To get comfortable using both types of URLs, we'll use the geo: format for the first two DataUri settings in our list, and the full URL for the third.
You'll need a list named dataURIs, containing one DataURI for each map you want to show. Create this list as shown in Figure 6-5 so that the items correspond to the items in the destinations list (i.e., the first ,dataURI should correspond to the first destination, the Eiffel Tower).
 Figure 6-5. The list of maps for your virtual tour
The first two items shown are DataURIs for the Eiffel Tower and the Louvre. They both use the geo: protocol. The third DataURI is not shown completely because the block is too long for this page; you should copy this URL from the entry for "Notre Dame, Street View" in Table 6-6 and place it in a text block.
In the first version of this app, the ListPicker.AfterPicking behavior set the DataUri to the concatenation (or combination) of "http://maps.google.com/?q=” and the destination the user chose from the list (e.g., Tour Eiffel). In this second version, the AfterPicking behavior must be more sophisticated, because the user is choosing from one list (destinations), but the DataUri must be selected from another list (dataURIs). Specifically, when the user chooses an item from the ListPicker, you need to know the index of his choice so you can use it to select the correct DataUri from the dataURIs list. We'll explain more about what an index is in a moment, but it helps to set up the blocks first to better illustrate the concept. There are quite a few blocks required for this functionality, all of which are listed in Table 6-7.
Table 6-7. Blocks for choosing a list item based on the user's selection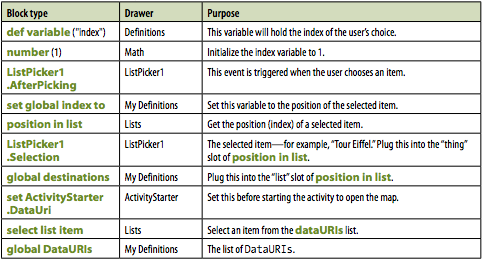

When the user chooses an item from the ListPicker, the AfterPicking event is triggered, as shown in Figure 6-6. The chosen item-e.g., "Tour Eiffel"-is in ListPicker.Selection. The event handler uses this to find the position of the selected item, or the index value, in the destinations list. The index corresponds to the position of the chosen destination in the list. So if "Tour Eiffel" is chosen, the index will be 1; if "Musée du Louvre" is chosen, it will be 2; and if "Cathédrale Notre Dame de Paris" is chosen, the index will be 3.
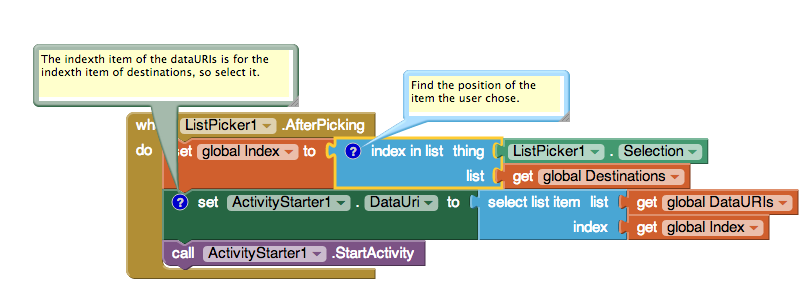 Figure 6-6. Choosing a list item based on the user's selection
The index can then be used to select an item from another list-in this case, dataURIs-and to set that entry as the ActivityStarter's DataUri. Once this is set, the map can be launched with ActivityStarter.StartActivity.
Test your app. On the phone, click the button labeled "Choose Paris Destination." The list should appear with the three items. Choose one of the items and see which map appears.
Here are some suggested variations to try:
Here are some of the ideas we've covered in this chapter: