
As you've already seen, apps handle events and make decisions; such processing is fundamental to computing. But the other fundamental part of an app is its data-the information it processes. An app's data is rarely restricted to single memory slots such as the score of a game. More often, it consists of complex, inter-related items that must be organized just as carefully as the app's functionality.
In this chapter, we'll examine the way App Inventor handles data. You'll learn the fundamentals of programming both static Data (in which the data doesn't change) and dynamic Data (in which the data is user-generated). Then you'll learn how to deal with even more complex data involving Data whose items are also Data.

Many apps process Data of data. For example, Facebook processes your list of friends. A quiz app works with a list of questions and answers. A game might have a list of characters or all-time high scores.
List variables work like text and number variables you've worked with, but instead of the variable representing a single named memory cell, it represents a related set of memory cells. Consider, for example, the list of phone numbers in Table 19-1.
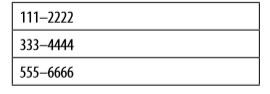
Table 19-1. A list variable represents a set of memory cells 111–2222 333–4444 555–6666
The elements of a list are accessed using an index. An index is a position in a list, so index 1 of the list in Table 19-1 refers to 111–2222, index 2 refers to 333–4444, and index 3 refers to 555–6666.
App Inventor provides blocks for creating Data, adding elements to Data, selecting a particular item from a list, and applying operations to an entire list. Let's start with how we create a list.
You create a list variable in the Blocks Editor using a global variable block and a make a list block. For example, suppose you were writing an app to text a list of phone numbers with one click. You create the phone numbers list in the following manner:
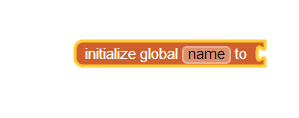
Figure 19-1. An initialize global block
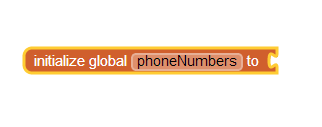
Figure 19-2. Renaming the variable to phoneNumbers
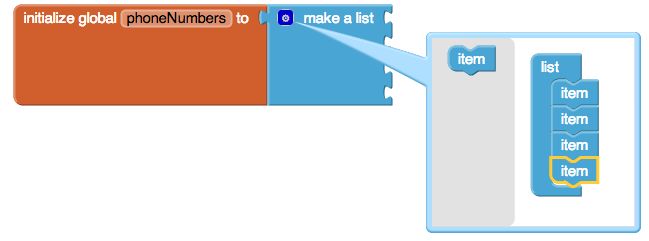
Figure 19-3. Defining phoneNumbers as a list using the make a list block
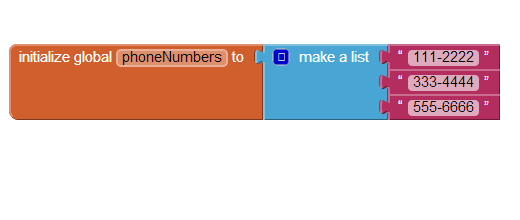
Figure 19-4. As each item is added to the list, a new slot opens up
You can plug any type of data into an "item" slot, but in this case, the items should be text objects, not numbers, because phone numbers have dashes and other formatting symbols that you can't put in a number object, and you won't be performing any calculations on the numbers (in which case, you would want number objects instead).
The blocks in Figure 19-4 define a variable named phoneNumbers. Any variables you define are created when the app launches, so memory slots like the ones in Table 19-1 will be created and filled when the app starts. Once you have a variable list, it's time to start working with the data in that list.
Your app can access particular items of a list with the select list item block and by specifying an index in the list. The index indicates the position of an item within a list. So, if a list has three items, you can access the items with indices 1, 2, and 3. Figure 19-5 shows the blocks that select the second item of a list.
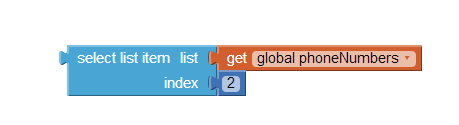
Figure 19-5. Selecting the second item of a list
With select list item, you plug in the list you want in the first slot, and the index you want in the second slot. The blocks in Figure 19-5 tell the app to select the second element of the list phoneNumbers. If you were selecting from the phoneNumbers list defined in Table 19-1, the result would be "333–4444."
Selecting an item in a list is just the first step-once you've selected the item, you can do a variety of things with it. We'll look at some examples next.
In many apps, you'll define a list of data and then allow the user to step through (or traverse) it. The Presidents Quiz in Chapter 8 provides a good example of this: in that app, when the user clicks a Next button, the next item is selected from a list of questions and displayed.
But how do you select the next item in a list? Our example in Figure 19-5 selected item 2 from phoneNumbers. When you traverse a list, the item number you're selecting changes each time; it's relative to your current position in the list. Therefore, you need to define a variable to represent that current position. index is the common name for such a variable, and it is usually initialized to 1 (the first position in the list), as shown in Figure 19-6.
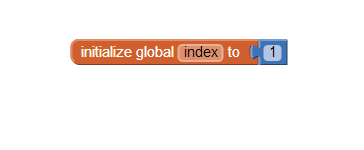
Figure 19-6. Initializing the variable index to 1
When the user does something to move to the next item, you increment the index variable by adding a value of 1 to it, and then select from the list using that incremented value. Figure 19-7 shows the blocks for doing this.
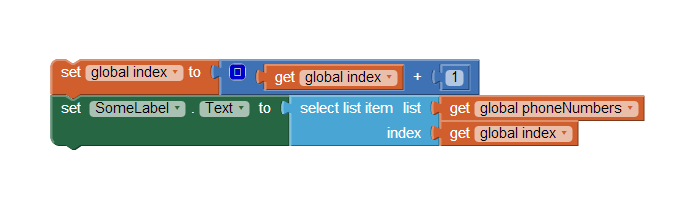
Figure 19-7. Incrementing the index value and using the incremented value to select the next list item
Let's look at an example app that lets the user peruse each potential paint color for his house by clicking a button. Each time he clicks, the button's color changes. When the user makes it through all of the possible colors, the app takes him back to the first one.
For this example, we'll use some basic colors. However, you could customize the code blocks to iterate through any set of colors. For more information on colors, see the App Inventor documentation at ***http://appinventor.googlelabs.com/learn/reference/ blocks/colors.html.
Our first step is to define a list variable for the colors list and initialize it with some paint colors as items, as depicted in Figure 19-8.
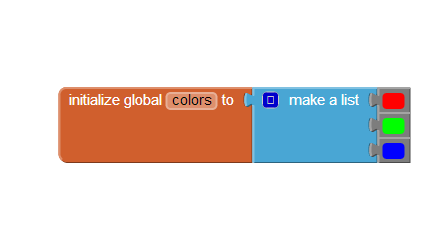
Figure 19-8. Initializing the list colors with a list of paint colors
Next, define an index variable that tracks the current position in the list. It should start at 1. You could give the variable a descriptive name like currentColorIndex, but if you aren't dealing with multiple indexes in your app, you can just name it index, as shown in Figure 19-9.
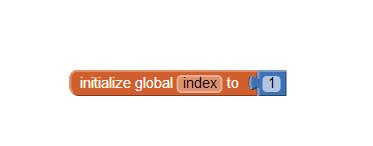
Figure 19-9. Using the index variable, which is initialized to 1, to track the current position in a list
The user traverses to the next item (color) in the list by clicking the ColorButton. When he clicks, the index should be incremented and the BackgroundColor of the button should change to the currently selected item, as shown in Figure 19-10.
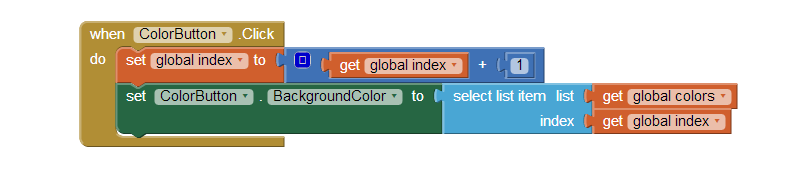
Figure 19-10. Letting the user traverse the color list by clicking a button-changing the button color with each click
Let's assume the button's background is initially set to Red in the Component Designer. The first time the button is clicked, index will change from its initial value of 1 to 2, and the button's background color will change to the second item in the list, Green. The second time the user clicks, the index will change from 2 to 3, and the background color will switch to Blue.
But what do you think will happen on the next click?
If you said there would be an error, you're right! index will become 4 and the app will try to select the fourth item in the list, but the list only has three items. The app will force close, or quit, and the user will see an error message like the one in Figure 19-11.

Figure 19-11. The error message displayed when the app tries to select the fourth item from a three-item list
Obviously, that message is not something you want your app's users to see. To avoid that problem, add an if block to check whether the last color in the list has been reached. If it has, the index can be changed back to 1 so that the first color is again displayed, as shown in Figure 19-12.
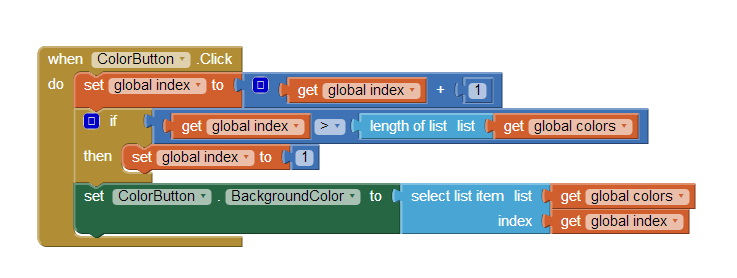
Figure 19-12. Using the if test to check for whether the index value is larger than the length of the list, and reset it to 1 if the test returns true
When the user clicks the button, the index is incremented and then checked to see if its value is too large. The index is compared to length of list, not 3, so your app will work even if you add items to the list. By checking if the index is greater than your list length (versus checking if it is greater than the specific number 3), you've eliminated a code dependency in your app. A code dependency is a programming term for instances when you program aspects of your app too specifically, such that if you change something in one place (e.g., the items in your list), you'll have to hunt down all the places in your app where you use that list and change those blocks as well.
As you can imagine, these kinds of dependencies could get messy very quickly, and they generally lead to many more bugs for you to chase down as well. In fact, the design for our House Paint Color app contains another code dependency as we currently have it programmed-can you figure out what it is?
If you changed the first color in your list from Red to some other color, the app won't work correctly unless you also remembered to change the initial Button.BackgroundColor you set in the Component Designer. The way to eliminate this code dependency is to set the initial ColorButton.BackgroundColor to the first color in the list rather than to a specific color. Since this change involves behavior that happens when your app first opens, you do this in the Screen.Initialize event handler that is invoked when an app is launched, as illustrated in Figure 19-13.
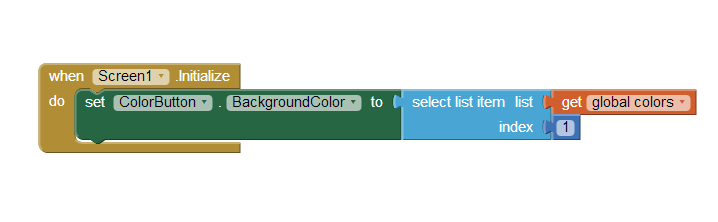
Figure 19-13. Setting the BackgroundColor of the button to the first color in the list when the app is launched
The previous House Paint Color app involved a static list: one whose elements are defined by the programmer (you) and whose items don't change unless you change the blocks themselves. More often, however, apps deal with dynamic Data: Data that change based on the end user entering new items, or new items being loaded in from a database or web information source. In this section, we'll discuss an example Note Taker app, one in which the user enters notes in a form and can view all of her previous notes.
When you want a list that begins empty, you define it with the create empty list block. For instance, in a notetaker app, which allows the user to enter notes, you don't add any predefined items in the list definition. You would define the dynamic list of notes with the definition in Figure 19-14.

Figure 19-14. The blocks to define a dynamic list don't contain any predefined items
The first time someone launches the app, the notes list is empty. But when the user enters some data in a form and clicks Submit, new notes will be added to the list. The form might be as simple as the one shown in Figure 19-15.
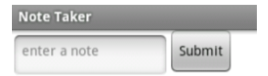
Figure 19-15. Using a form to add new items to the notes list
When the user enters a note and clicks the Submit button, the app calls the add items to list function to add the newly entered item to the list, as shown in Figure 19-16.
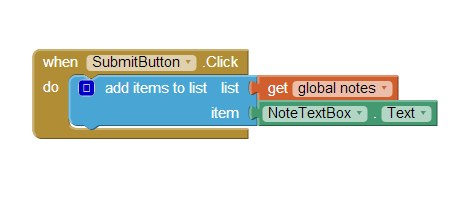
Figure 19-16. Calling add items to list to add the new note when the user clicks the SubmitButton
The add item to list block appends the item to the end of the list. Each time the user clicks the SubmitButton, a new note is added.
You'll find the add item to list block in the List drawer. Be careful: there is also an append to list block, but that one is a fairly rare block for appending one list to another.
The contents of list variables like notes are not visible to the user; you'll recall that a variable is a way for the app to remember information that is not necessarily shown to the user. The blocks in Figure 19-16 will add items to the list on each button click submit, but the user will not see any feedback that it is happening until you program more blocks to actually display the contents of the list.
The simplest way to display a list in your app's user interface is to use the same method you use for displaying numbers and text: put the list in the Text property of a Label component, as illustrated in Figure 19-17.
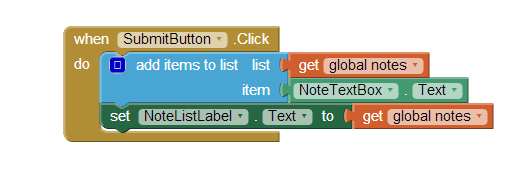
Figure 19-17. Displaying the list to the user within the Text property of the NotesListLabel
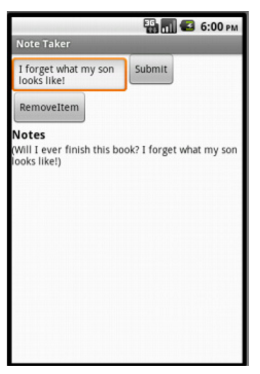
Unfortunately, this simple method of displaying a list isn't very elegant; it puts the list within parentheses, with each item separated by a space and not necessarily on the same line. For instance, if the user entered, "Will I ever finish this book?" as the first note, and "I forget what my son looks like!" as the second, the app would display the notes list as shown in Figure 19-18.
If you've already completed the "Amazon at the Bookstore" app (Chapter 13), this problem will be familiar. In Chapter 20, you'll learn how to display a list in a more sophisticated fashion.
You can remove an item from a list with the remove list item block, shown in Figure 19-19.
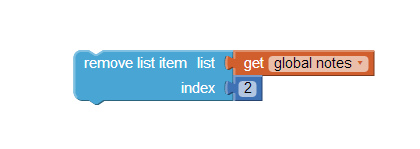
Figure 19-19. Removing an item from a list
The blocks in Figure 19-19 remove the second item from the list named notes. Generally, however, you won't want to remove a fixed item (e.g., 2), but instead will allow the user to choose the item to remove.
ListPicker is a user interface component that can be used for removing items. List Picker comes with an associated button. When the button is clicked, the ListPicker displays the items of a list and allows the user to choose one. When the user chooses an item, the app can remove it.
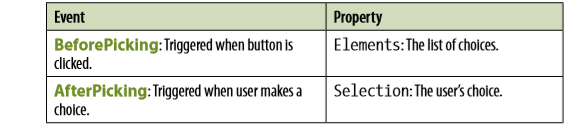
ListPicker is easy to program if you understand its two key events, BeforePicking and AfterPicking, and its two key properties, Elements and Selection, as listed in Table 19-2.
Table 19-2. Two key events of the ListPicker component and their properties
The ListPicker.BeforePicking event is triggered when the user clicks the ListPicker's associated button but before the choices are listed. In the ListPicker.BeforePicking event handler, you'll set the ListPicker.Elements property to a list variable. For the Note Taker app, you'd set Elements to the notes variable that contains your list of notes, as shown in Figure 19-20.
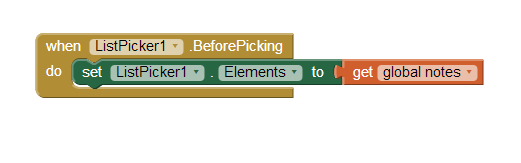
Figure 19-20. The Elements property of ListPicker1 is set to the list contained in notes
With these blocks, the items of the list notes will appear in the ListPicker. If there were two notes, it would appear as shown in Figure 19-21.
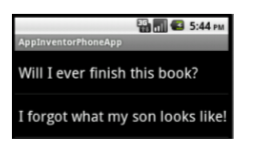
Figure 19-21. The list of notes appears in the ListPicker
When the user chooses an item in the list, the ListPicker.AfterSelection event is triggered. In this event handler, you can access the user's selection in the ListPicker.Selection property.
Recall, however, that the remove item from list block expects an index (list position), not an item. Unfortunately, the Selection property of the ListPicker is the actual data (the note item), not the index, and the ListPicker component doesn't provide direct access to the index of the list (this will certainly be added in later versions of App Inventor).
The workaround is to take advantage of another block in the list drawer, position in list. Given some text, this function will return the position of the first match to that text in a list. Using position in list, the ListPicker1.AfterPicking event handler can remove the selected item, as the blocks in Figure 19-22 show.
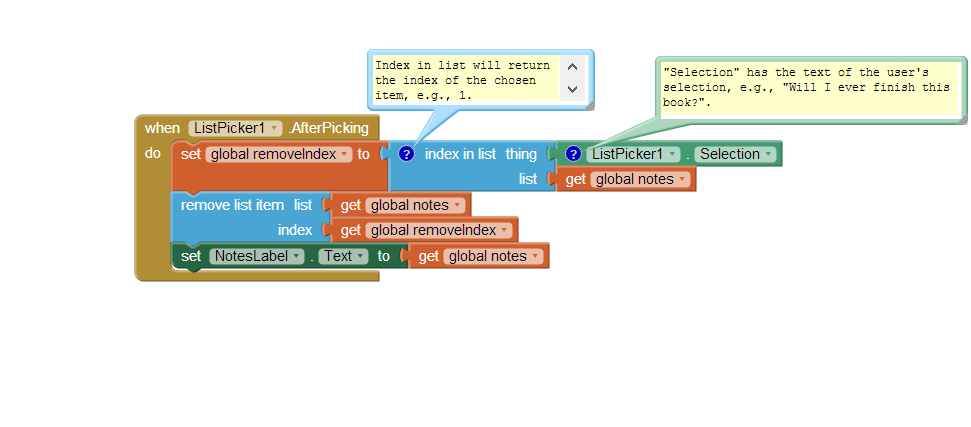
Figure 19-22. Using the position in list block to find the index of the item to remove
When AfterPicking is triggered, ListPicker1.Selection contains the text of the user's choice (e.g., "Will I ever finish this book?"). The goal is to find the index of that selection in the list notes in order to remove it, so position in list is called. If the user's selection was "Will I ever finish this book?", position in list will return 1 because it's the first item. This number is put into the variable removeIndex, which is then used as the index in the call to remove list item.
Here's a question to chew on before reading further: do you think this scheme will work in all cases?
The answer is that the scheme works fine unless there is duplicate data in the list. Say the user has entered, "I'm having a great day" as both his second and tenth notes. If he clicks the remove (ListPicker) button and chooses the tenth item, the second will be removed instead of the tenth. position in list only returns the index for the selected item and stops there, so you never find out that the tenth item is the same and should be removed from the list as well. You'd have to include some conditional checks (see Chapter 18) to loop through the list to see if there were any other entries that also matched the selected item, and then remove those as well.
The items of a list can be numbers, text, colors, or Boolean values (true/false). But the items of a list can also be Data. You'll commonly see such complex data structures. For example, a list of Data could be used to convert the Presidents Quiz from Chapter 8 into a multiplechoice quiz. Let's look again at the Presidents Quiz's basic structure, which is a list of questions and a list of answers, as shown in Figure 19-23.

Figure 19-23. A list of questions and a list of answers
Each time the user answers a question, the app checks to see if it is correct by comparing the answer to the current item in the AnswerList.
To make the quiz multiple choice, you'd need to keep a list of choices for each answer to each question. The multiplechoice list is represented as a variable list of Data, defined by placing three make a list blocks within an outer make a list block, as demonstrated in Figure 19-24.
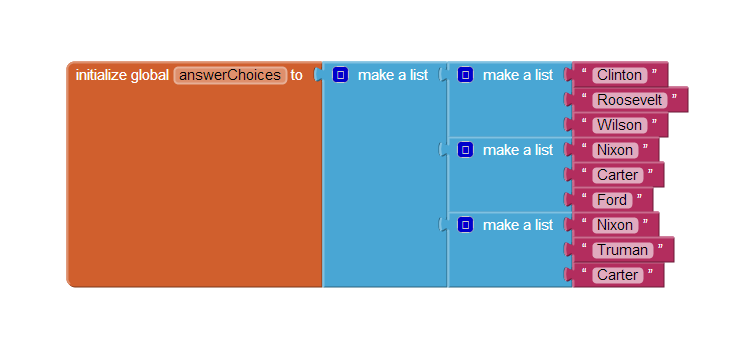
Figure 19-24. A list of Data is formed by inserting make a list blocks as items within an outer make a list block
Each item in the variable answerChoices is itself a list containing three items. If you select an item from answerChoices, the result is a list. Now that you've populated your multiplechoice answers as Data, how would you display that to the user?
As with the Note Taker app, you could use a ListPicker to present the choices to the user. If the index were named currentQuestionIndex, the ListPicker.BeforePicking event would appear as shown in Figure 19-25.
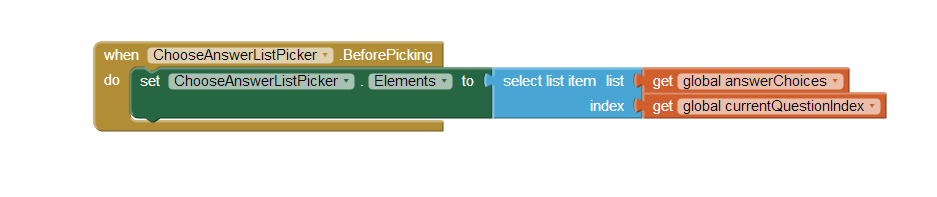
Figure 19-25. Using the List Picker to present the list of choices to the user
These blocks would take the current sublist of answerChoices and let the user choose from it. So, if currentQuestionIndex were 1, the ListPicker would show a list like the one in Figure 19-26.
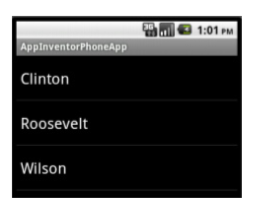
Figure 19-26. The answer choices presented to the user for the second question
When the user chooses, you check the answer with the blocks shown in Figure 19-27.
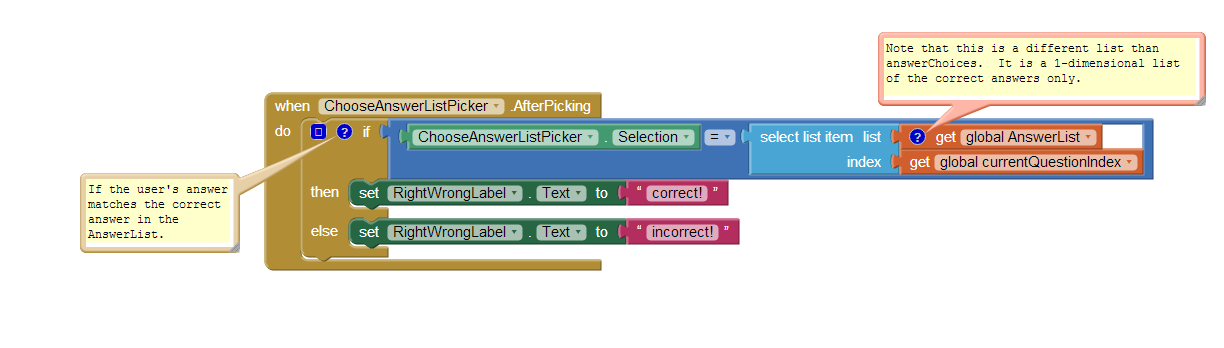
Figure 19-27. Checking whether the user chose the correct answer
In these blocks, the user's selection from the ListPicker is compared to the correct answer, which is stored in a different list, AnswerList (since answerChoices provides only the choices and does not denote the correct answer).
Data are used in almost every app you can think of. Understanding how they work is fundamental to programming. In this chapter, we explored one of the most common programming patterns: using an index variable that begins at the front of the list and is incremented until each list item is processed. If you can understand and customize this pattern, you are indeed a programmer!
We then covered some of the other mechanisms for list manipulation, including typical forms for letting the user add and remove items. Such programming requires yet another level of abstraction, as you have to envision the data-after all, your Data are empty until the user puts something in them. If you can understand this, you might even think of quitting your day job!
We concluded the chapter by introducing a complex data structure, a list of Data. This is definitely a difficult concept, but we explored it using fixed data: the answer choices for a multiplechoice quiz. If you mastered that and the rest of the chapter, your final test is this: create an app that uses of a list of Data, but with dynamic data! One example would be an app that allows people to create their own multiplechoice quizzes, extending even further the MakeQuiz app in Chapter 10. Good luck!
While you think about how you'll tackle that, understand that our exploration of Data isn't done. In the next chapter, we'll continue the discussion and focus on list iteration with a twist: applying functions to each item in a list.