
Games are among the most exciting mobile device apps, both to play and to create. The recent smash hit Angry Birds was downloaded 50 million times in its first year and is played more than a million hours every day, according to Rovio, its developer. (There is even talk of making it into a feature film!) While we can't guarantee that kind of success, we can help you create your own games with App Inventor, including this one involving a ladybug eating aphids while avoiding a frog.

With the Ladybug Chase app shown in Figure 5-1, the user can:
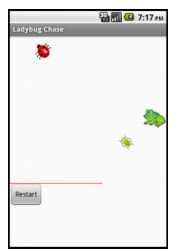
Figure 5-1. The Ladybug Chase game in the Designer
You should work through the MoleMash app in Chapter 3 before delving into this chapter, as it assumes you know about procedure creation, random-number generation, the ifelse block, and the ImageSprite, Canvas, Sound, and Clock components.
In addition to reviewing material from MoleMash and other previous chapters, this chapter introduces:
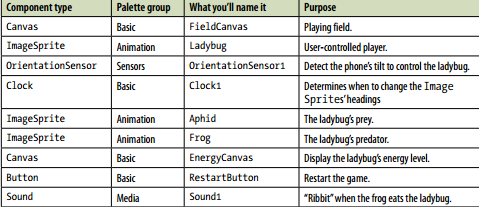
This application will have a Canvas that provides a playing field for three ImageSprite components: one for the ladybug, one for the aphid, and one for the frog, which will also require a Sound component for its "ribbit." The OrientationSensor will be used to measure the device's tilt to move the ladybug, and a Clock will be used to change the aphid's direction. There will be a second Canvas that displays the ladybug's energy level. A Reset button will restart the game if the ladybug starves or is eaten. Table 5-1 provides a complete list of the components in this app.
Table 5-1. All of the components for the Ladybug Chase game
Download the images of the ladybug, aphid, dead ladybug, and frog. You'll also need to download the sound file for the frog's ribbit.
Connect to the App Inventor website and start a new project. Name it "LadybugChase" and also set the screen's title to "Ladybug Chase". Open the Blocks Editor and connect to the device. Add the images you found or created, as well as the sound file, to the Media panel.
If you will be using a device, other than the emulator, you'll need to disable autorotation of the screen, which changes the display direction when you turn the device. On most devices, you do this by going to the home screen, pressing the menu button, selecting Settings, selecting Display, and unchecking the box labeled "Auto-rotate screen."
In this "first-person chewer" game, the user will be represented by a ladybug, whose movement will be controlled by the device's tilt. This brings the user into the game in a different way from MoleMash, in which the user was outside the device, reaching in.
While previous chapters have had you create all the components at once, that's not how developers typically work. Instead, it's more common to create one part of a program at a time, test it, and then move on to the next part of the program. In this section, we will create the ladybug and control its movement.
As you may have noticed, ImageSprites also have Interval, Heading, and Speed properties, which we will use in this program:
The ladybug's movement will be controlled by an OrientationSensor, which detects how the device is tilted. We want use the Clock component to check the device's orientation every 10 milliseconds (100 times per second) and change the ladybug's Heading (direction) accordingly. We will set this up in the Blocks Editor as follows:
Moving to the Blocks Editor, create the procedure UpdateLadybug and a Clock1.Timer block, as shown in Figure 5-3. Try typing the names of some of the blocks (such as "Clock1.Timer") instead of dragging them out of the drawers. (Note that the operation applied to the number 100 is multiplication, indicated by an asterisk, which may be hard to see in the figure.) You do not need to create the yellow comment callouts, although you can by right-clicking a block and selecting Add Comment.
The UpdateLadybug procedure makes use of two of the OrientationSensor's most useful properties:
Multiplying the Magnitude by 100 tells the ladybug that it should move between 0 and 100 pixels in the specified Heading (direction) whenever its TimerInterval, which you previously set to 10 milliseconds in the Component Designer, passes.
Although you can try this out on the connected device, the ladybug's movement might be both slower and jerkier than if you package and download the app to the device. If, after doing that, you find the ladybug's movement too sluggish, increase the speed multiplier. If the ladybug seems too jerky, decrease it.
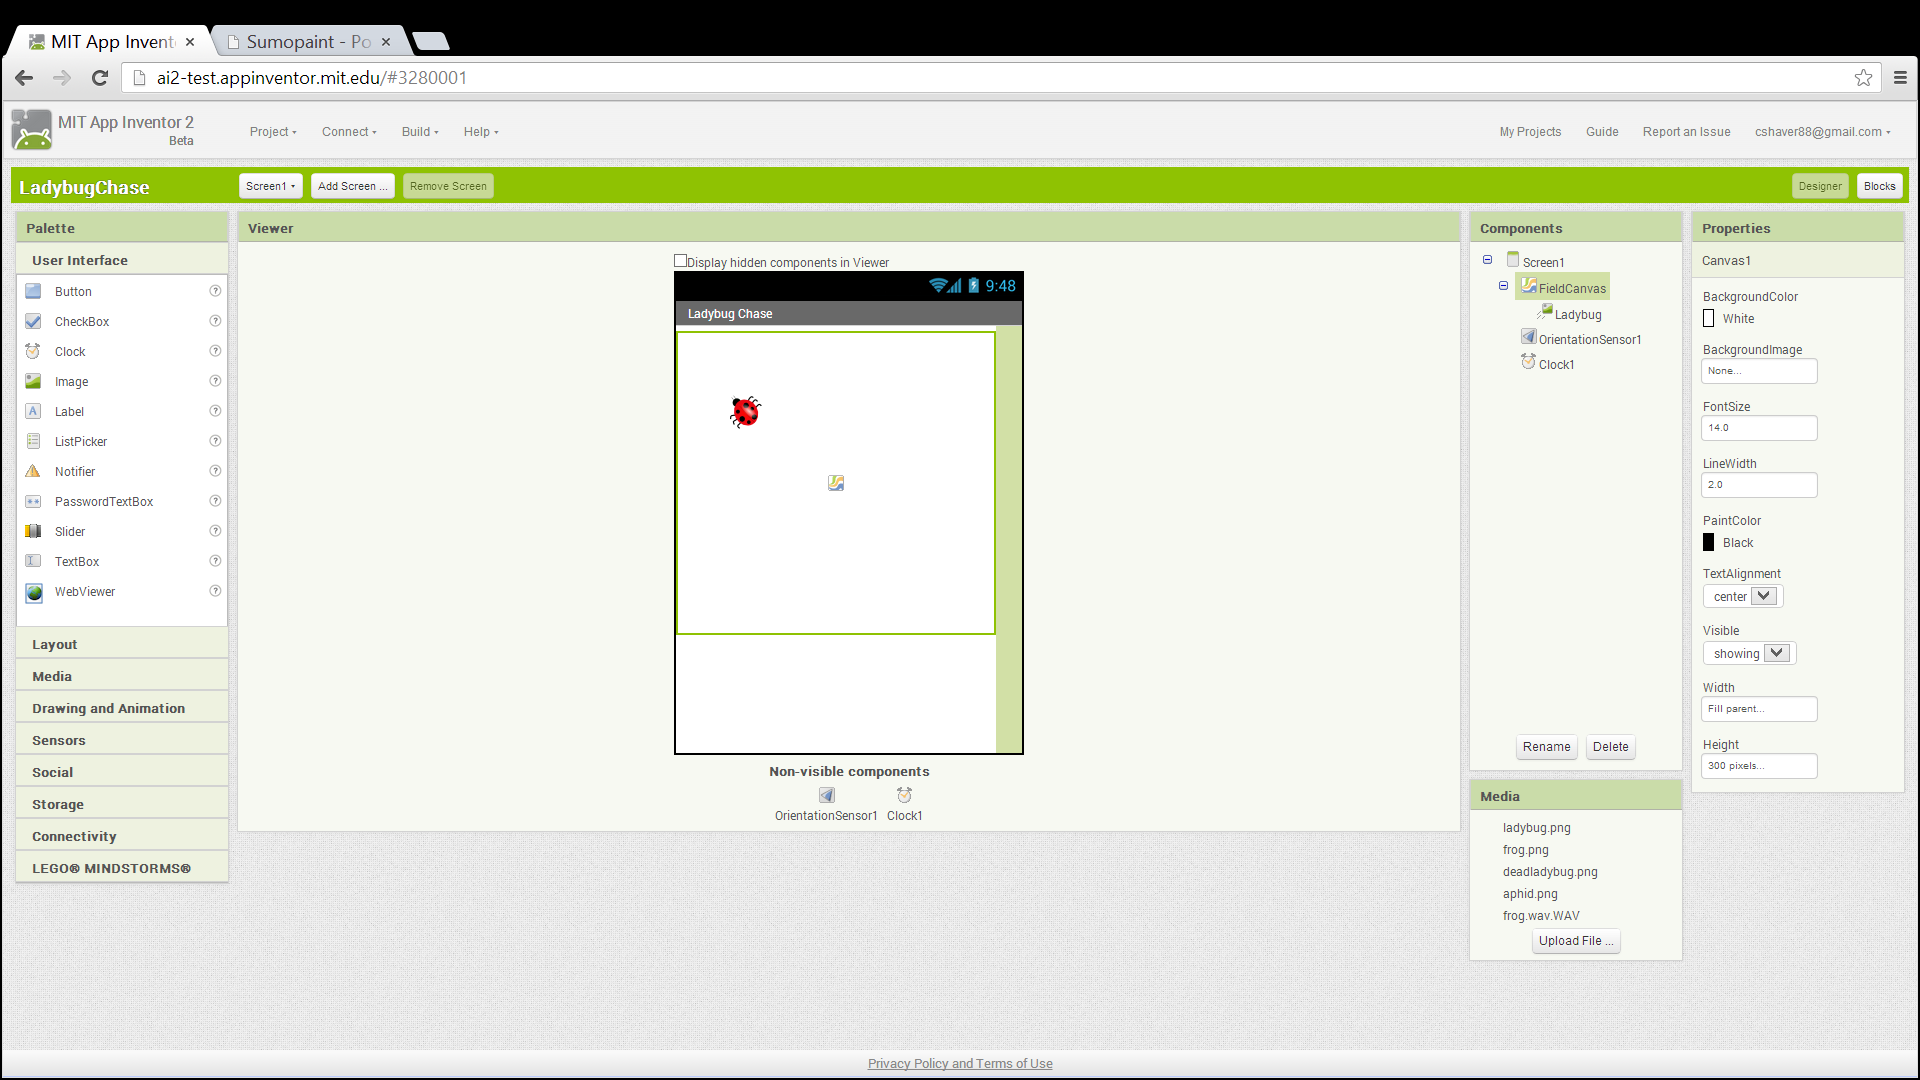
Figure 5-2. Setting up the user interface in the Component Designer for animating the ladybug
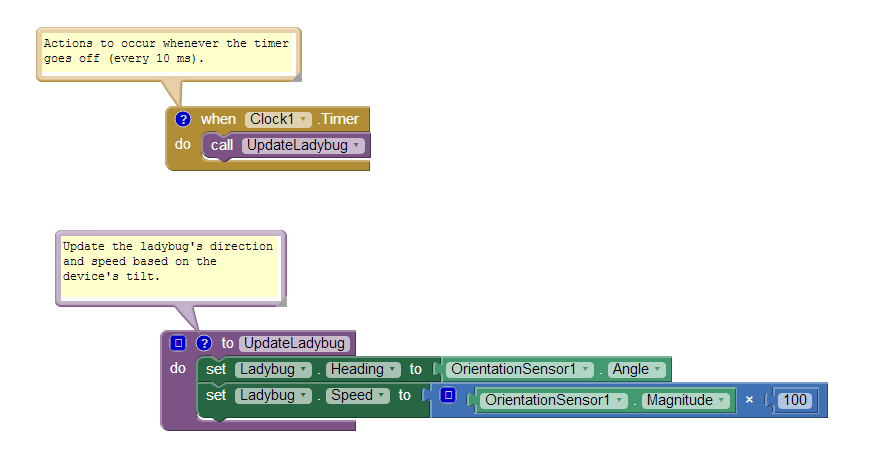
Figure 5-3. Changing the ladybug's heading and speed every 10 milliseconds
We will display the ladybug's energy level with a red bar in a second canvas. The line will be 1 pixel high, and its width will be the same number of pixels as the ladybug's energy, which ranges from 200 (well fed) to 0 (dead).
In the Designer, create a new Canvas, placing it beneath FieldCanvas and naming it EnergyCanvas. Set its Width property to "Fill parent" and its Height to 1 pixel.
In the Blocks Editor, you will need to create a variable energy with an initial value of 200 to keep track of the ladybug's energy level. (As you may recall, we first used a variable, dotSize, in Chapter 2's PaintPot app.) Here's how to do it:
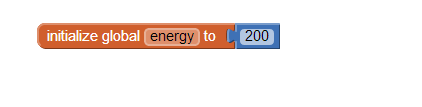
Figure 5-4. Initializing the variable energy to 200
Figure 5-5 shows how creating the variable also added blocks to the My Definitions drawer to set or get the value of energy.
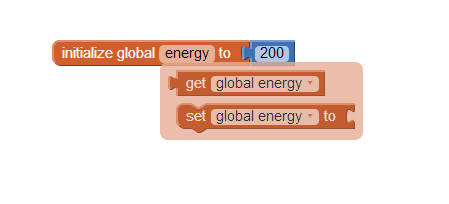
Figure 5-5. View of the My Definitions drawer showing new global energy and set global energy blocks
We want to communicate the energy level with a red bar whose length in pixels is the energy value. To do so, we could create two similar sets of blocks as follows:
However, a better alternative is to create a procedure that can draw a line of any length and of any color in FieldCanvas. To do this, we must specify two arguments, length and color, when our procedure is called, just as we needed to specify parameter values in MoleMash when we called the built-in random integer procedure. Here are the steps for creating a DrawEnergyLine procedure, which is shown in Figure 5-6.
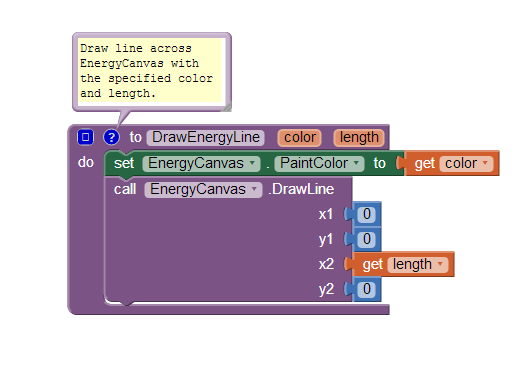
Figure 5-6. Defining the procedure DrawEnergyLine
Now that you're getting the hang of creating your own procedures, let's also write a DisplayEnergyLevel procedure that calls DrawEnergyLine twice, once to erase the old line (by drawing a white line all the way across the canvas) and once to display the new line, as shown in Figure 5-7.
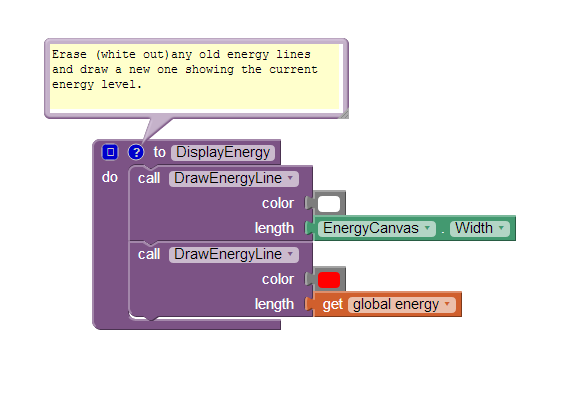
Figure 5-7. Defining the procedure DisplayEnergyLevel
The DisplayEnergyLeve procedure consists of four lines that do the following:

Note. The process of replacing common code with calls to a new procedure is called refactoring, a set of powerful techniques for making programs more maintainable and reliable. In this case, if we ever wanted to change the height or location of the energy line, we would just have to make a single change to DrawEnergyLine, rather than making changes to every call to it.
Unlike the apps in previous chapters, this game has a way to end: it's over if the ladybug fails to eat enough aphids or is eaten by the frog. In either of these cases, we want the ladybug to stop moving (which we can do by setting Ladybug.Enabled to false) and for the picture to change from a live ladybug to a dead one (which we can do by changing Ladybug.Picture to the name of the appropriate uploaded image). Create the GameOver procedure as shown in Figure 5-8.
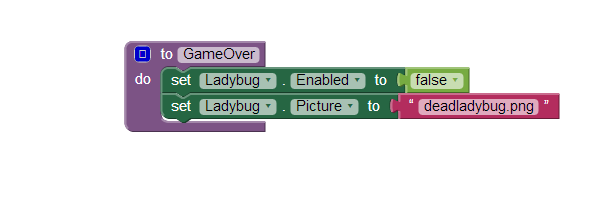
Figure 5-8. Defining the procedure GameOver
Next, add the code outlined in red in Figure 5-9 to UpdateLadybug (which, as you may recall, is called by Clock.Timer every 10 milliseconds) to:

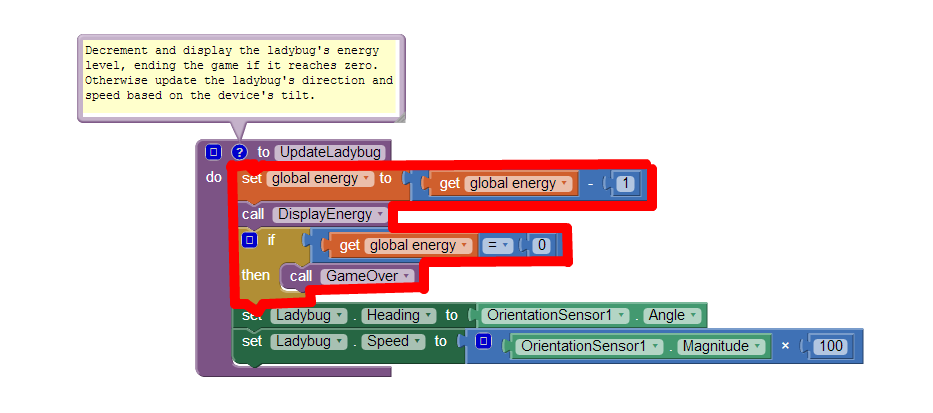
Figure 5-9. Second version of the procedure UpdateLadybug
The next step is to add an aphid. Specifically, an aphid should flit around FieldCanvas. If the ladybug runs into the aphid (thereby "eating" it), the ladybug's energy level should increase and the aphid should disappear, to be replaced by another one a little later. (From the user's point of view, it will be a different aphid, but it will really be the same ImageSprite component.)
The first step to add an aphid is to go back to the Designer and create another ImageSprite, being sure not to place it on top of the ladybug. It should be renamed Aphid and its properties set as follows:
Don't worry about its X and Y properties (as long as it's not on top of the ladybug) or its Heading property, which will be set in the Blocks Editor.
By experimenting, we found it worked best for the aphid to change directions approximately once every 50 milliseconds (5 "ticks" of Clock1). One approach to enabling this behavior would be to create a second clock with a TimerInterval of 50 milliseconds. However, we'd like you to try a different technique so you can learn about the random fraction block, which returns a random number greater than or equal to 0 and less than 1 each time it is called. Create the UpdateAphid procedure shown in Figure 5-10 and add a call to it in Clock1.Timer.
Whenever the timer goes off (100 times per second), both UpdateLadybug (like before) and UpdateAphid are called. The first thing that happens in UpdateAphid is that a random fraction between 0 and 1 is generated—for example, 0.15. If this number is less than 0.20 (which will happen 20% of the time), the aphid will change its direction to a random number of degrees between 0 and 360. If the number is not less than 0.20 (which will be the case the remaining 80% of the time), the aphid will stay the course.
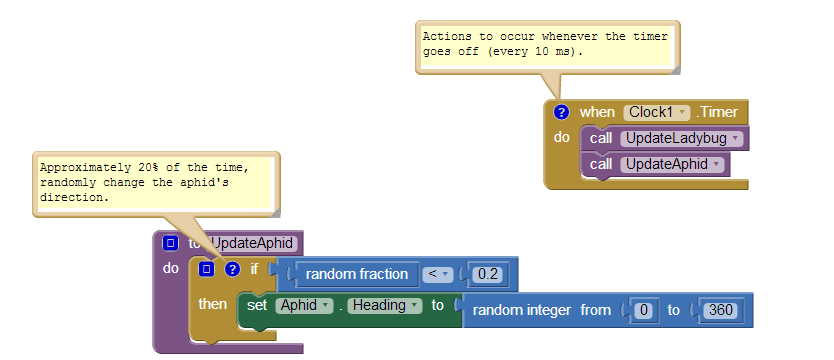
Figure 5-10. Adding the procedure UpdateAphid
The next step is having the ladybug "eat" the aphid when they collide. Fortunately, App Inventor provides blocks for detecting collisions between ImageSprite components, which raises the question: what should happen when the ladybug and the aphid collide? You might want to stop and think about this before reading on.
To handle what happens when the ladybug and aphid collide, let's create a procedure, EatAphid, that does the following:
Check that your blocks match Figure 5-11. If you had other ideas of what should happen, such as sound effects, you can add those too.
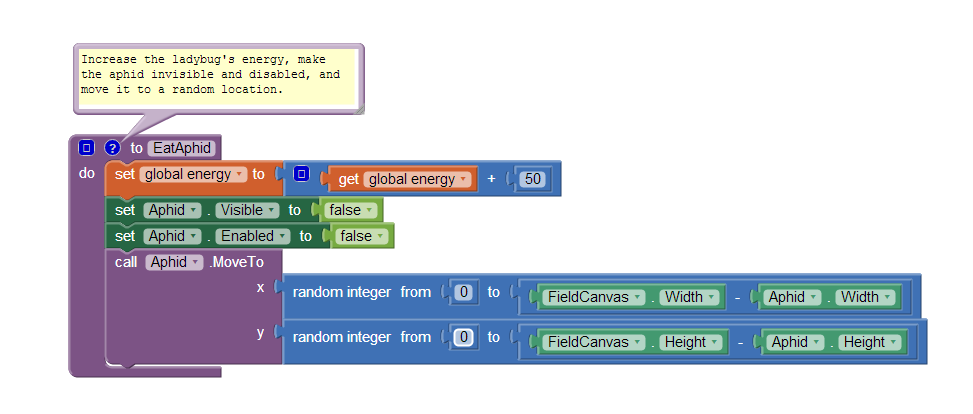
Figure 5-11. Adding the procedure EatAphid
Whenever EatAphid is called, it adds 50 to the variable energy, staving off starvation for the ladybug. Next, the aphid's Visible and Enabled properties are set to false so it seems to disappear and stops moving. Finally, random x and y coordinates are generated for a call to Aphid.MoveTo so that, when the aphid reappears, it's in a new location (otherwise, it will be eaten as soon as it reemerges).
Figure 5-12 shows the code to detect collisions between the ladybug and the aphid. Note that when you add a condition to the "and" block, a new test socket appears.
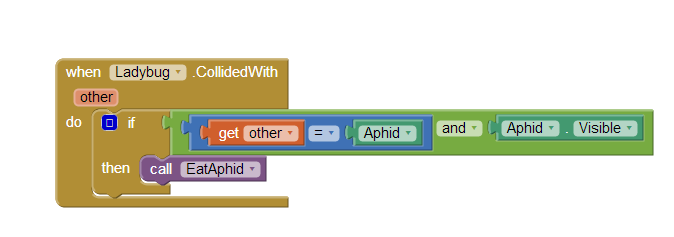
Figure 5-12. Detecting and acting on collisions between the ladybug and aphid
When the ladybug collides with another ImageSprite, Ladybug.CollidedWith gets called, with the parameter "other" bound to whatever the ladybug collided with.Right now, the only thing it can collide with is the aphid, but we'll be adding a frog later. We'll use defensive programming and explicitly check that the collision was with the aphid before calling EatAphid. There's also a check to confirm that the aphid is visible. Otherwise, after an aphid is eaten but before it reappears, it could collide with the ladybug again. Without the check, the invisible aphid would be eaten again, causing another jump in energy without the user understanding why.
Note. Defensive programming is the practice of writing code in such a way that it is still likely to work even if the program gets modiis not strictly necessary because the only thing the ladybug can currently collide with is the aphid, but having the check will prevent our program from malfunctioning if we add another ImageSprite and forget to change Ladybug.CollidedWith. Programmers generally spend more time fixing bugs than writing new code, so it is well worth taking a little time to write code in a way that prevents bugs.
To make the aphid eventually reappear, you should modify UpdateAphid as shown in Figure 5-13 so it changes the aphid's direction only if it is visible. (Changing it if it's invisible is a waste of time.) If the aphid is not visible (as in, it has been eaten recently), there is a 1 in 20 (5%) chance that it will be reenabled—in other words, made eligible to be eaten again.
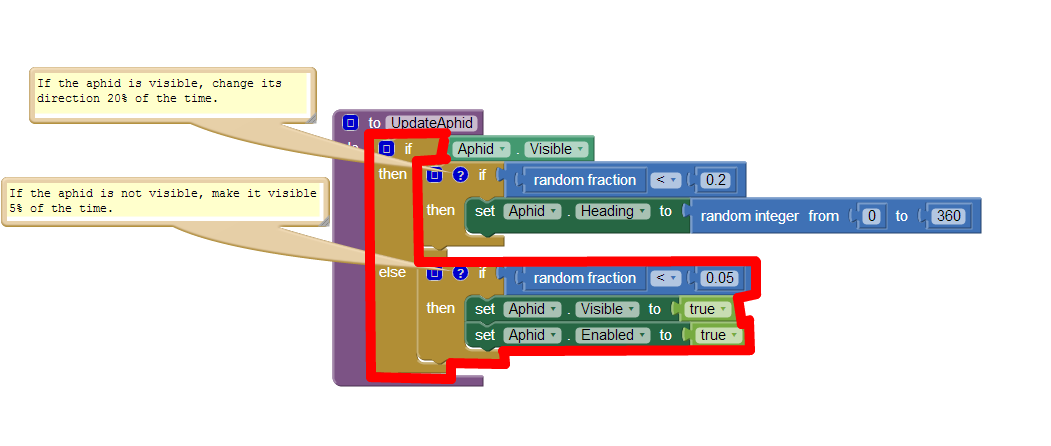
Figure 5-13. Modifying UpdateAphid to make invisible aphids come back to life
UpdateAphid is getting pretty complex, so let's carefully step through its behavior:
Because UpdateAphid is called by Clock1.Timer, which occurs every 10 milliseconds, and there is a 1 in 20 (5%) chance of the aphid becoming visible again, the aphid will take on average 200 milliseconds (1/5 of a second) to reappear.
As you may have noticed from testing the app with your new aphid-eating functionality, the game really needs a Restart button. (This is another reason why it's helpful to design and build your app in small chunks and then test it—you often discover things that you may have overlooked, and it's easier to add them as you progress than to go back in and change them once the app is "complete.") In the Component Designer, add a Button component underneath EnergyCanvas, rename it "RestartButton", and set its Text property to "Restart".
In the Blocks Editor, create the code shown in Figure 5-14 to do the following when the RestartButton is clicked:
Figure 5-14. Restarting the game when RestartButton is pressed
Right now, keeping the ladybug alive isn't too hard. We need a predator. Specifically, we'll add a frog that moves directly toward the ladybug. If they collide, the ladybug gets eaten, and the game ends.
The first step to having the frog chase the ladybug is returning to the Component Designer and adding a third ImageSprite—Frog—to FieldCanvas. Set its Picture property to the appropriate picture, its Interval to 10, and its Speed to 1, since it should be slower-moving than the other creatures.
Figure 5-15 shows UpdateFrog, a new procedure you should create and call from Clock1.Timer.
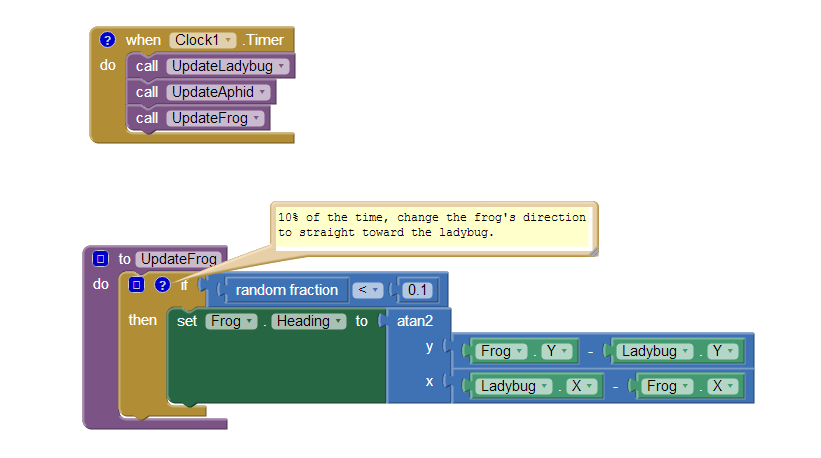
Figure 5-15. Making the frog move toward the ladybug
By now, you should be familiar with the use of the random fraction block to make an event occur with a certain probability. In this case, there is a 10% chance that the frog's direction will be changed to head straight toward the ladybug. This requires trigonometry, but don't panic—you don't have to figure it out yourself! App Inventor handles a ton of math functions for you, even stuff like trig. In this case, you want to use the atan2 (arctangent) block, which returns the angle corresponding to a given set of x and y values. (For those of you familiar with trigonometry, the reason the y argument to atan2 has the opposite sign of what you'd expect—the opposite order of arguments to subtract— is that the y coordinate increases in the downward direction on an Android Canvas, the opposite of what would occur in a standard x–y coordinate system.)
We now need to modify the collision code so that if the ladybug collides with the frog, the energy level and bar goes to 0 and the game ends, as shown in Figure 5-16.
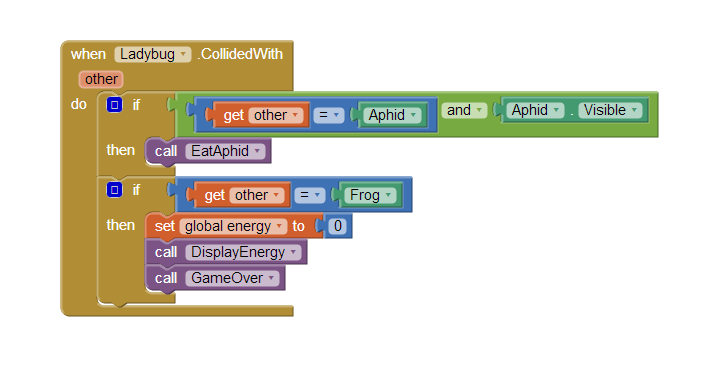
Figure 5-16. Making the frog eat the ladybug
In addition to the first if, which checks if the ladybug collided with the aphid, there is now a second if, which checks if the ladybug has collided with the frog. If the ladybug and the frog collide, three things happen:
RestartButton.Click already has code to replace the picture of the dead ladybug with the one of the live ladybug. Now you need to add code to move the live ladybug to a random location. (Think about what would happen if you didn't move the ladybug at the beginning of a new game. Where would it be in relation to the frog?) Figure 5-17 shows the blocks to move the ladybug when the game restarts.
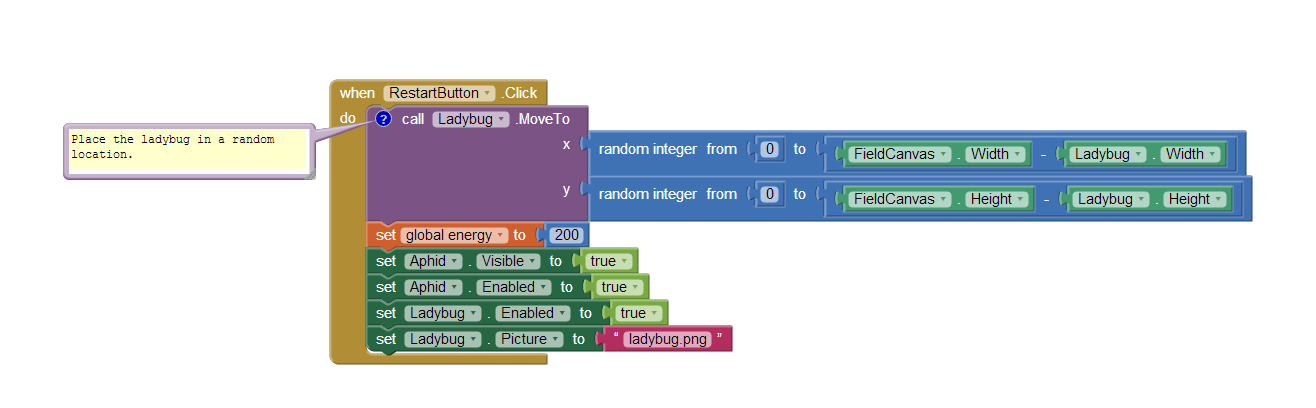
Figure 5-17. The final version of RestartButton.Click
The only difference between this version of RestartButton.Click and the previous version is the Ladybug.MoveTo block and its arguments. The built-in function random integer is called twice, once to generate a legal x coordinate and once to generate a legal y coordinate. While there is nothing to prevent the ladybug from being placed on top of the aphid or the frog, the odds are against it.
Test your app. Restart the game and make sure the ladybug shows up in a new random location.
When you tested the game, you may have noticed there isn't very good feedback when an animal gets eaten. To add sound effects and tactile feedback, do the following:
Here are some ideas of how to improve or customize this game:
With two games now under your belt (if you completed the MoleMash tutorial), you now know how to create your own games, which is the goal of many new programmers or wannabes! Specifically, you learned:
Another component useful for games is Ball, which only differs from ImageSprite in having the appearance of a filled circle rather than an arbitrary image.