I Have a Dream!
Most people have never even dreamed of building an app; software is this mysterious world of 0s, 1s and computer nerds. The goal of this site is to show people that they can create in this medium, that they can program software and contribute in today's highly digitized society.
This tutorial will get you building an app in minutes! You don't need to install anything on your computer-- App Inventor runs in the cloud! You will build the app on your computer and test it on your Android device. If you don't have a device, you can even test on an emulator
For your first app, you will build the I Have a Dream app. It has a picture of Martin Luther King and a play button that, when touched, plays the famous speech given to 250,000 on the steps of the Lincoln Memorial in 1963.
After completing the first version, you will add an image of Malcolm X and one of his speeches, turning the app into a soundboard with these great leader's perspectives on the civil rights movement. After going through this tutorial, you can use this app as a template to build soundboard apps on any topic.
If you'd rather watch video, check out the video equivalent to this tutorial.
What You'll Learn
- The basics of building apps
- An app is an event-response machine consisting of a set of event handlers
- An app can make decisions with conditional "if" blocks.
Setup App Inventor
With the new release of App Inventor (App Inventor 2) you can start building apps within minutes. The best way to build apps is to have a computer, an Android device, and a Wi-Fi connection. If you have these things, these setup instructions are for you. If you want to build apps using an emulator, or if you don't have a Wi-Fi connection, check out thesetup page for App Inventor. Once you're setup, come back to this tutorial.
So let's get started. App Inventor is a browser tool, so you don't need to install anything on your computer. You do need to install an app on your device, the MIT App Inventor Companion, so you can test the apps you build. You also need to connect to the same Wi-Fi connection on both your computer and your device.
To setup, perform the following:
- Connect to your Wi-Fi connection on both your computer and your Android device.
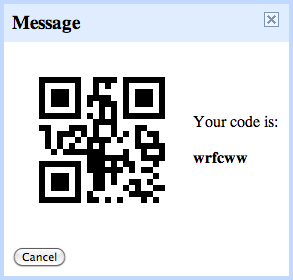
- In a browser, go to http://ai2.appinventor.mit.edu. If you haven't been there before, you'll be prompted to download the MIT App Inventor Companion app onto your phone or tablet. You can either scan the provided QR code, or go to Google Play and install the MIT App Inventor companion from there. The images below show the steps for finding the companion on Google Play, then installing and opening the app.
.
-
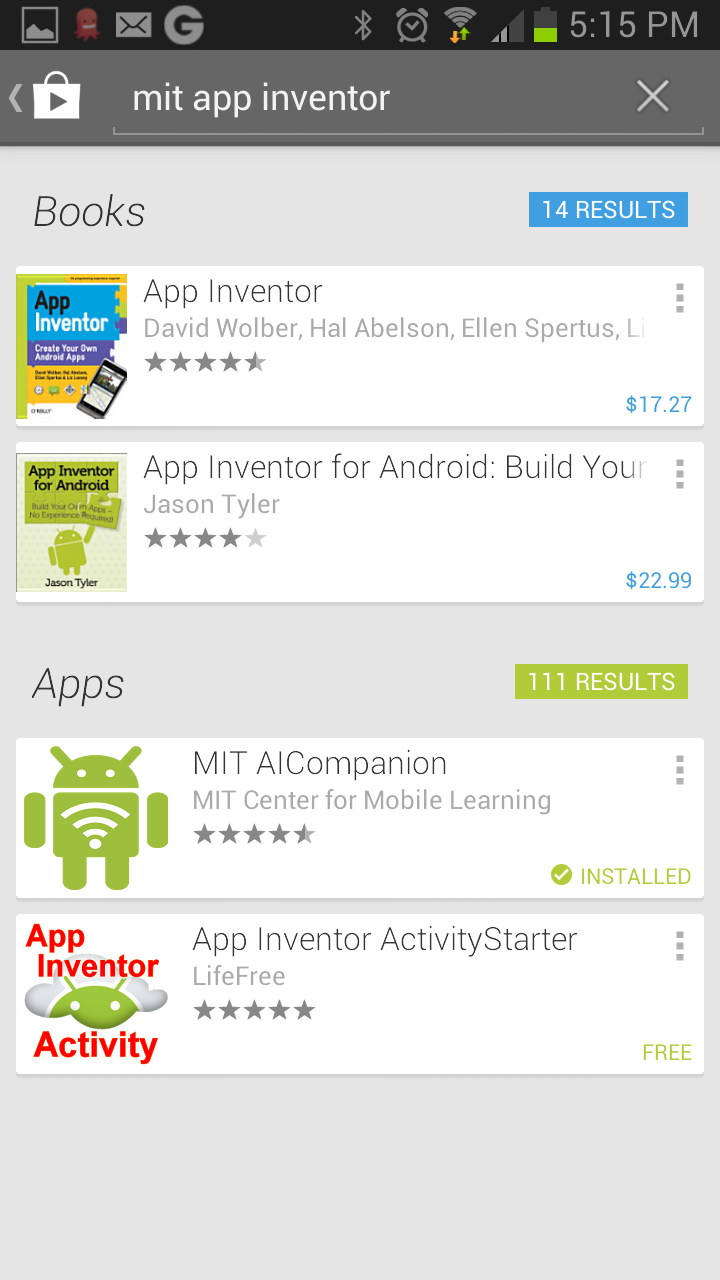
Search
find the MIT App Companion on Google Play
-
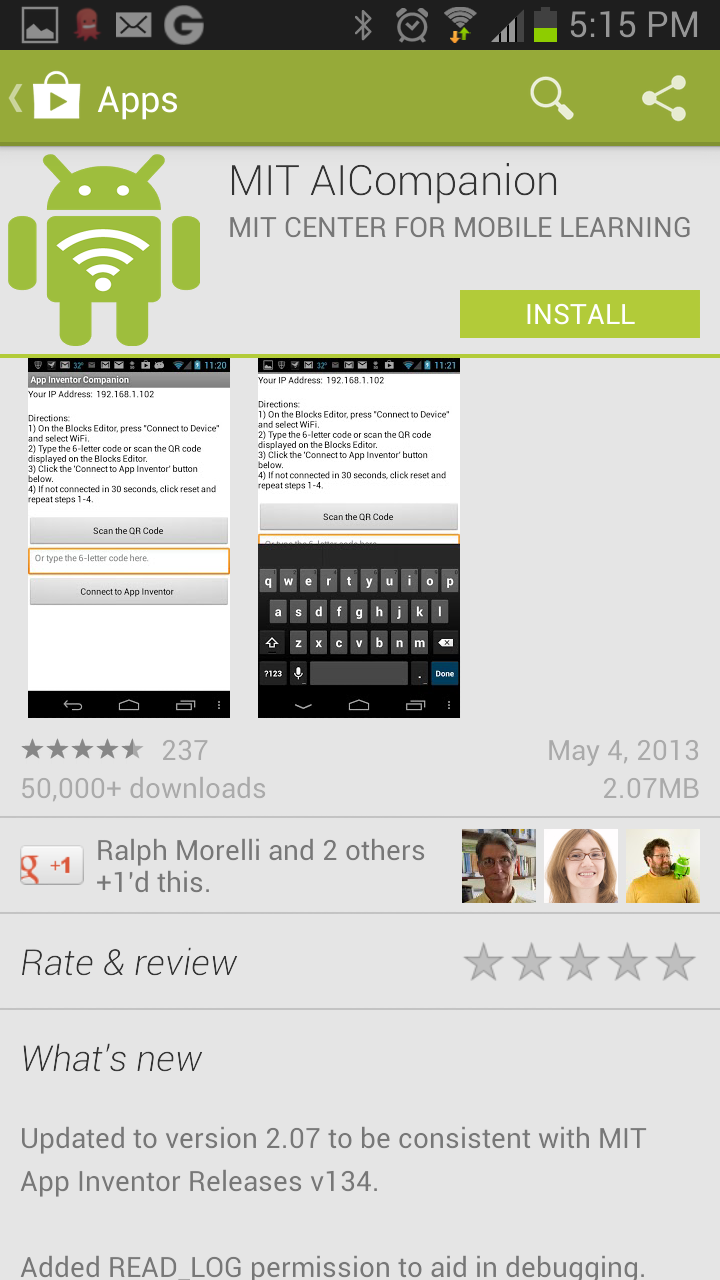
Install
Install the app on your phone
-
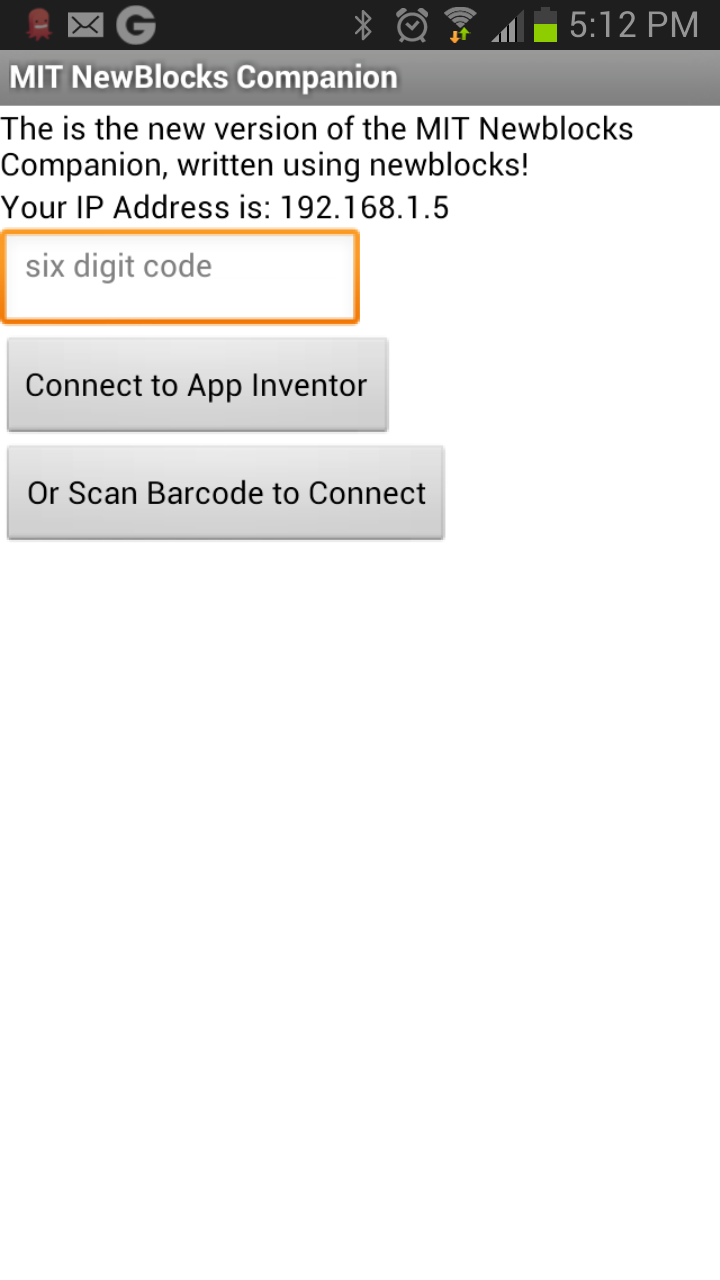
Launch It
Launch the Companion app.
- Once you've successfully installed the Companion app on your device, you're ready to go. In App Inventor, create a new project and name it "MLKDream" (note: spaces are not allowed in project names).
- Open the Blocks Editor by choosing Blocks from the top menu. Then Choose Connect to Companion. This will bring up the dialog to the right.
-
Back on your device, make sure the Companion app is running and click Scan QR Code. Scan the code showing on the computer screen. After some time, from five to thirty seconds, your app should appear on your device. If all is well, your skeleton app will appear on your device with "Screen1" in the area at the top. If your app does not appear, go to the setup page for App Inventor.
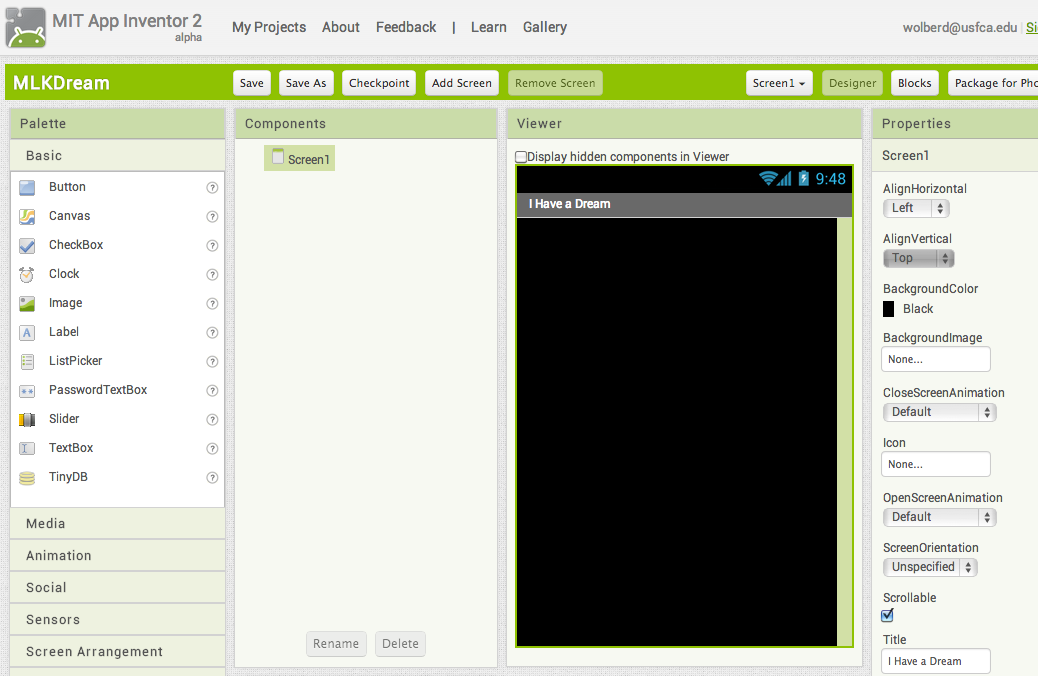
- To get an idea for how things work, change the screen title. In the App Inventor Designer, change the Screen1.Title property to "I Have a Dream". You should see this change both in the designer view of the app and, because of live testing, on your device.
- Change the screen background. In the App Inventor Designer, change the Screen1.BackgroundColor property to black. You should see this change both in the designer view of the app and on your device.
After changing the title and background, the app should appear like this in the designer:
and similarly on the device.
Upload Media
You have the skeleton of an app setup, so the next step is to load the media you will need into the app, both a picture of MLK and a sound file of his speech.
- Download these two files onto your computer: mlk.jpg, king.mp3. Generally, clicking on these links will not result in the files being downloaded-- use control-click or right-click instead.
-
Go to the Media section near the bottom-left of the Designer and choose Upload New. Choose the image and sound files you just downloaded. You won't see the picture or hear the sound file yet, but they're loaded into your app.
-
Add an Image component.The left side of the designer has numerous component palettes (folders), including the one that is open by default named User Interface. Within that folder, click on the Image component, and drag an instance into the designer (click and drag in one motion!). When you add the Image, App Inventor will give it a name, "Image1". This is fine for now.
-
Set the picture of the image component so that MLK appears on it. Go to the Image1 property editor, click on the Picture property and choose the image file you previously uploaded (MLK.jpg)
- Center the image. Click on Screen1 and change the AlignHorizontal property to "Center".
-
Change the name of the Image Component from "Image1" to "MLKImage" (use the Rename button near the bottom of the Components area.
The picture of MLK should now appear both in the App Inventor viewer and on your device.
Add the Start Button and Player Component
Next, add a button that when clicked will play the "I Have a Dream" Speech:
- From the User Interface palette, drag in a Button component.
-
Change the Button1.Text property to "Play" so that "Play" appears on the button.
-
Change Button1's name to "MLKButton".
-
Add the Player Component. Drag in a Player component for playing the speech. You will find the Player component in the Media folder (not the User Interface folder). Drag it out and drop it on the Viewer. Note that it will appear below the rectangle representing the phone. This is because the Player is a non-visible component. It is part of your app but not visible to the user. You can leave the name as "Player1".
-
Set the Player1.Source property to king.mp3. Just as you associated the image file with the Image component, associate the mp3 sound file with the Player1 component. Click on the Source property of the Player1 and choose the "king.mp3" file you uploaded earlier.
Program the App Behavior
So far you have designed the user interface and also added a non-visible component to play the speech. At this point, if you test the app and click the Play button, nothing will happen. Now its time to program how the app responds to user input, in this case playing a speech when the user clicks a button.
You program behavior in the Blocks Editor, so click on the Blocks button in the top area of App Inventor. When the Blocks editor appears it lists all your components by name on the left side. You should see the MLKButton and the Player1 components listed under Screen1
When you click on a component, you will see all the blocks related to that component.
- Drag out the when MLKButton.Click event handler. It is the first block under MLKButton and is the probably the most common event handler. Drag this block into the viewer.
-
When the user clicks the MLKButton, you want to play his speech. So click on the Player1 component. drag out a Player1.Start block, and place it within the when MLKButton.Click block:
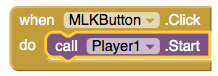
Recall that, in the Designer, you set Player1.Source property to the file "king.mp3". Thus, Player1.Start should play the "I Have a Dream" Speech.
Test the Behavior
As soon as you specify a behavior, you can test it on the device. If you have your device connected using the MIT App Companion (see above) you should now see the MLK picture and the "Play" button below it. Touch the button. Does the speech start playing?
 Event handlers
 like the one you just built are fundamental to programming.
Learn more.
Add Behavior to Pause the Speech
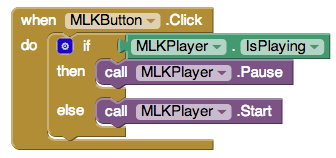
Suppose you wanted to modify the app so that the user could start and stop the speech by clicking the same button. The behavior might be described as:
  when the button is clicked,
     if the button has the text Play on it, then
         play the speech and set the button text to Pause.
     Otherwise (if the button already has the text Pause on it),
             pause the speech and set the Button.Text property to Play.
This behavior does not fit as a simple when-do block. You will keep the when Button.Click event, but you will insert a conditional if-else block within it.
-
In the Blocks editor, open the Control folder within the Built-in blocks.
-
Drag out an if block and place it just within the when MLKButton.Click block.
-
Click the + on the if block and drag in an else block within the if in the sub-screen.
-
Drag out an = block from the Math folder. Plug this block into the if as its test.
-
Drag out a MLKButton.get block and choose Text as its property. Place this block in the left-side of the =.
-
Drag out a text block from the Text folder of the Built-in blocks. Enter the text "Play" and plug the block into the right side of the equals.
-
Within the if-do block, place the Player1.Start block.
-
Drag out a MLKButton.set block and change the property to Text.
-
Drag out a text block from the Text folder and enter "Pause" in it. Place this text block in the right side of the MLKButton.set block.
-
Place the entire MLKButton.set block in the if-do block, just below the Player1.Start.
-
Drag out a Player1.Pause block and place it within the else block
-
Copy the MLKButton.set block and paste it within the else-do block. Change the text to "Pause" instead of "Play".
The blocks should now appear as:
Test the App
Always test your app as you add new features. Test this one by clicking on the button. The text of the Button should toggle between "Play" and "Pause", and the speech should start and stop accordingly.
Components and their properties are fundamental to programming.
Learn more.
Package the App
Congratulations! You have just built your first app with App Inventor. However, you really do not have the app on your device yet. Right now you are live testing it through the MIT App Companion app, and there is really no "I Have a Dream" app installed on your device. If you broke the (Wi-Fi) connection between your computer (App Inventor) and the Companion app, you would not be able to launch your app and it would not appear as one of your apps.
To actually get the app to your device, do the following:
-
Choose Package for Phone | Download to computer from the App Inventor top menu (right-side). This will take a minute.
-
When the process completes, a dialog will appear on the computer telling you so. Dismiss the dialog. You should now have a file with a .apk extension in your downloads directory. This is the app!
-
Email the .apk file to yourself, then go to your Android device, open your email, and open the attached .apk file. This will start the install process. Want to show off? Email the .apk to your family and friends!
Version 2: Adding Malcolm X and another Speech
In this section, you will add a second picture and speech from one of MLK's contemporaries in the civil right's movement, Malcolm X. You'll learn how to arrange components on the screen and enough programming to create just about any "sound board app" that lets the user click on images to hear speeches or other sounds.
First, in the Designer, SaveAs your app and add a smaller image of MLK, an image of Malcolm X, a sound file with Malcolm X's speech, and new image and button components:
- SaveAs the App and give it a new name (e.g., "IHaveADreamButNoName").
-
In the Designer, download the picture of Malcolm X the sound clip from his speech, and a smaller picture of MLK. Upload them into the app as you did with the MLK media.
-
Drag a new Image component into the Viewer and place it below the "Play" button. Set the Image.Picture property to "malcolm152x129.jpg". Name the Image component "MalcolmImage"
-
Drag a new button into the Viewer and place it below the Malcolm X image. Set its Text property to "Play" and change its name to "MalcolmButton"
-
Change the MLKImage.Picture property so that it shows the new, smaller picture (mlk152x129.jpg)
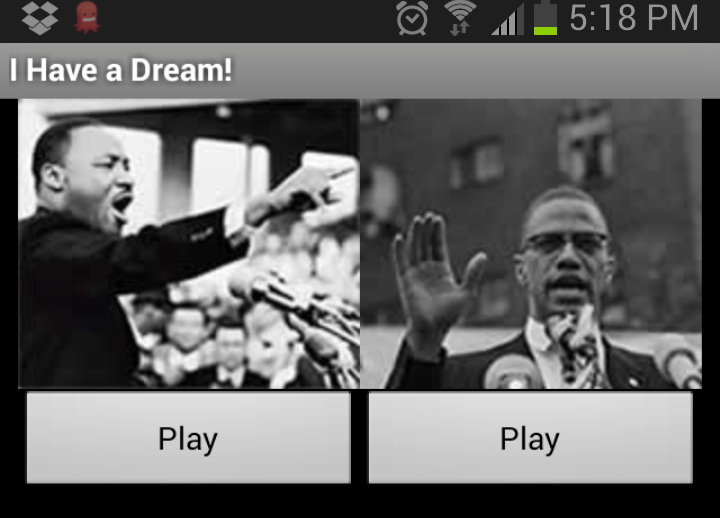
Now Arrange the leaders side-by-side:
-
From the Screen Arrangement folder, drag out a TableArrangement component.
-
Drag the MLKImage component and place it in the top-left slot of the TableArrangement.
-
Drag the MLKButton component and place it in the bottom-left slot of the TableArrangement.
-
Drag the MalcolmImage component and place it in the top-right slot of the Table Arrangement.
-
Drag the MalcolmButton component and place it in the bottom-right slot of the Table Arrangement.
-
Finally, add another Player component. Name this one "MalcolmPlayer" and set its source property to the malcolmx.mp3 file. Rename the original "Player1" component to "MLKPlayer".
If you aren't connected for live testing, connect now by choosing Connect to Companion, running the MIT App Companion app on your device, and scanning the resulting QR code. When the app appears, do MLK and Malcolm X appear side-by-side?
Update the Behavior so that Both Speeches Play
Next, go to the Blocks editor and update the app's behavior. The goal is that clicking on either Play button will start the corresponding speech. You also want to be sure to pause the "other" speech when one is started.
-
The easiest way to code this is to copy and paste the entire when MLKButton.click event-handler. Use ctrl-clic (Mac) or right-click (Windows) to copy the blocks, then paste them.
-
Change the copy so that all references to "MLK" components are replaced with references to "Malcolm" components:
The blocks should appear as:
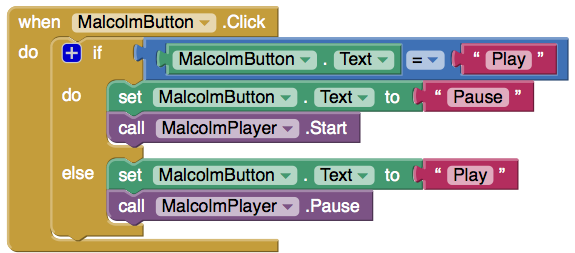
Challenge: Debugging the App
The app, coded as in the blocks above, has a behavior error. Before moving on, try to identify and fix the error. When you are ready, click on "View Answer"
The speeches will play over each other if you click "Play" on both before the first one completes. You need to pause each speech when the other is played, and change the text on its button:
Here are the blocks for the final version of the app:


Customize
After stepping through a tutorial it is important to 1) explore adding components, blocks, and features on your own, without the use of detailed instructions, and 2) think creatively and build an app of similar functionality but perhaps entirely different content. So try the following:
-
Build a "soundboard" app of your own design. Build an educational app with soundclips like "I Have a Dream", an informational app about your school or workplace, or something completely inane about your favorite television characters. Remix "I Have a Dream" to build something for your own life!
-
Add Text-to-Speech. You can have your images "speak" any words you want using the Text-to-Speech component. You'll find it in the "Other stuff" folder.
Conceptualize
Learning programming is similar to learning a foreign language and there is a potentially overwhelming amount of terminology and difficult concepts. After you step through a tutorial, it is important to take a step back and ensure that you are understanding the programming terms and concepts in a general way.
There are three main programming concepts touched upon in this tutorial. Click on each of the following to explore your general understanding of each:

