
This chapter gets you started building apps. It presents the key elements of App Inventor, the Component Designer and the Blocks Editor, and leads you through the basic steps of creating your first app, HelloPurr. When you're finished, you'll be ready to build apps on your own.
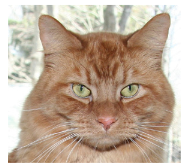
A typical first program with a new computer system prints the message "Hello World" to show that everything is connected correctly. This tradition goes back to the 1970s and Brian Kernighan's work on the C programming language at Bell Labs. With App Inventor, even the simplest apps do more than just show messages: they play sounds and react when you touch the device. So we're going to get started right away with something more exciting; your first app (as shown in Figure 1-1) will be "HelloPurr," a picture of a cat that meows when you touch it and purrs when you shake it.
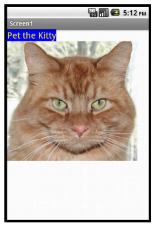
Figure 1-1. The HelloPurr app
The chapter covers the following topics:
The App Inventor programming environment has three key parts, all shown in Figure 1-2:
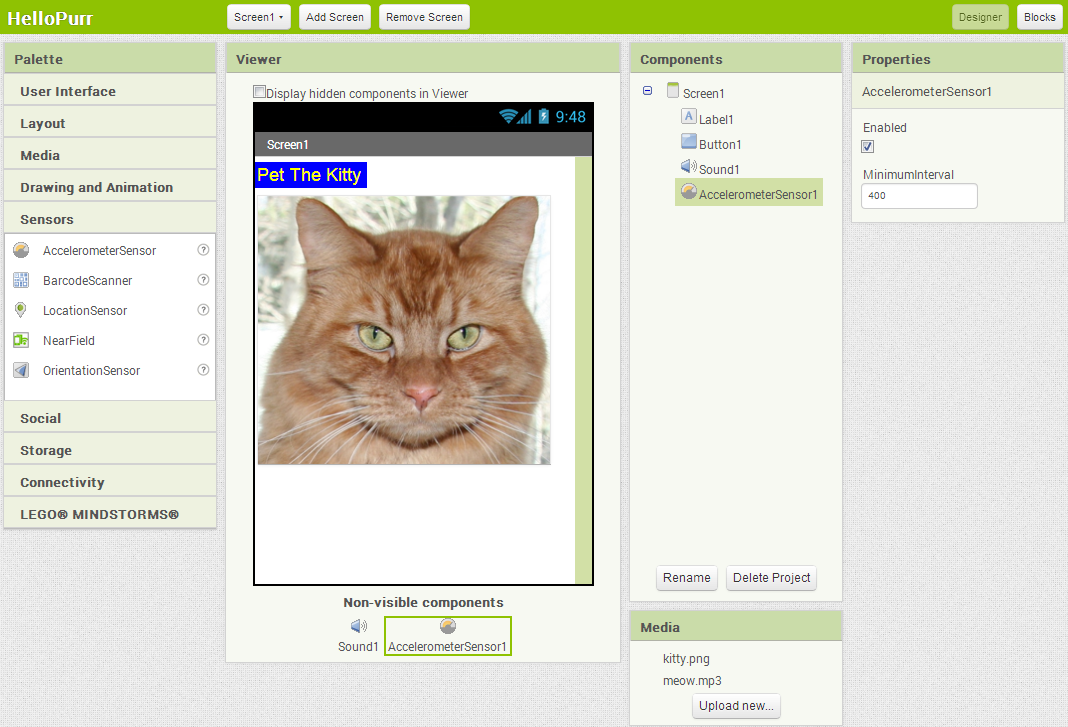 Figure 1-2A. The Components Designer.
 Figure 1-2B. The Blocks Editor.
You start App Inventor by browsing to ai2.appinventor.mit.edu. If this is the first time you've used App Inventor, you'll see the Projects page, which will be mostly blank because you haven't created any projects yet. To create a project, click New at the top left of the page, enter the project name "HelloPurr" (one word with no spaces), and click OK.
The first window that opens is the Component Designer. The Blocks Editor is available by clicking on Blocks in the top right corner of the window.
When the Blocks Editor is open you'll see a button near the top left of the screen with three options in the drop down menu, as shown in Figure 1-3.
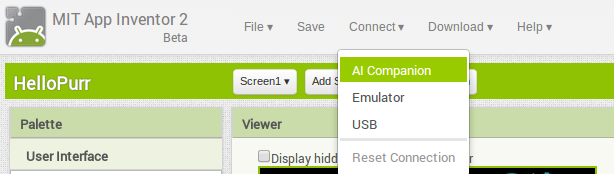
Figure 1-3. Click "Connect" and select AI Companion
If you have an Android device, and an internet connection with WIFI, go to the Play Store on your device and search for MIT AICompanion and install it. Then select AI Companion from the drop down menu, and follow the instructions on the pop up window and those in the Companion app itself. If instead you want to test the apps you build using an emulator, select "Emulator" and wait about 30 seconds while the Android emulator loads.
If all is well, you should see a window for the Component Designer, and Blocks Editor, as well as the emulator window if you chose that option (your screen should look something like Figure 1-2A and 1-2B, shown previously, but with the windows mostly empty). If you're having problems here, review the setup instructions at ai2.appinventor.mit.edu.
The first tool you'll use is the Component Designer (or just Designer). Components are the elements you combine to create apps, like ingredients in a recipe. Some components are very simple, like a Label component, which shows text on the screen, or a Button component, which you tap to initiate an action. Other components are more elaborate: a drawing Canvas that can hold still images or animations; an accelerometer, a motion sensor that works like a Wii controller and detects when you move or shake the device; or components that make or send text messages, play music, and video, get information from websites, and so on.
When you open the Designer, it will appear as shown in Figure 1-4.
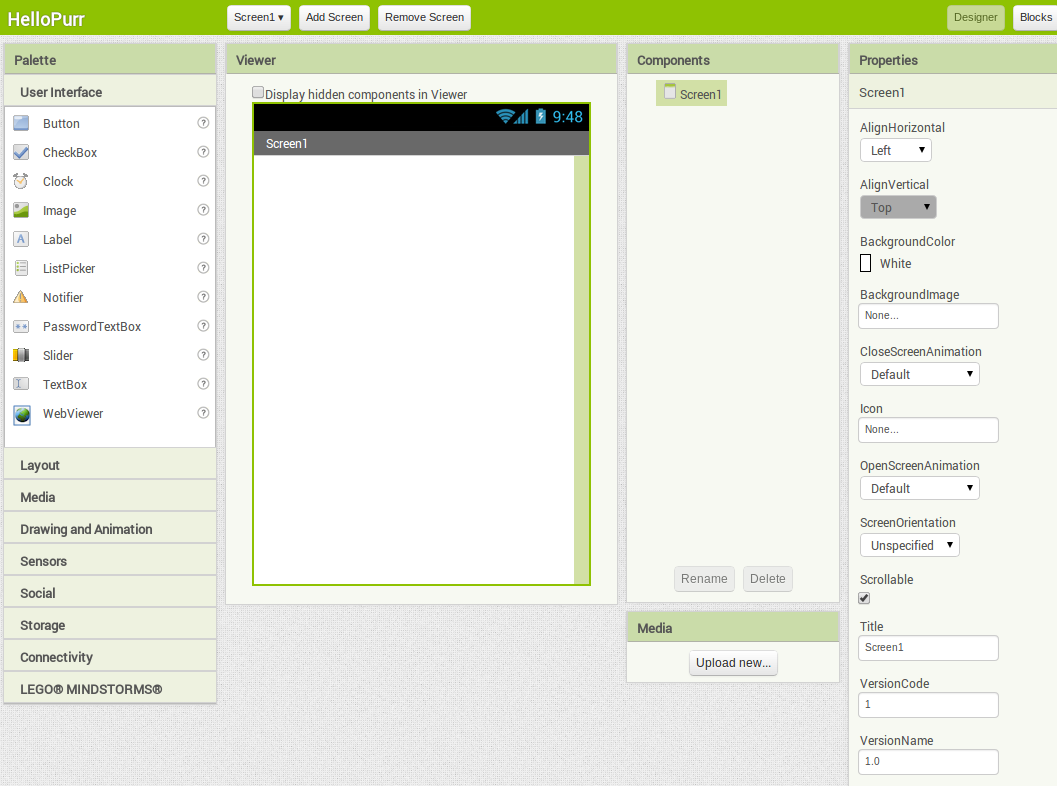
Figure 1-4. The App Inventor Component Designer
The Designer is divided into several areas:
At the far right is a section that shows the Properties of components; when you click a component in the Viewer, you'll see its Properties listed here. Properties are details about each component that you can change. (For example, when clicking on a Label component, you might see properties related to color, text, font, and so on.) Right now, it shows the properties of the screen (called Screen1), which include a background color, a background image, and a title.
For the HelloPurr app, you'll need two visible components (you can think of these as components you can actually see in the app): the Label component reading "Pet the Kitty" and a Button component with an image of a cat in it. You'll also need a non-visible Sound component that knows how to play sounds, such as "meow," and an Accelerometer component for detecting when the device is being shaken. Don't worry-we'll walk you through each component step by step.
The first component to add is a Label:
The Designer should now appear as shown in Figure 1-5.
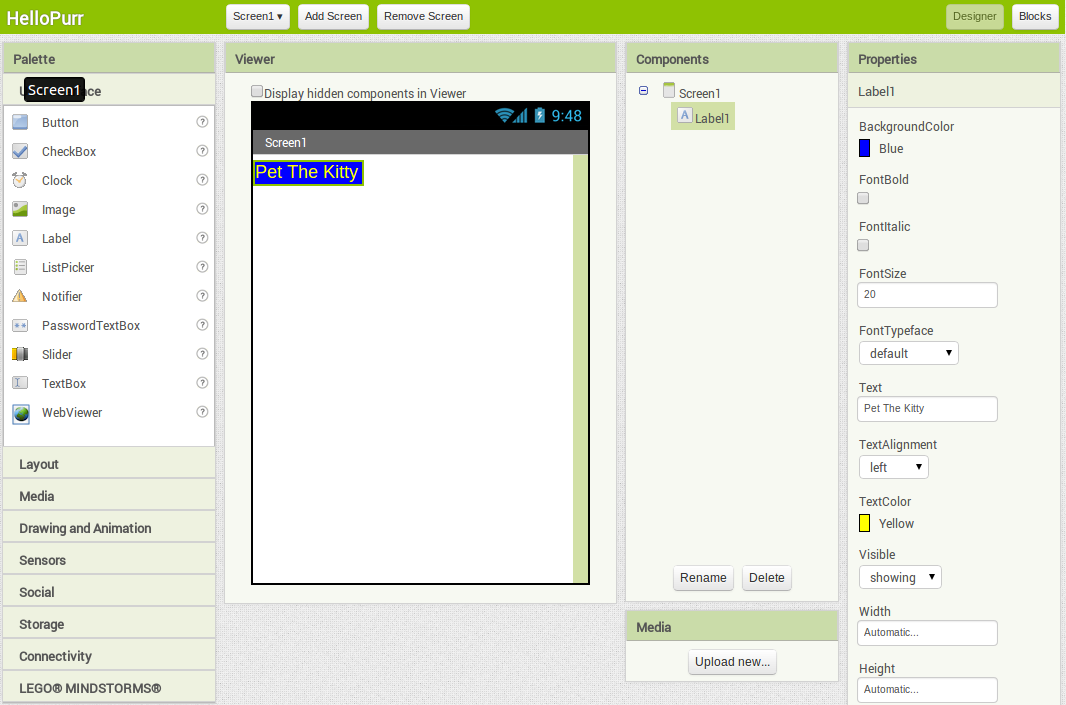
Figure 1-5. The app now has a label
Be sure you have your device or emulator connected and the Blocks Editor open. You should see the label appear on the device as you add it in the Designer. In App Inventor, you build the application on the device as you pick the components in the Designer. That way, you can see right away how your application will look. This is called live testing, and it also applies to the behaviors you create for the components in the Blocks Editor, as you'll see shortly.
The kitty for HelloPurr is implemented as a Button component-you create a normal button, and then change the button image to the kitty. To make the basic button first, go to the Palette in the Designer and click Button (at the top of the list of components). Drag it onto the Viewer, placing it below the label. You'll see a rectangular button appear on the Viewer. After about 10 seconds, the button should appear on the device. Go ahead and tap the device's button-do you think anything will happen? It won't, because your app hasn't told the button to do anything yet. This is the first important point to understand about App Inventor: for every component you add in the Designer, you have to move over to the Blocks Editor and create the code to make something happen with that component (we'll do that after we finish adding the components we need in the Designer).
Now we've got a button that we'll use to trigger the sound effect when someone clicks it, but we really want it to look like the picture of the kitty, not a plain old rectangle. To make the button look like the kitty:
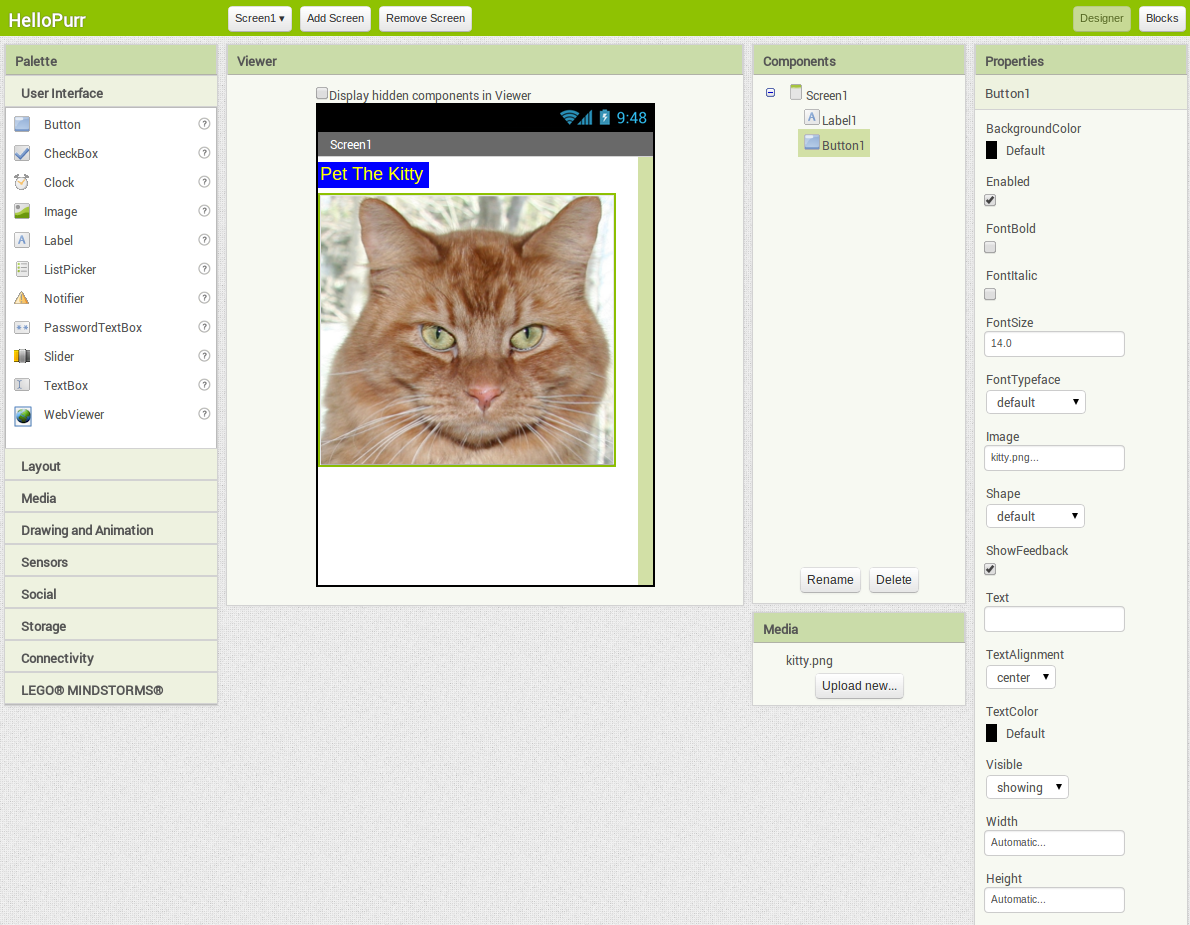
Figure 1-6. The app with a label and a button with an image on it
In your app, the kitty will meow when you tap the button. For this, you'll need to add the meow sound, and program the button behavior to play that sound when the button is clicked:
Table 1-1. The components you've added to the HelloPurr app

You've just added Button, Label, and Sound components as the building blocks for your first app. Now let's make the kitty meow when you tap the button. You do this with the Blocks Editor. Click "Blocks" in the top right of the Component Designer.
Look at the Blocks Editor window. This is where you tell the components what to do and when to do it. You're going to tell the kitty button to play a sound when the user taps it. If components are ingredients in a recipe, you can think of blocks as the cooking instructions.
At the top left of the window, you'll see buttons below "Blocks" beneath this header and you'll see a column that includes a drawer for each component you created in the Designer: Button1, Label1, Screen1, and Sound1. When you click a drawer, you get a bunch of options (blocks) for that component you created. Click the drawer for Button1. The drawer opens, showing a selection of blocks that you can use to tell the button what to do, starting with Button1.Click at the top, as shown in Figure 1-7.
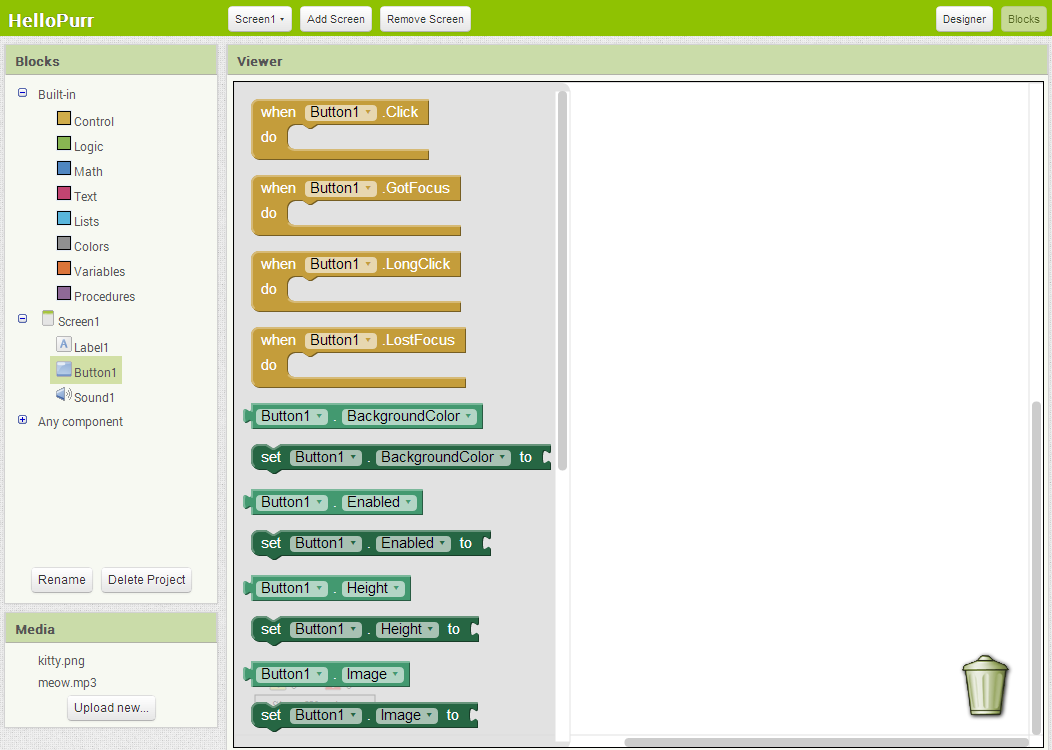
Figure 1-7. Clicking Button1 shows the component's blocks
Click the block labeled Button1.Click and drag it into the workspace. When you're looking for the block, you'll notice that the word "when" is included on the Button1.Click block. Blocks including the word "when" are called event handlers; they specify what components should do when some particular event happens. In this case, the event we're interested in happens when the app user clicks on the kitty (which is really a button), as shown in Figure 1-8. Next, we'll add some blocks to program what will happen in response to that event.
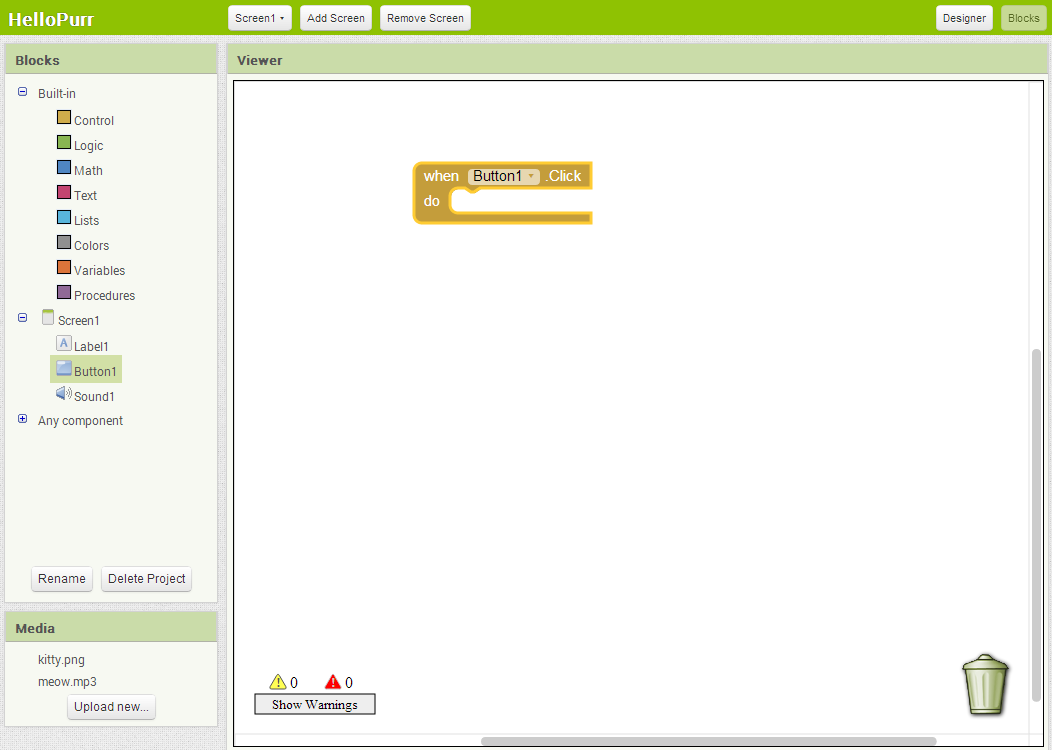
Figure 1-8. You'll specify a response to the user clicking within the Button.Click block
Click Sound1 to open the drawer for the sound component, and drag out the call Sound1.Play block. (Remember, earlier we set the property for Sound1 to the meow sound file you downloaded to your computer.) You may notice at this point that the call Sound1.Play block is shaped so it can fit into a gap marked "do" in the Button1.Click block. App Inventor is set up so that only certain blocks fit together; this way, you always know you're connecting blocks that actually work together. In this case, blocks with the word "call" make components do things. The two blocks should snap together to form a unit, as shown in Figure 1-9, and you'll hear a snapping sound when they connect.

Figure 1-9. Now when someone clicks the button, the meow sound will play
Unlike traditional programming code (which often looks like a jumbled mess of gobbledygook "words"), blocks in App Inventor spell out the behaviors you're trying to create. In this case, we're essentially saying, "Hey, App Inventor, when someone clicks on the kitty button, play the meow sound."

Test your app. Let's check to make sure everything is working properly-it's important to test your app each time you add something new. Tap the button on the device (or click it using the emulator). You should hear the kitty meow. Congratulations, your first app is running!
Now we're going to make the kitty purr and meow when you tap the button. We'll simulate the purr by making the device vibrate. That may sound hard, but in fact, it's easy to do because the Sound component we used to play the meow sound can make the device vibrate as well. App Inventor helps you tap into this kind of core device functionality without having to deal with how the device actually vibrates. You don't need to do anything different in the Designer; you can just add a second behavior to the button click in the Blocks Editor:
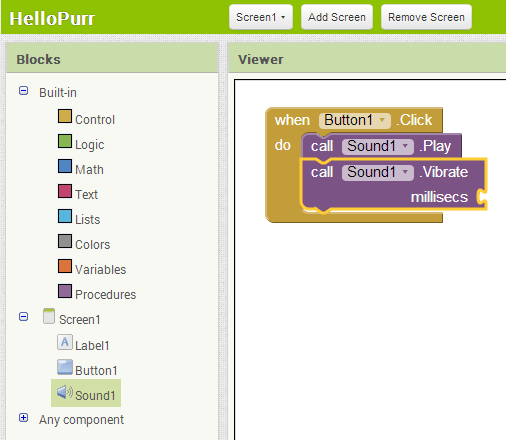
Figure 1-10. Playing the sound and vibrating on the Click event
Figure 1-11. Opening the Math drawer
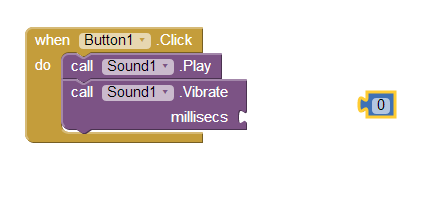
Figure 1-12. Choosing a number block (0 is the default value)
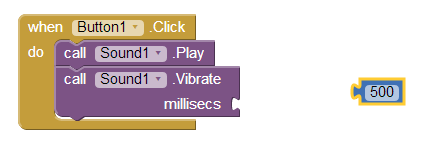
Figure 1-13. Changing the value to 500
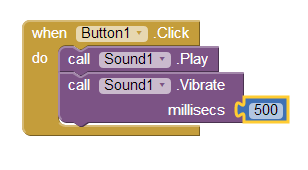
Figure 1-14. Plugging the 500 into the millisecs slot
Test your app. Try it! Tap the button on the device, and you'll feel the purr for half a second.
Now let's add a final element that taps into another cool feature of Android device's: make the kitty meow when you shake the device. To do this, you'll use a component called AccelerometerSensor that can sense when you shake or move the device around.
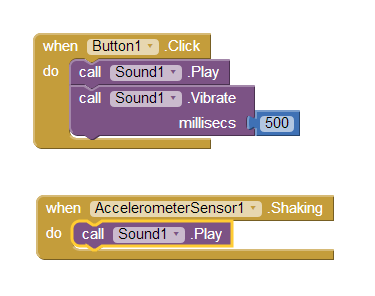
Figure 1-15. The blocks for HelloPurr
App Inventor is a cloud computing tool, meaning your app is stored on Google's online servers as you work. So if you close App Inventor, your app will be there when you return; you don't have to save anything on your computer as you would with a Word file or a music track. This also allows you to easily test the app while connected to your device (what we call live testing), without having to download anything to your device, either. The only problem is that if you disconnect your device from App Inventor, the app running on the device will stop, and you won't find an icon for it anywhere because it was never truly installed.
You can download and install the completed app so that it works on any device, even when it's not connected to the computer. First, make sure your device allows apps to be downloaded from places other than the Android Market. Typically, you do this by going to Settings→Applications on your device and checking the box next to "Unknown sources." Then, go to back into the Designer in App Inventor, click "Build," and select "Application (provide QR Code)." You should see a "Progress Bar" message in the window, a process that takes up to a minute. After the "Progress Bar" message disappears, continue to wait for another 10-15 seconds while the QR Code for the finished app is displayed. Scan the QR Code with a Barcode Scanner. After scanning the QR Code the device will prompt you to enter your password for your Google account, when finished entering your password your app will download to your device. If you do not have a Barcode Scanner, go to the Play Store and search for one to download. Once the app has been downloaded you will need to go into the downloads folder and select the HelloPurr.apk file. A message will appear asking if you want to install, click Install.
Once you've installed it, look at the apps available on your device, and you'll now see HelloPurr, the app we just built. You run it just like any other app. (Make sure that you run your new app, not the App Inventor application.) You can now unplug or even reboot the device and kill all applications, and your new packaged application will still be there.
It's important to understand that this means your packaged app is now separate from the project on App Inventor. You can do more work on the project in App Inventor by connecting the device with the AI Companion as before. But that won't change the packaged app that is now installed on your device. If you make further changes to your app in App Inventor, you'll want to package the result and download the new version to replace the old one on the device.
Go ahead and download, and install your HelloPurr app so you have it on your device. Once you've done this, you can share it with your family and friends, too!
You can share your app in a couple of ways. To share the executable app, first click "Build" and choose "Application (save to my computer)." This will create a file with a .apk extension on your computer. You need to upload this file so that it is accessible on the Web. Once the app is on the Web, other people can install it on their device's by opening the device's browser and downloading it. Just let them know they need to allow "unknown sources" in their device's Application settings in order to install apps that aren't from the Android Market.
You can also share the source code (blocks) of your app with another App Inventor developer. To do this, click My Projects, check the app you want to share (in this case, HelloPurr), and select File→Export Project. The file created on your computer will have a .aia extension. You can email this file to someone, and they can open App Inventor, choose File→Import Project, and select the .aia file. This will give the user their own complete copy of your app, which they can then edit and customize without affecting your version.
The process of sharing apps is easy and more fun-work is available at the community sharing site gallery.appinventor.mit.edu.
Now that you've built a complete app and had the chance to play with it (and maybe download it to share with other people), you might have noticed a couple of things. Take a look at the following items and consider how you'd address them in your app. As you'll likely soon discover, you'll often build an app, find ways to improve and change it, and then go back into it to program those new ideas. Don't worry, that's a good thing-it means you're on your way to becoming a full-fledged app developer!
Here are some of the concepts we've covered in this chapter: