
Facebook has a database of every member's account information, friends list, and posts. Amazon has a database of just about everything you can buy. Google has a database of information about every page in the World Wide Web. Though not to this scale, almost every nontrivial app you can create will have a database component.
In most programming environments, building an app that communicates with a database is an advanced programming technique: you have to set up a server with database software like Oracle or MySQL and then write code that interfaces with that database. In universities, such programming is generally not taught until an upper-level software engineering or database course.
App Inventor does the heavy lifting for you when it comes to databases (and lots of other useful things!). The language provides components that reduce database communication to simple store and get operations. You can create apps that store data directly on the Android device, and with some setup, you can create apps that share data with other devices and people by storing it in a centralized web database.

The data in variables and component properties is short-term: if the user enters some information in a form and then closes the app, that information will be gone when the app is reopened. To store information persistently, you must store it in a database. The information in databases is said to be persistent because even when you close the app and reopen it, the data is still available.
As an example, consider Chapter 4's No Texting While Driving app, which sends an autoresponse to texts that come in when the user is busy. This app lets the user enter a custom message to be sent in response to incoming texts. If the user changes the custom message to "I'm sleeping; stop bugging me" and then closes the app, the message should still be "I'm sleeping; stop bugging me" when the app is reopened. Thus, the custom message must be stored in a database, and every time the app is opened, that message must be retrieved from the database back into the app.
App Inventor provides two components to facilitate database activity: TinyDB and TinyWebDB. TinyDB is used to store persistent data directly on the Android device; this is useful for highly personalized apps where the user won't need to share her data with another device or person, as in No Texting While Driving. TinyWebDB, on the other hand, is used to store data in a web database that can be shared among devices. Being able to access data from a web database is essential for multiuser games and apps where users can enter and share information (like the MakeQuiz app in Chapter 10).
The database components are similar, but TinyDB is a bit simpler, so we'll explore it first. With TinyDB, you don't need to set up a database at all; the data is stored in a database directly on the device and associated with your app.
You transfer data to long-term memory with the TinyDB.StoreValue block, as shown in Figure 22-1, which comes from the No Texting While Driving app.
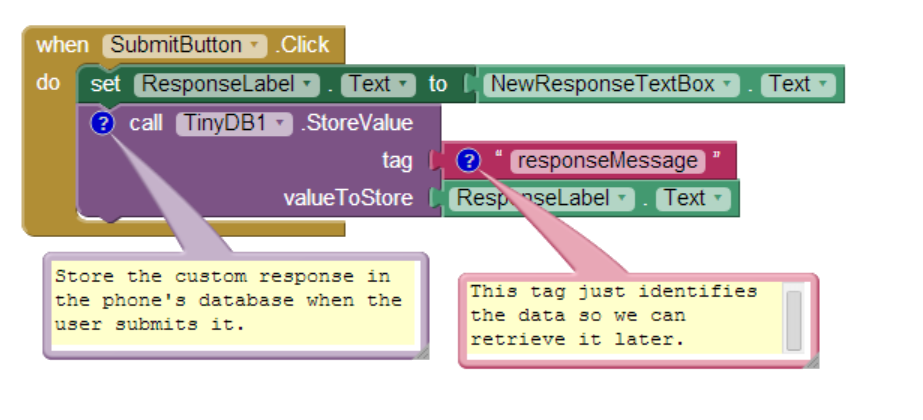
Figure 22-1. The TinyDB.StoreValue block stores data to the device's long-term memory
A tag-value scheme is used for database storage. In Figure 22-1, the data is tagged with the text "responseMessage." The value is some text the user has entered for the new custom response-say, "I'm sleeping; stop bugging me."
The tag gives the data you're storing in the database a name-a way to reference the information-while the value is the data itself. You can think of the tag as a key that you'll use later when you want to retrieve the data from the database.
Likewise, you can think of an App Inventor TinyDB database as a table of tag-value pairs. After the TinyDB1.StoreValue in Figure 22-1 is executed, the device's database will have the value listed in Table 22-1.
Table 22-1. The value stored in the databases Tag Value responseMessage I'm sleeping; stop bugging me

An app might store many tag-value pairs for the various data items you wish to be persistent. The tag is always text, while the value can be either a single piece of information (a text or number) or a list. Each tag has only one value; every time you store to a tag, it overwrites the existing value.
You retrieve data from the database with the TinyDB.GetValue block. When you call GetValue, you request particular data by providing a tag. For the No Texting While Driving app, you can request the custom response using the same tag as we used in the StoreValue, "responseMessage." The call to GetValue returns the data, so you must plug it into a variable.
Often, you'll retrieve data from the database when the app opens. App Inventor provides a special event handler, Screen.Initialize, which is triggered when the app starts up. You need to be careful to consider the case when there is no data yet in the database (e.g., the first time app is launched). When you call GetValue, you specify a "valueIfTagNotThere" parameter. If there is no data, that value will be returned from the call.
The blocks in Figure 22-2, for the Screen.Initialize of No Texting While Driving, are indicative of how many apps will load data on initialization.
The blocks put the data returned from GetValue into the label ResponseLabel. if there is data already in the database, it is placed in ResponseLabel. If there is no data for the given tag, the "valueIfTagNotThere" value-- "I'm driving right now..." is placed in it.

Figure 22-2. A template for loading database data when the app launches
The TinyDB component stores data in a database located directly on the Android device. This is appropriate for personal-use apps that don't need to share data among users. For instance, many people might download the No Texting While Driving app, but there's no need for the various people using the app to share their custom responses with others.
Of course, many apps do share data: think of Facebook, Twitter, and popular multiuser games such as Words with Friends. For such data-sharing apps, the database must live on the Web, not the device. The MakeQuiz/TakeQuiz apps from Chapter 10 provide another example: a person on one phone creates a quiz and stores it in a web database so that a person on another phone can load the quiz and take it.
TinyWebDB is the web counterpart to TinyDB. It allows you to write apps that store data on the Web, using a StoreValue/GetValue protocol similar to that of TinyDB.
By default, the TinyWebDB component stores data using a web database set up by the App Inventor team and accessible at http://appinvtinywebdb.appspot.com. That website contains a database and "serves" (responds to) web requests for storing and retrieving data. The site also provides a human-readable web interface that a database administrator (you) can use to examine the data stored there.
To explore the web database, open a browser to http://appinvtinywebdb.appspot.com and check out some of the tag-value data stored there.
This default database is for development only; it is limited in size and accessible to all App Inventor programmers. Because any App Inventor app can store data there, you have no assurance that another app won't overwrite your data!
If you're just exploring App Inventor or in early the stages of a project, the default web database is fine. But if you're creating an app for real deployment, at some point you'll need to set up your own web database. Since we're just exploring right now, we'll use the default web database. Later in the chapter, you'll learn how to create your own web database and configure TinyWebDB to use it instead.
In this section, we'll build a voting app (depicted in Figure 22-3) to illustrate how TinyWebDB works. The app will have the following features:
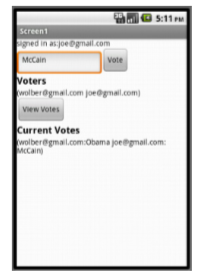
Figure 22-3. A Voting app that stores votes to TinyWebDB
The TinyWebDB.StoreValue block works the same as TinyDB.StoreValue, only the data is stored on the Web. For our voting sample, assume the user can enter a vote in a text box named VoteTextBox and click a button named VoteButton to submit the vote. To store the vote to the web database so others can see it, we'll code the VoteButton.Click event handler like the example in Figure 22-4.
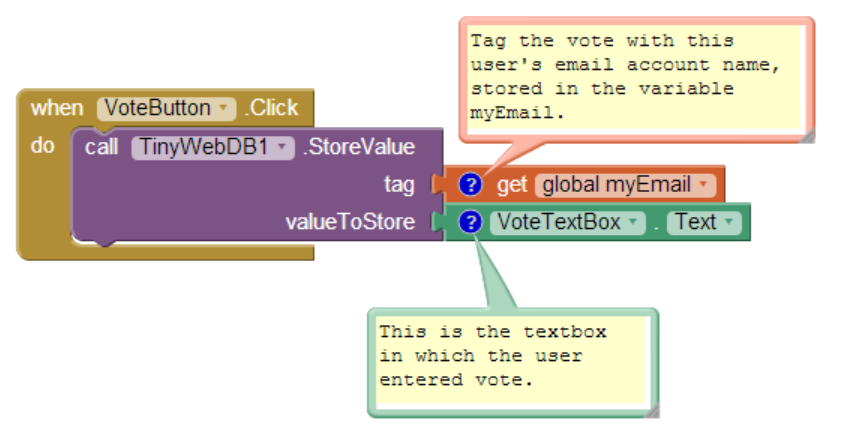
Figure 22-4. Using the VoteButton.Click event handler to store a vote to the database
The tag used to identify the data is the user's email, which has previously been stored in the variable myEmail (we'll see this later). The value is whatever the user entered in VoteTextBox. So, if the user email was wolber@gmail.com and his vote was "Obama," the entry would be stored in the database as shown in Table 22-2.
Table 22-2. The tag and value for the vote are recorded in the database

The TinyWebDB.StoreValue block sends the tag-value pair over the Web to the database server at http://appinvtinywebdb.appspot.com. Because it's the default service, it shows lots of data from various apps, so you may or may not see your app's data in the initial window that appears. If you don't see your data, there is a /getValue link that allows you to search for data with a particular tag.

Test your app. As you program with TinyWebDB, use the web interface of the database server to test that data is being stored as you expect.
Retrieving data with TinyWebDB is more complicated than with TinyDB. With TinyDB, the GetValue operation immediately returns a value because your app is communicating with a database directly on the Android device. With TinyWebDB, the app is requesting data over the Web, so Android requires a two-step scheme for handling it.
With TinyWebDB, you request the data with GetValue and then process it later in a TinyWebDB.GotValue event handler. TinyWebDB.GetValue should really be called "RequestValue" because it just makes the request to the web database and doesn't actually "get" a value from it right away. To see this more clearly, check out the difference between the TinyDB.GetValue block (Figure 22-5) and the TinyWebDB.GetValue block (Figure 22-6).
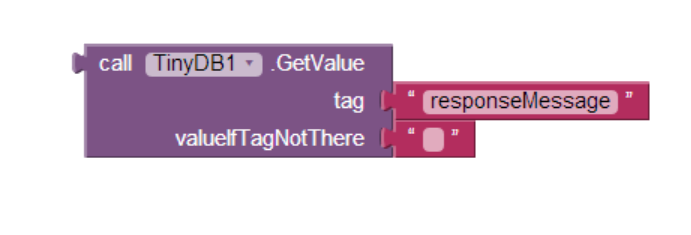
Figure 22-5. The TinyDB.GetValue block
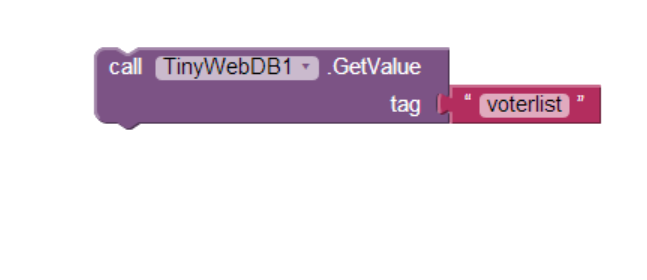
Figure 22-6. The TinyWebDB.GetValue block
The TinyDB.GetValue block returns a value right away, and thus a plug appears on its left side so that the returned value can be placed into a variable or property. The TinyWebDB.GetValue block does not return a value immediately, so there is no plug on its left side.
Instead, when the web database fulfills the request and the data arrives back at the device, a TinyWebDB.GotValue event is triggered. So you'll call TinyWebDB.GetValue in one place of your app, and then you'll program the TinyWebDB.GotValue event handler to specify how to handle the data when it actually arrives. An event handler like TinyWebDB.GotValue is sometimes called a callback procedure, because some external entity (the web database) is in effect calling your app back after processing your request. It's like ordering at a busy coffee shop: you place your order and then wait for the barista to call your name to actually go pick up your drink. In the meantime, she's been taking orders from everyone else in line too (and those people are all waiting for their names to be called as well).
For our sample app, we need to store and retrieve a list of the voters who have the app, as the ultimate goal is to show the votes of all users.
The simplest scheme for retrieving list data is to request the data when the app launches, in the Screen.Initialize event, as shown in Figure 22-7. (In this example, we'll just call the database with the tag for "voterlist.")

Figure 22-7. Requesting data in the Screen1.Initialize event
When the list of voters arrives from the web database, the TinyWebDB1.GotValue event handler will be triggered. Figure 22-8 shows some blocks for processing the returned list.
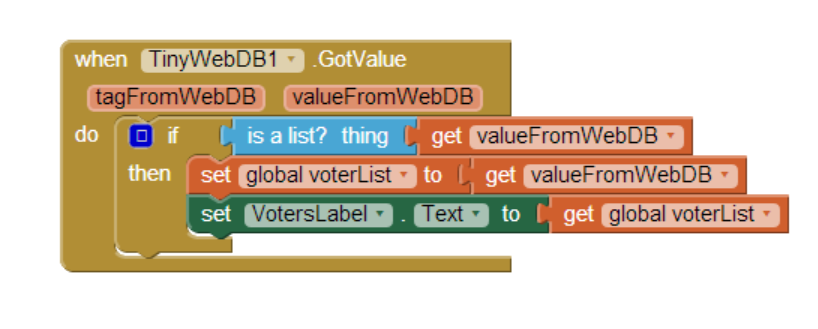
Figure 22-8. Using the GotValue event handler to process the returned list
The valueFromWebDB argument of GotValue holds the data returned from the database request. Event arguments like valueFromWebDB have meaning only within the event handler that invokes them (they are considered local to the event handler), so you can't reference them in other event handlers.
It may seem a bit counterintuitive, but once you get used to the idea of arguments holding local data, you're probably already thinking about something that can handle data more globally (anywhere in an app): variables. Given that, it makes sense that GotValue's key job is to transfer the data returned in valueFromWebDB into a variable. In this case, the data is transferred into the variable voterList, which you'll use in another event handler.
The if block in the event handler is also often used in conjunction with GotValue, the reason being that the database returns an empty text ("") in valueFromWebDB if there is no data for the requested tag-most commonly, when it's the first time the app has been used. By asking if the valueFromWebDB is a list, you're making sure there is some data actually returned. If the valueFromWebDB is the empty text (the if test is false), you don't put it into voterList.
Note that get data, check data, set data (into a variable) is the same pattern you used in the preceding TinyDB example, but here you are expecting a list, so you use a slightly different test.
The blocks in Figure 22-8 are a good model for retrieving data in a fairly simplistic app. In our voting example, however, we need more complicated logic. Specifically:
Figure 22-9 shows the blocks for this more complicated scheme for requesting the database data.
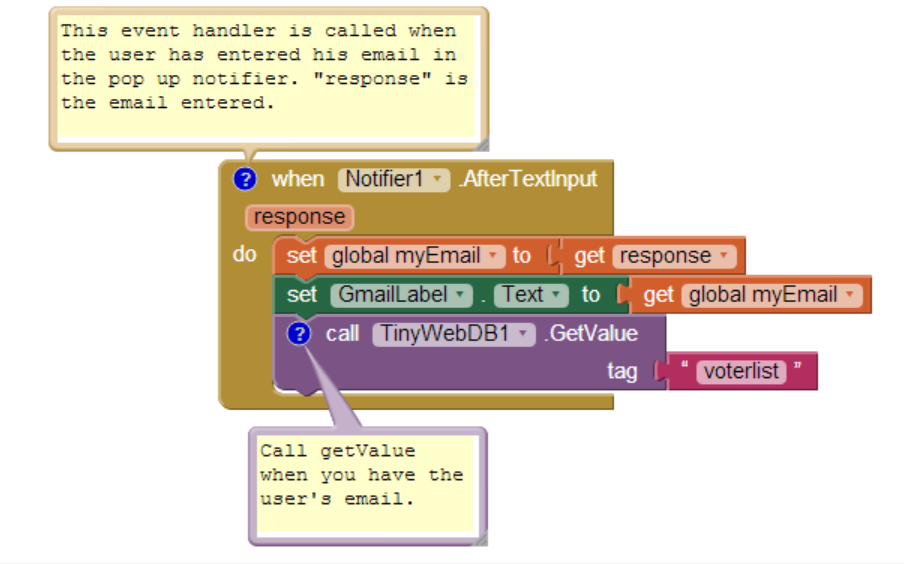
Figure 22-9. In this more complex scheme, GetValue is called after getting the user's email
On startup (Screen1.Initialize), a Notifier component prompts the user to enter his email. When the user enters it (Notifier.AfterTextInput), his entry is put into a variable and label, and then GetValue is called to get the list of voters. Note that GetValue isn't called directly in Screen.Initialize because we need the user's email to be set first.
So, with these blocks, when the app initializes, it prompts the user for his email and then calls GetValue with a tag of "voterlist." When the list arrives from the Web, GotValue will be triggered. Here's what we want to happen:
Figure 22-10 shows the blocks for this behavior.
The blocks first ask if a nonempty voter list came back from the database by calling is a list?. If so, the data is put into the variable voterList. Remember, voterList will have emails for everyone who has used this app. But we don't know if this particular user is in the list yet, so we have to check. If the user is not yet in the list, he is added with add item to list, and the updated list is stored to the web database.
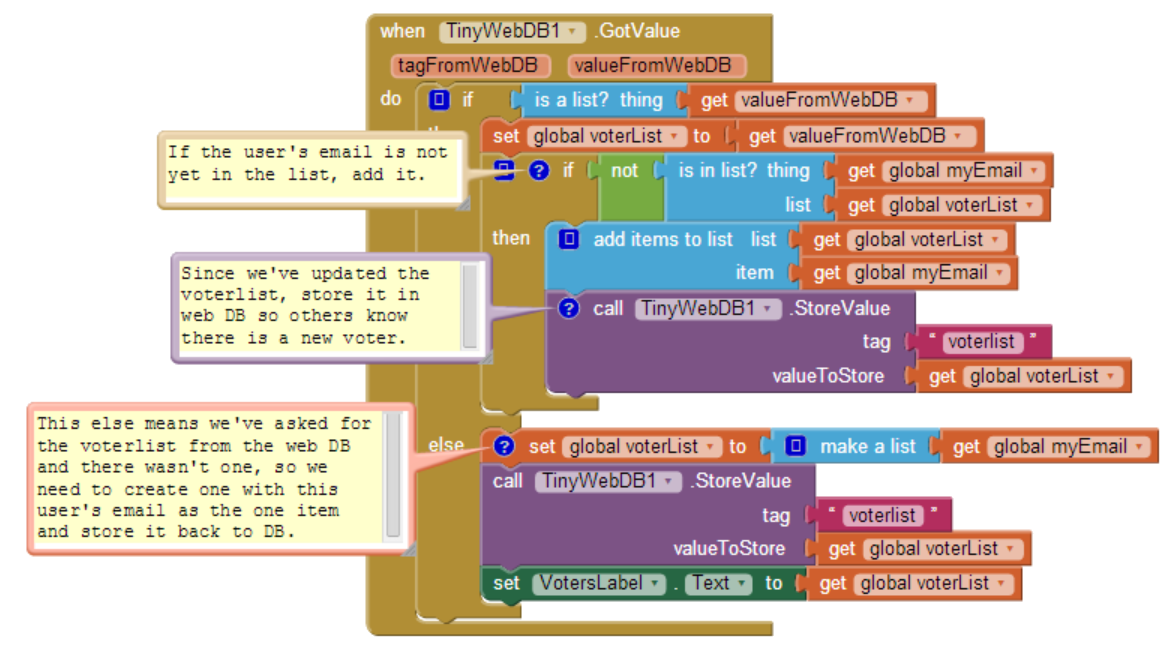
Figure 22-10. Using the GotValue blocks to process the data returned from the database and perform different actions based on what is returned
The "else-do" part of the ifelse block is invoked if a list wasn't returned from the web database; this happens if nobody has used the app yet. In this case, a new voterList is created with the current user's email as the first item. This one-item voter list is then stored to the web database (with the hope that others will join as well!).
The voting app thus far manages a list of an app's users. Each person can see the emails of all the other users, but we haven't yet created blocks for retrieving and displaying each user's vote.
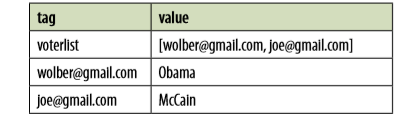
Recall that the VoteButton allowed the user to submit a vote with a tag-value pair of the form "email: vote." If two people had used the app and voted, the pertinent database entries would look something like Table 22-3.
Table 22-3. The tag-value pairs stored in the database
When the user clicks on the ViewVotes button, the app should retrieve all votes from the database and display them. Supposing the voter list has already been retrieved into the variable voterList, we can use a foreach to request the vote of each person in the list, as shown in Figure 22-11.
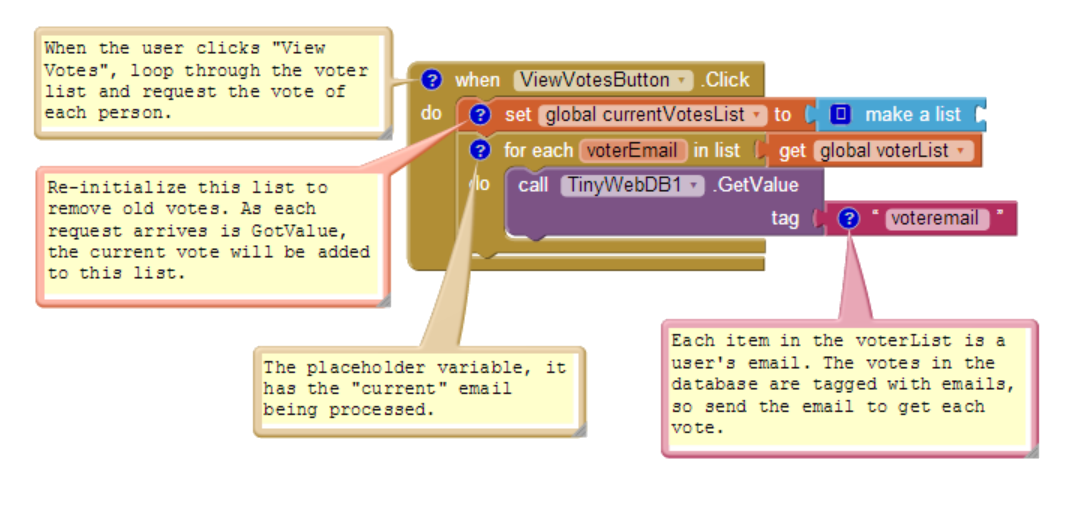
Figure 22-11. Using a foreach block to request the vote of each person in the list
Here we initialize a variable, currentVotesList, to an empty list, as our goal is to add the up-to-date votes from the database into this list. We then use foreach to call TinyWebDB1.GetValue for every email in the list, sending the email (voterEmail) as the tag in the request. Note that the votes won't actually be added to currentVotesList until they arrive via a series of GotValue events.
Now that we want to display the votes in our app, things get a bit more complicated yet again. With the requests from ViewVotesButton, TinyWebDB.GotValue will now be returning data related to all the email tags, as well as the "voterlist" tag used to retrieve the list of user emails. When your app requests more than one item from the database with different tags, you need to code TinyWebDB.GotValue to handle all possible requests. (You might think that you could try to code multiple GotValue event handlers, one for each database request-can you figure out why this won't work?)
To handle this complexity, the GotValue event handler has a tagFromWebDB argument that tells you which request has just arrived. In this case, if the tag is "voterlist," we should continue to process the request as we did previously. If the tag is something else, we can assume it's the email of someone in the user list, stemming from the requests triggered in the ViewVotesButton.Click event handler. When those requests come in, we want to add the data-the voter and vote-to the currentVotesList so we can display it to the user.
Figure 22-12 shows the entire TinyWebDB.GotValue event handler.
As we mentioned earlier in the chapter, the default web database at http://appinvtiny webdb.appspot.com is intended for prototyping and testing purposes only. Before you deploy an app with real users, you need to create a database specifically for your app.
You can create a web database using the instructions at http://appinventorapi.com/ program-an-api-python/. This site was set up by one of the authors (Wolber) and contains sample code and instructions for setting up App Inventor web databases and APIs. The instructions point you to some code that you can download and use with only a minor modification to a configuration file. The code you'll download is the same as that used for the default web database set up by App Inventor. It runs on Google's App Engine, a cloud computing service that will host your web database on Google's servers for free. By following the instructions, you can have your own private web database (that is compliant with App Inventor's protocols) up and running within minutes and begin creating web-enabled mobile apps that use it.
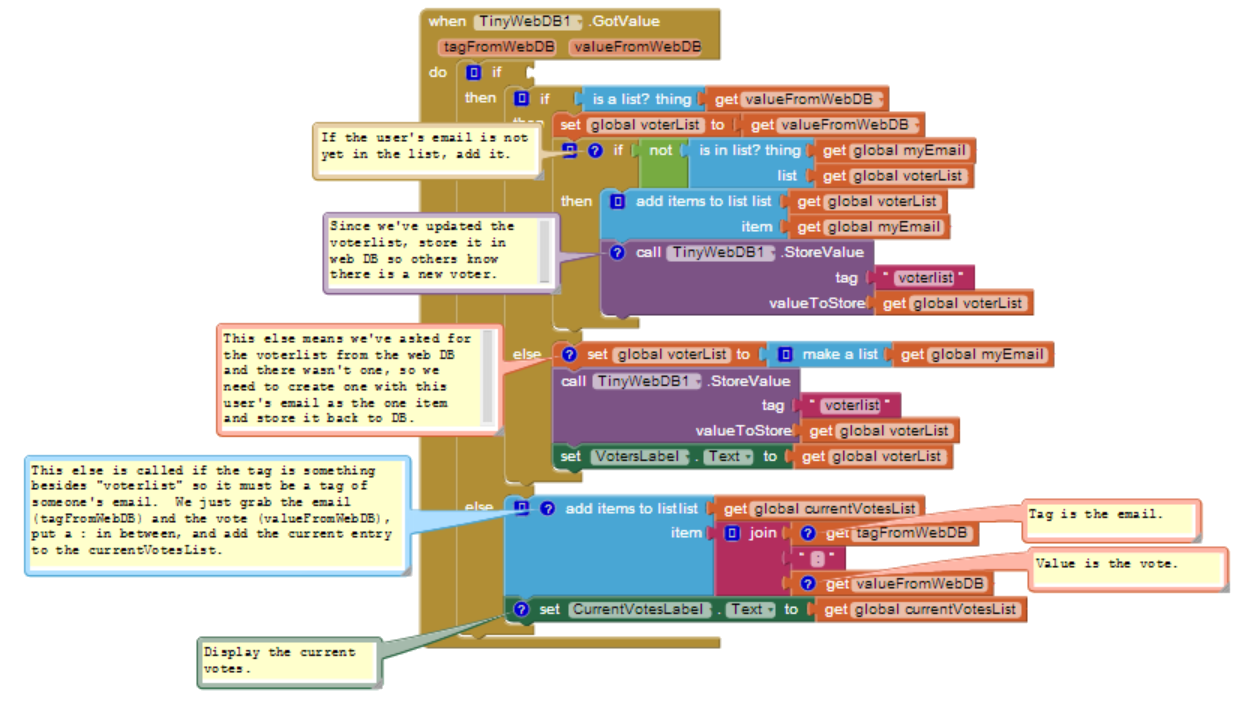
Figure 22-12. The TinyWebDB.GotValue event handler
Once you create and deploy your own custom web database (at which point, you'll know the URL for it), you can create apps that use it. For an app to use your custom database, you'll need to change a property in the TinyWebDB component, ServiceURL, so the component knows to store and retrieve data from your new custom database. Figure 22-13 illustrates how to do this.
Figure 22-13. Changing the ServiceURL property to the URL of your custom database
In this example, the ServiceURL is set to http://usfweb service.appspot.com, a web database that one of the authors set up for his students' apps (the end of "appspot.com" is cut off in the text box in Figure 22-13). Once the ServiceURL is set, all TinyWebDB.StoreValue and TinyWebDB.GetValue calls will be sent to the specified URL.
App Inventor makes it easy to store data persistently through its TinyDB and TinyWebDB components. Data is always stored as a tag-value pair, with the tag identifying the data for later retrieval. Use TinyDB when it is appropriate to store data directly on the device. When data needs to be shared across phones (e.g., for a multiplayer game or a voting app), you'll need to use TinyWebDB instead. TinyWebDB is more complicated because you need to set up a callback procedure (the GotValue event handler), as well as a web database service.
Once you get the hang of working with databases-especially the key get data, check data, set data pattern-you'll be building more complex apps in no time!