In the PaintPot app, you can draw lines and circles on a picture you take with the camera.
This lesson describes the App Inventor Java Bridge version of this app, comparing it to its App Inventor blocks equivalent to illustrate.
Download the codeCreate the User Interface
In App Inventor, you build the user interface shown above by dragging component instances into the Designer view. In Java, you first import the component classes you need, then declare each component instance within the Screen1 class, then create the instances in the $define function (If you're not sure how to do this, see these instructions).
PaintPot is different than RedClick or MoleMash in that it uses a variable, dotSize, to keep track of whether the user has chosen to draw small or big circles. In PaintPot, this variable is declared as an instance variable within the class "Screen1", just as the component instances are declared:
			public class Screen1 extends Form implements HandlesEventDispatching
{
	private float dotSize;
	private Canvas canvas1;
	private HorizontalArrangement horizontalArrangement1;
	// ...
The instance creations in $define are similar to those in MoleMash. However, a couple of new types of statements are added:
			protected void $define()
{
	this.Title("Paint Pot");
	this.Icon("kitty.png");
	dotSize = 2;
	canvas1 = new Canvas( this );
	canvas1.Height( 300 );
	canvas1.Width(LENGTH_FILL_PARENT);
The first two lines set properties of "Screen1". "this", in Java, refers to the object for the enclosing class, "Screen1". The "Title" property sets the text at the top of the screen, while the "Icon" property sets the image that will appear in the apps area when this app is installed. Note that "kitty.png", or whatever file you set as the Icon, must be in your "assets" sub-folder.
Define PaintPot's Event-Response Behavior
The PaintPot app need numerous event handlers. It needs event handlers for all the button clicks, including for each of the color ("Red", "Green", and "Blue") buttons, as well as the "Big" and "Small" buttons and the "Take Picture" button. It also needs event handlers for when the canvas is touched to draw a dot, and when it is dragged on to draw a line.
Program the Canvas.Touched Event
Within the dispatchEvent function, you will "catch" the Touched event and call a function, "canvas1Touched" to respond to it.
				public boolean dispatchEvent( Component component, String componentName, String eventName, Object[] params )
{
	//...
	if( component.equals(canvas1) && eventName.equals("Touched") )
	{
		canvas1Touched((Float) params[0], (Float) params[1], (Boolean) params[2]);
		return true;
	}
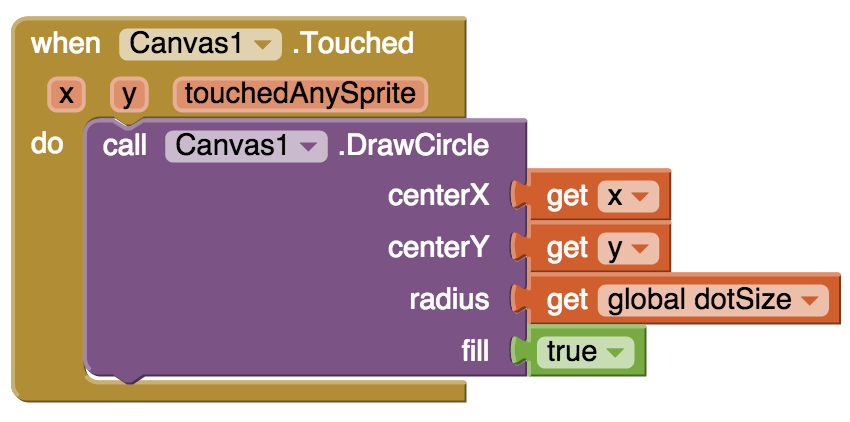
If you are working through these Java Bridge lessons in sequence, you haven't seen an event handler with parameters yet. As shown in the App Inventor blocks, the "Touched" event has parameters for the location of the touch ("x" and "y") as well as "touchedAnySprite" which specifies if a sprite has been touched within the canvas.
The parameters for an event are provided in a parameter of the dispatchEvent function named "params" (say that five times real fasat!"). "params" is a Java array. The 0th item (params[0]) gives you the 1st parameter, the 1st item gives you the second, and so on. For the "Touched" event, params[0] is the x value, params[1] is the y value, and params[2] is the touchedAnySprite value (the order they appear in the blocks.
You could respond to the Touched event directly in the code above. Instead, the code calls a separate function, canvas1Touched, and sends the parameters as specified. Of course you must provide the canvas1Touched function and place it within the Screen1 class:
		public void canvas1Touched( Float x, Float y, Boolean touchedSprite )
{
	canvas1.DrawCircle( x.intValue(),y.intValue(), dotSize,true );
}
Note that for some reason the event parameters "x" and "y" for the Touched event are of type Float, while DrawCircle expects integers. Thus, the intValue() function is used to to convert.
Program the Canvas.Dragged Event
Within the dispatchEvent function, you will "catch" the Dragged event and call a function, "canvas1Dragged" to respond to it.
	public boolean dispatchEvent( Component component, String componentName, String eventName, Object[] params )
{
	// ...
	if( component.equals(canvas1) && eventName.equals("Dragged") )
	{
			canvas1Dragged((Float) params[0], (Float) params[1], (Float) params[2], (Float) params[3], (Float) params[4], (Float) params[5], (Boolean) params[6]);
			return true;
	}
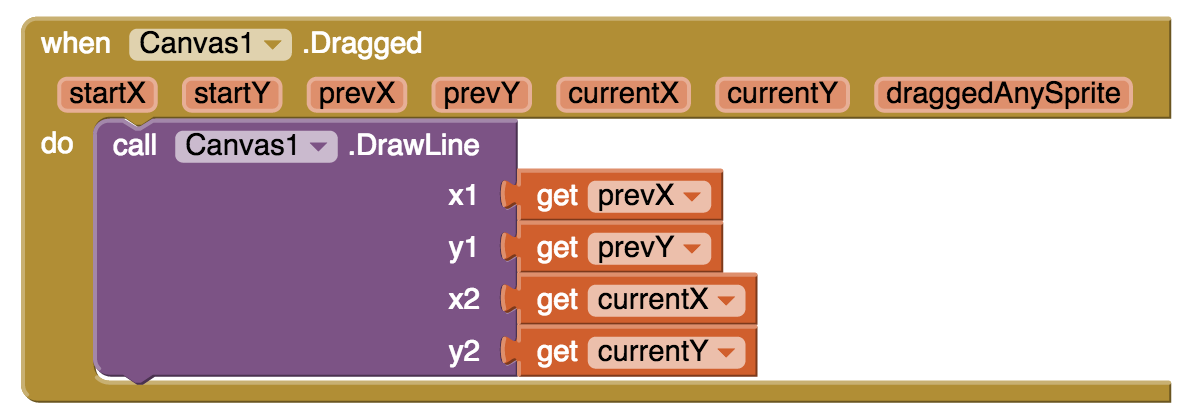
As shown in the App Inventor blocks, the "Dragged" event has parameters for the location where the drag started, where the previous drag point was, and the current drag point (each slight movement triggers a separate event). There is also a "draggedAnySprite" parameter which specifies if the drag is on a sprite within the canvas.
You could respond to the Dragged event directly in the code above. Instead, the code calls a separate function, canvas1Dragged, and sends the parameters as specified. Of course you must provide the canvas1Dragged function and place it within the Screen1 class:
public void canvas1Dragged( Float startX, Float startY, Float prevX, Float prevY, Float currentX, Float currentY, Boolean draggedSprite )
{
	canvas1.DrawLine( prevX.intValue(), prevY.intValue(), currentX.intValue(), currentY.intValue() );
}
Note that for some reason the event parameters "x" and "y" for the Touched event are of type Float, while DrawCircle expects integers. Thus, the intValue() function is used to to convert.
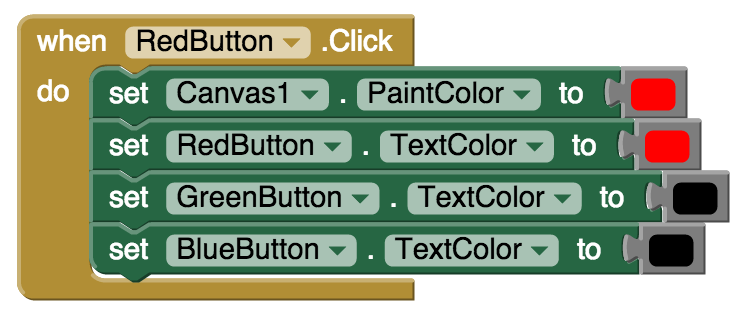
Program the Color Buttons
Within the dispatchEvent function, you will "catch" the button click event:
public boolean dispatchEvent( Component component, String componentName, String eventName, Object[] params )
{
	//...
	if( component.equals(redButton) && eventName.equals("Click") )
	{
			redButtonClick();
			return true;
	}
In this example, instead of placing the response code directly within the dispatchEvent function, a call is made to "redButtonClick". Of course you need to write that code as well and place it within the Screen1 class:
			public void redButtonClick()
{

	canvas1.PaintColor(COLOR_RED);
	redButton.TextColor(COLOR_RED);
	greenButton.TextColor(COLOR_BLACK );
	blueButton.TextColor( COLOR_BLACK );
}
The code for greenButtonClick and blueButtonClick are very similar.
Program the Big and Small Buttons

When the bigButton is clicked, you just want to change the variable dotSize so that the next time the Canvas is touched it will draw a bigger circle. Here is the code:
	public void bigButtonClick()
{
	dotSize = 8;
}
Program the Events for Taking a Picture

When the TakePictureButton is clicked, you start up the Camera. When the picture is taken, the AfterPicture event is triggered. Here is the code to catch the two events:
		public boolean dispatchEvent( Component component, String componentName, String eventName, Object[] params )
{
	if( component.equals(takePictureButton) && eventName.equals("Click") )
	{
		takePictureButtonClick();
		return true;
	}
	if( component.equals(camera1) && eventName.equals("AfterPicture") )
	{
		camera1AfterPicture((String) params[0]);
		return true;
	}
Here is the response code functions:
			public void takePictureButtonClick()
{
	camera1.TakePicture();
}
public void camera1AfterPicture( String image )
{
	canvas1.BackgroundImage( image );
}