Setup a web portfolio
If you haven't setup a web page for your portfolio, do so now. Google Sites (sites.google.com) is one of the simplest methods, instructions for this setup are located here.
Give your app a descriptive name, title, and icon.
Give your app a descriptive name (e.g., not "Project 2"). The name of an App Inventor app is the project name-- this name appears on the phone when it is installed. You can change this name by doing a SaveAs of your project.
Give your app a descriptive screen title (this can be same as project name). The screen title is a property of the Screen component. It appears at the top of screen when your app runs.
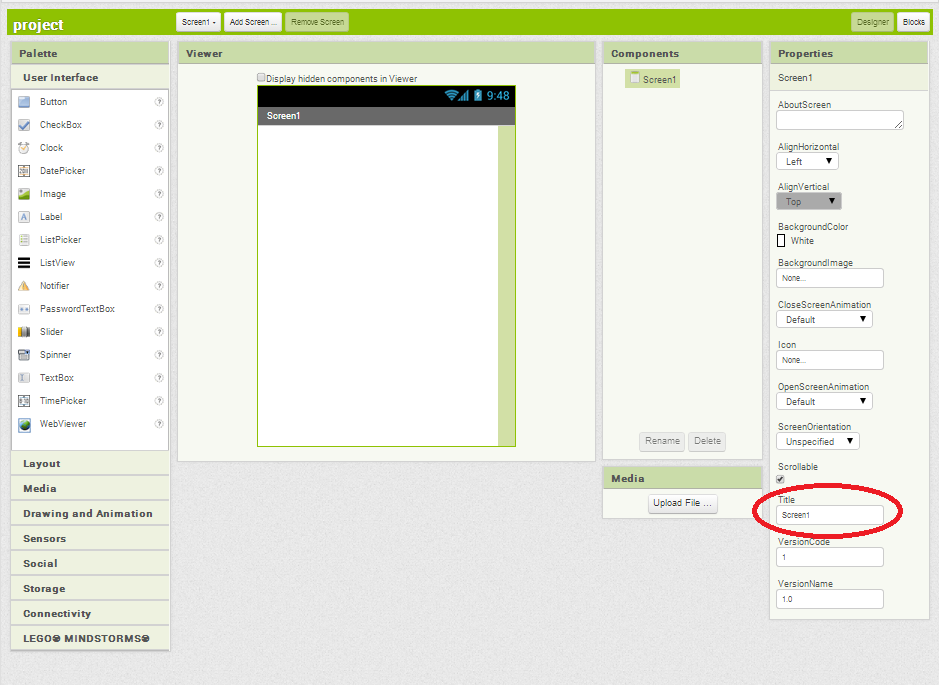
You can change the Title here.
Give your app an icon. The icon is the little square image that appears on the device once an app is installed. The icon is a property of the Screen component and you can set it to any image file.
You can change the app's icon here.
Download your app APK and source code
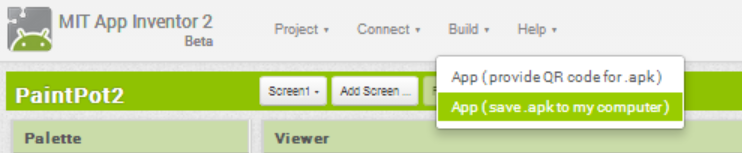
Download the APK file of your app to your computer. An APK file has a .apk extension and is the executable app that runs on the device. You generate an app's APK file in App Inventor by selecting "Build | App (save.apk to my computer)".
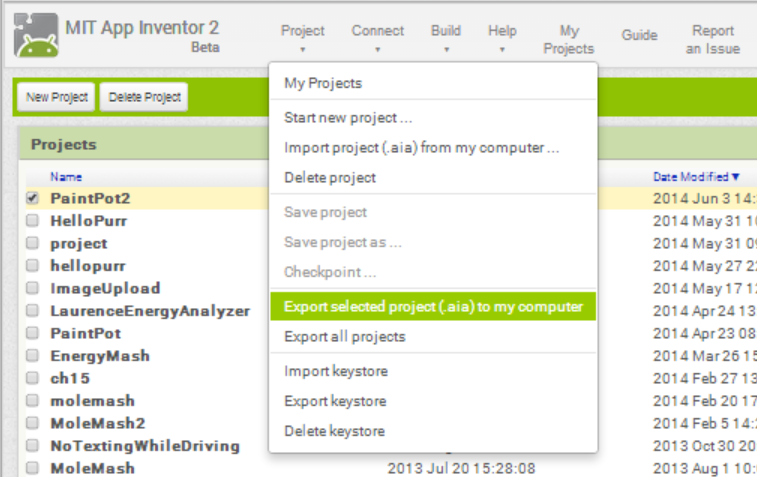
Download source code to computer. The source code (blocks) allow you or others to edit/customize the app. You generate source code for an app in App Inventor from the Project page. Check your project, then choose Project and Export selected project (.aia) to my computer from the dropdown menu.
Create the portfolio page for your app.
- Create a project page on your portfolio. Use Google Sites to create a new page in your portfolio with your app name as the Title.
- Get the app and source code onto the web. Attach the app (.apk file) and the source (.aia) file you just downloaded to the bottom of your new portfolio (Google Sites) page. This will get the apk and source files onto the web.
- Here's a sample of an app page for the "No Texting While Driving" app
Create a QR code for the app
- Create a scannable QR Code for the app. First, grab a link (URL) to the apk file you just put on the web (right or control-click on the download icon (arrow) of your attachment and copy the link-- Copy Link Location). Then go to http://www.the-qrcode-generator.com/, paste that URL, select Static below the textbox, and click Generate. Once you have created the code take a screenshot to keep the image.
- Add the QR Code to portfolio page. In Google Sites, choose Insert | Image and choose the image file you just created of the QR code. This will add the QR code to your page.
- Having trouble generating a QR code for your app? See this screencast. And be sure to test it by scanning it onto a phone and checking that your app installs.
Add some information about your app.
- Add a title, description, developer name(s), pictures, and source link to project page.
- Back on the portfolio project page add a link "Download Source" that is a link to the attached source code file.
Add Screenshots of your app and blocks
- Take screenshot(s) of your app and add them on the project page. You can get a screenshot by running the app in the emulator and then taking a screenshot.
- Add screenshot(s) of your blocks. Show the blocks for your app.
Submit your app to the MIT App Inventor Gallery
- Publish to the gallery if your app is creative in terms of what it does or the blocks it uses.
- App Inventor now has an integrated gallery. On your My Projects page, choose the checkbox for your app then click the Publish button. You can provide a description and a screenshot or other image on the Publish App page.