MakeQuiz and TakeQuiz
The Presidents Quiz app in Chapter 8 can be customized to build any quiz, but the customization
is restricted to App Inventor programmers. Only you, as the programmer, can modify the questions
and answers; there is no way for parents, teachers, or other app users to create their own quizzes
or change the quiz questions (unless they too want to learn how to use App Inventor!).
In this chapter, you’ll build a MakeQuiz app that lets a “teacher” create quizzes using an
input form. The quiz questions and answers will be stored in a web database so that “students”
can access a separate TakeQuiz app and take the test. While building these two apps, you’ll make yet another
significant conceptual leap and learn how to create apps with user-generated data that is shared across apps
and among users.
MakeQuiz and TakeQuiz are two apps that work in tandem and allow a “teacher” to create
quizzes for a “student.” Parents can create fun trivia apps for their children during a long
road trip, grade-school teachers can build “Math Blaster” quizzes, and college students can build
quizzes to help their study groups prepare for a final. This chapter builds on the Presidents
Quiz in Chapter 8, so if you haven’t completed that app, you should do so before continuing here.
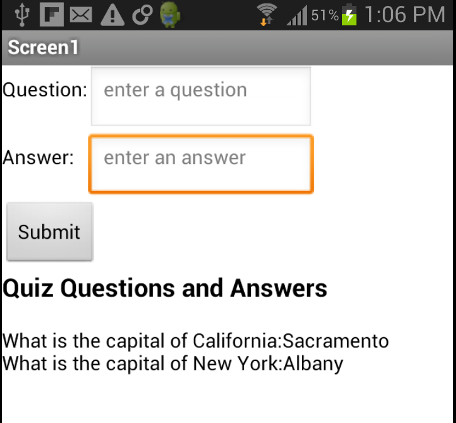
You’ll design two apps, MakeQuiz for the “teacher” (see Figure 10-1) and TakeQuiz for the “student.”
With MakeQuiz:
- The user enters questions and answers in an input form.
- The entered question-answer pairs are displayed.
- The quiz questions and answers are stored in a database.
TakeQuiz will work similarly to the Presidents Quiz app you’ve already built. In fact, you’ll create
it using that app as a starting point. TakeQuiz will differ in that the questions asked will be
those that were entered into the database using MakeQuiz.
What You'll Learn
The Presidents Quiz was an example of an app with static data: no matter how many times you take the
quiz, the questions are always the same because they are written as part of the app (also known as
hardcoded). News apps, blogs, and social networking apps like Facebook and Twitter work with dynamic
data, meaning it can change over time. Often, this dynamic information is user-generated—the app allows
users to enter, modify, and share information. With MakeQuiz and TakeQuiz, you’ll learn how to build an app
that handles user-generated data.
If you completed the Xylophone app (Chapter 9), you’ve already been introduced to dynamic lists; in that
app, the musical notes the user plays are recorded in lists. Apps with such user-generated data are more complex,
and the blocks are more abstract because they don’t rely on predefined, static data. You define list variables,
but you define them without specific items. As you program your app, you need to envision the lists being
populated with data entered by the end user.
This tutorial covers the following App Inventor concepts:
- Input forms for allowing the user to enter information.
- Displaying items from multiple lists.
- Persistent data—MakeQuiz will save the quiz questions and answers in a web database, and
TakeQuiz will load them in from the same database.
-
- Data sharing—you’ll store the data in a web database using the TinyWebDB component
(instead of the TinyDB component used in previous chapters).
Getting Started
Connect to the App Inventor website and start a new project. Name it “MakeQuiz” and set the
screen’s title to “Make Quiz”. Open the Blocks Editor and connect to your phone.
Designing the Components
Use the Component Designer to create the interface for MakeQuiz. When you finish, it should look
something like Figure 10-2 (there are also more detailed instructions after the snapshot).
You can build the user interface shown in Figure 10-2 by dragging out the components listed in
Table 10-1. Drag each component from the Palette into the Viewer and name it as specified in the
table. Note that you can leave the header label names (Label1 – Label4) as their defaults
(you won’t use them in the Blocks Editor anyway).
Table 10-1. All the components for the MakeQuiz app
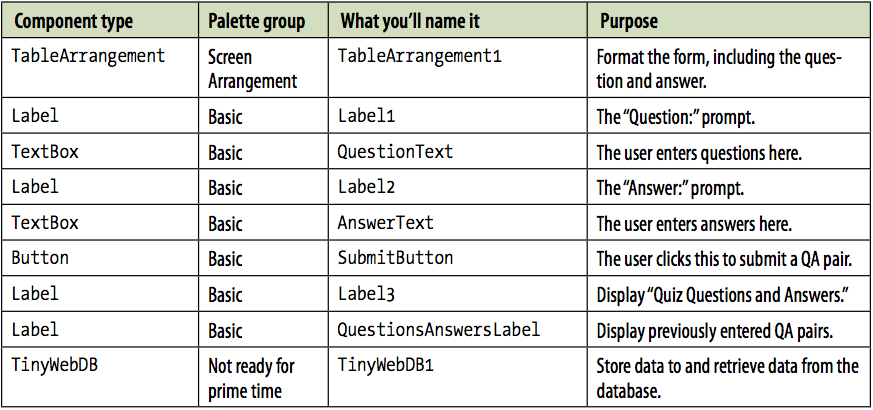
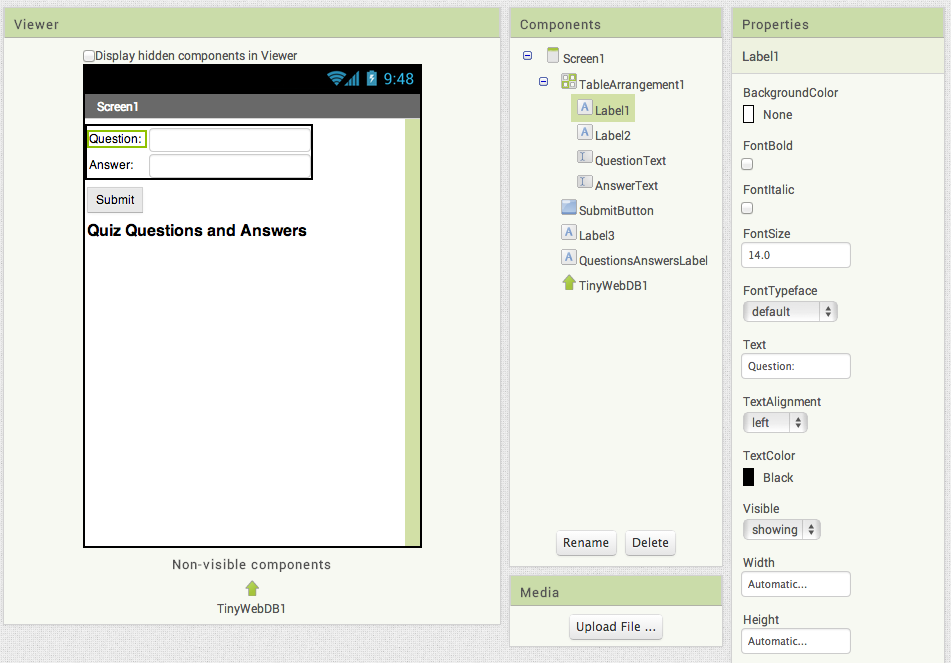
Figure 10-2. MakeQuiz in the Component Designer
Set the properties of the components in the following way:
- Set the Text of Label1 to “Question”, the Text of Label2 to “Answer”, and the text of Label3 to
“Quiz Questions and Answers”.
- Set the FontSize of Label3 to 18 and check the FontBold box.
- Set the Hint of QuestionText to “Enter a question” and the Hint of AnswerText
to “Enter an answer”.
- Set the Text of SubmitButton to “Submit”.
- Set the Text of QuestionsAnswersLabel to “Questions and Answers”.
- Move the QuestionText, AnswerText, and their associated labels into TableArrangement1.
Adding Behaviors to the Components
As with the Presidents Quiz app, you’ll first define some global variables for the QuestionList and
AnswerList, but this time you won’t provide fixed questions and answers.
The blocks should look as shown in Figure 10-3.

Figure 10-3. The lists for MakeQuiz
Note that, unlike the Presidents Quiz app, the lists are defined without items in the slots.
This is because with MakeQuiz and TakeQuiz, all data will be created by the app user (it is
dynamic, user-generated data).
Recording the User’s Entries
The first behavior you’ll build is for handling the user’s input. Specifically, when the user
enters a question and answer and clicks Submit, you’ll use add item to list blocks to update
the QuestionList and AnswerList. The blocks should appear as:
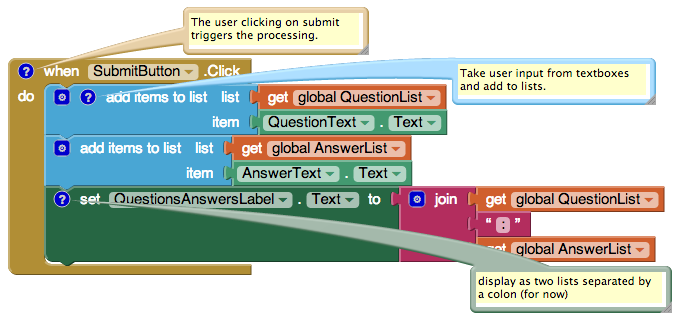
Figure 10-4. Adding the new entries to the lists.
How the Blocks Work
The add items to list block appends, or adds, each item to the end of a list. As shown in Figure 10-4,
the app takes the text the user has entered in the QuestionText and AnswerText text boxes and appends
each to the corresponding list.
The add items to list blocks update the QuestionList and AnswerList variables,
but these changes are not yet shown to the user. The third row of blocks displays these lists by
concatenating them (make text) with a colon in between. By default, App Inventor displays lists
with surrounding parentheses and spaces between items like this: (item1 item2 item3). Of course,
this is not the ideal way to display the lists, but it will allow you to test the app’s behavior
for now. Later, you’ll create a more sophisticated method of displaying the lists that shows each
question-answer pair on a separate line.
Blanking Out the Question and Answer
As you’ll recall from the Presidents Quiz app, when you moved on to the next question in the list,
you needed to blank out the answer results from the previous question. In this app, when a user
submits a question-answer pair, you’ll want to clear the QuestionText and AnswerText text boxes
so they’re ready for a new entry instead of showing the previous one. The blocks should appear as:
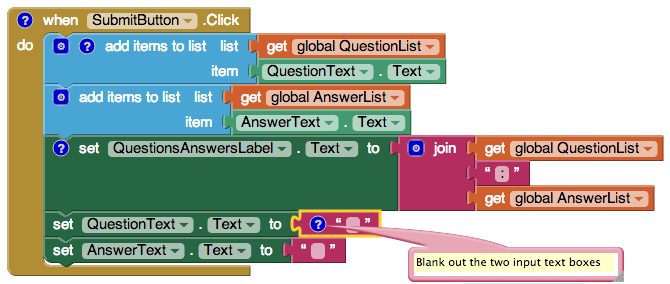
Figure 10-5. Blanking out the question and answer text boxes after submission.
How the Blocks Work
When the user submits a new question and answer, they are added to their respective lists
and displayed. At that point, the text in the QuestionText and AnswerText is blanked out
with empty text blocks, as shown in Figure 10-5. Note that you can create an empty text
block by clicking on the text within the block and pressing Delete.
Displaying Question-Answer Pairs on Multiple Lines
In the app you’ve built so far, the question and answer lists are displayed separately and
with the default list display format for App Inventor. So, if you were making a quiz on
state capitals and had entered two pairs of questions and answers, it might appear like so:
(What is the capital of California? What is the capital of New York? Sacramento Albany)
As you can imagine, if someone is creating a fairly long quiz, that could get pretty messy.
A better display would show each question with its corresponding answer, with one question-answer
pair per line like this:
What is the capital of California?: Sacramento
What is the capital of New York?: Albany
The technique for displaying a single list with each item on a separate line is described in
Chapter 20—you may want to read that chapter before going on.
The task here is a bit more complicated,
as you’re dealing with two lists. Because of its complexity, you’ll put the blocks for it in
a procedure named displayQAs, and call that procedure from the SubmitButton.Click event handler.
To display question-answer pairs on separate lines, you’ll need to do the following:
- Use a foreach block to iterate through each question in the QuestionList.
- Use a variable answerIndex so that you can grab each answer as you iterate through the questions.
- Use make text to build a text object with each question and answer pair,
and a newline character (\n) separating each pair.
The blocks should appear as:
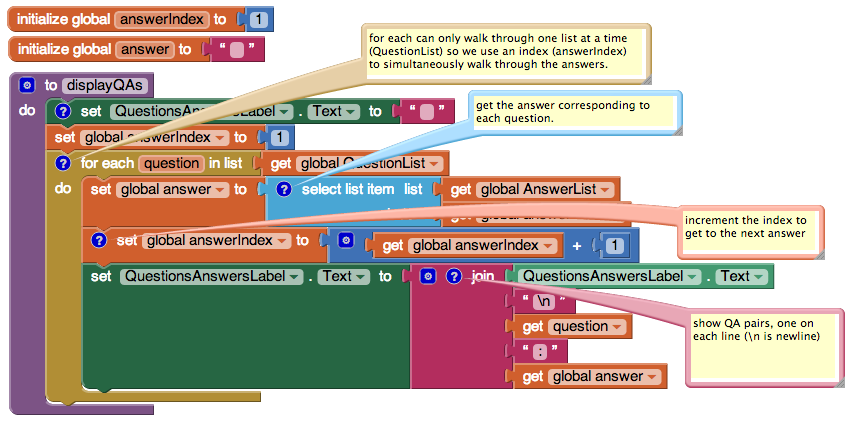
Figure 10-6. The displayQAs procedure
How the blocks work
The displayQAs block encapsulates all of the blocks for displaying the data, as shown in
Figure 10-6.
By using a procedure, we won’t have to have the display blocks more than once in
the app, and we can just call displayQAs when we need to display the lists.
The foreach only allows you to iterate through one list. In this case, there are two
lists, and you need to select each answer as you proceed through the questions. To
accomplish this, we’ll use an index variable, as we did with the currentQuestionIndex in
the Presidents Quiz tutorial in Chapter 8. In this case, the index variable, answerIndex,
is used to track the position in the AnswerList as the foreach goes through the QuestionList.
answerIndex is set to 1 before the foreach begins. Within the foreach, answerIndex
selects the current answer from the AnswerList, and then it is incremented.
On each iteration of the foreach, the current question and answer are concatenated to the
end of the QuestionsAnswersLabel.Text property, with a colon between them.
Calling the new procedure
You now have a procedure for displaying the question-answer pairs, but it won’t help unless you
call it when you need it. Modify the SubmitButton.Click event handler by calling displayQAs
instead of displaying the lists with the simple set QuestionsAnswersLabel.Text to block. The
updated blocks should appear as shown in Figure 10-7.
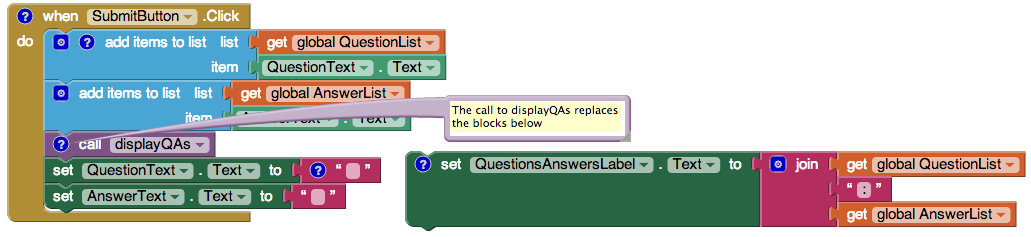
Figure 10-7. Calling the displayQAs procedure from SubmitButton.Click
So far, you’ve created an app that puts the entered questions and answers into a
list. But what happens if the quiz maker closes the app? If you’ve completed the
“No Texting While Driving” app (Chapter 4) or the “Android, Where’s My Car?” app (Chapter 7),
you know that if you don’t store the data in a database, it won’t be there when the user closes
and reopens the app. Storing the data persistently will allow the quiz maker to view or edit the latest
update of the quiz each time the app is opened. Persistent storage is also necessary because the TakeQuiz
app needs access to the data as well.
You’re already familiar with using the TinyDB component to store and retrieve data in a database.
But in this case, you’ll use the TinyWebDB component instead. Whereas TinyDB stores information directly
on a phone, TinyWebDB stores data in databases that live on the Web.
What about your app design would merit using an online database instead of one stored on a person’s
phone? The key issue here is that you’re building two apps that both need access to the same data—if the
quiz maker stores the questions and answers on her phone, the quiz takers won’t have any way of
getting to the data for their quiz! Because TinyWebDB stores data on the Web, the quiz taker can access the quiz questions and answers on a different device than the quiz maker’s. (Online data storage is often referred to as the cloud.)
Here’s the general scheme for making list data—like the questions and answers—persistent:
- Store a list to the database each time a new item is added to it.
- When the app launches, load the list from the database into a variable.
Start by storing the QuestionList and AnswerList in the database each time the user enters a
new pair.
How the blocks work
The TinyWebDB1.StoreValue blocks store data in a web database. StoreValue has two arguments: the
tag that identifies the data and the value that is the actual data you want to store. As shown
in Figure 10-8, the QuestionList is stored with a tag of “questions” while the AnswerList is stored
with a tag of “answers.”
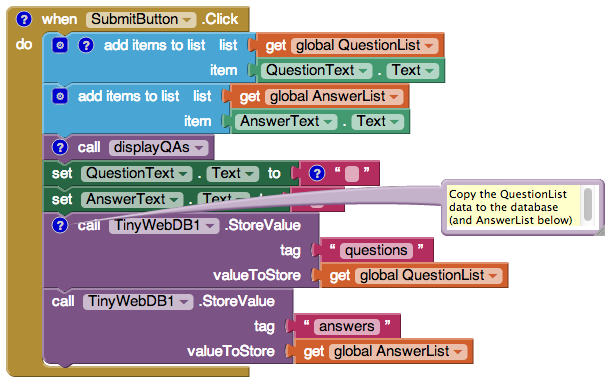
Figure 10-8. Storing the questions and answers in the database
However, for your app, you should use tags that are more distinctive than “questions” and “answers” (e.g.,
“DavesQuestions” and “DavesAnswers”). This is important because you’re using the default web database for
App Inventor, so your data (the list of ques- tions and answers) can be overwritten by others, including other
people following this tutorial.
Note that the default web service is shared among programmers and apps, so it is intended only for testing.
When you’re ready to deploy your app with real users, you’ll want to set up your own private database service.
Fortunately, doing so is straight- forward and requires no programming (see Chapter 22).
Loading Data from the Database
One reason we need to store the questions and answers in a database is so the person creating the quiz
can close the app and relaunch it at a later time without losing the questions and answers previously
entered. (We also do it so the quiz taker can access the questions, but we’ll cover that later.)
Let’s program the blocks for loading the lists back into the app from the web database each time
the app is restarted.
As we’ve covered in earlier chapters, to specify what should happen when an app launches, you
program the Screen.Initialize event handler. In this case, the app needs to request two lists from
the TinyWebDB web database—the questions and the answers—so the Screen1.Initialize will make two calls to
TinyWebDB.GetValue.
The blocks should appear as:
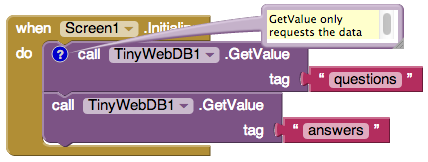
Figure 10-9. Requesting the lists from the database when the app opens
How the blocks work
The TinyWebDB.GetValue blocks, shown in Figure 10-9, work differently than TinyDB.GetValue,
which returns a value immediately. TinyWebDB.GetValue only requests the data from the web
database; it doesn’t immediately receive a value. Instead, when the data arrives from the
web database, a TinyWebDB.GotValue event is triggered. You must also program another event
handler to process the data that is returned.
When the TinyWebDB.GotValue event occurs, the data requested is contained in an argument named valueFromWebDB.
The tag you requested is contained in the argument tagFromWebDB.
In this app, since two different requests are made for the questions and answers, GotValue
will be triggered twice. To avoid putting questions in your AnswerList or vice versa, your app
needs to check the tag to see which request has arrived, and then put the value returned from the
database into the corresponding list (QuestionList or AnswerList). Now you’re probably realizing how useful
those tags really are!
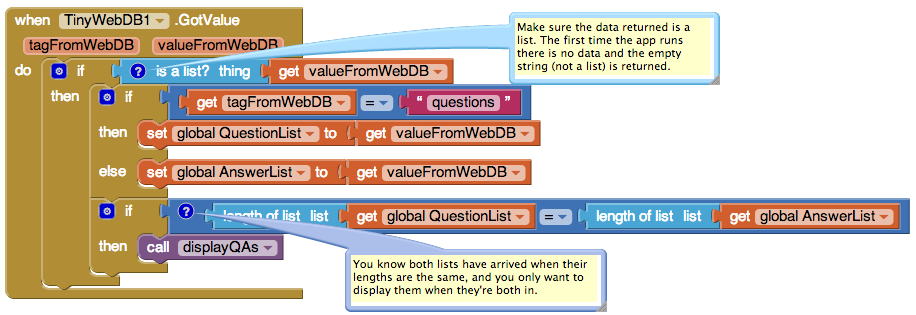
Figure 10-10. GotValue is triggered when the data arrives from the Web
How the blocks work
The app calls TinyWebDB1.GetValue twice: once to request the stored QuestionList and once to
request the stored AnswerList. When the data
arrives from the web database from either request, the TinyWebDB1.GotValue event is triggered,
as shown in Figure 10-10.
The valueFromWebDB argument of GotValue holds the data returned from the data- base request. We
need the outer if block in the event handler because the database will return an empty text (“”)
in valueFromWebDB if it’s the first time the app has been used and there aren’t yet questions and answers.
By asking if the valueFromWebDB is a list?, you’re making sure there is some data actually returned.
If there isn’t any data, you’ll bypass the blocks for processing it.
If data is returned (is a list? is true), the blocks go on to check which request has arrived. The
tag identifying the data is in tagFromWebDB: it will be either “questions” or “answers.” If the tag is
“questions,” the valueFromWebDB is put into the variable QuestionList. Otherwise (else), it is placed
in the AnswerList. (If you used tags other than “questions” and “answers,” check for those instead.)
We only want to display the lists after both have arrived (GotValue has been triggered twice). Can you think of how you’d know for sure that you have both lists loaded in from the database? These blocks
use an if test to check if the lengths of the lists are the same, as this can only be true if both have
been returned. If they are, the handy displayQAs procedure you wrote earlier is called to display the
loaded data.
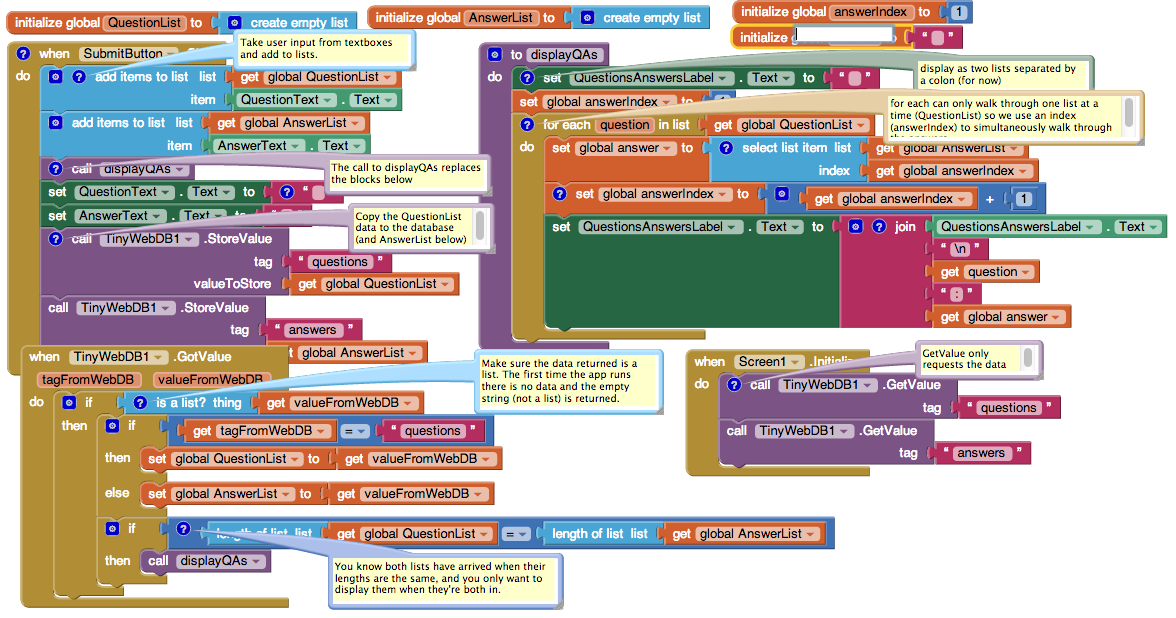
Figure 10-11. The blocks for MakeQuiz
TakeQuiz: An App for Taking the Quiz in the Database
You now have a MakeQuiz app that will store a quiz in a web database. Building TakeQuiz, the
app that dynamically loads the quiz, is simpler. It can be built with a few modifications to
the Presidents Quiz you completed in Chapter 8 (if you have not completed that tutorial, do
so now before continuing).
Begin by opening your Presidents Quiz app, choosing Save As, and naming the new project “TakeQuiz”.
This will leave your Presidents Quiz app unmodified but allow you to use its blocks as the basis for TakeQuiz.
Then make the following changes in the Designer:
- This version of MakeQuiz/TakeQuiz does not display images with each question, so first remove
the references to images from the TakeQuiz app. In the Component Designer, choose each image from
the Media palette and delete it. Then delete the Image1 component, which will remove all references
to it from the Blocks Editor.
-
Since TakeQuiz will work with database data, drag a TinyWebDB component into the app.
- Because you don’t want the user to answer or click the NextButton until the questions are loaded,
uncheck the Enabled property of the AnswerButton and NextButton.
TakeQuiz: Modifying the Blocks to Load the Quiz from the Database
Now modify the blocks so that the quiz given to the user is loaded from the database. First, since
there are no fixed questions and answers, remove all the actual question and answer text blocks from
the make a list blocks within the QuestionList and AnswerList. The resulting blocks should appear as
shown in Figure 10-12.

Figure 10-12. The question and answer lists now start empty
You can also completely delete the PictureList; this app won’t deal with images. Now modify your
Screen1.Initialize so that it calls TinyWebDB.GetValue twice to load the lists, just as you did in MakeQuiz.
The blocks should look as they do in Figure 10-13.
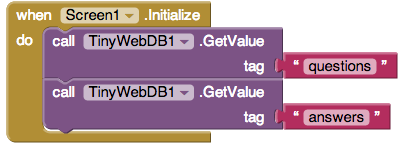
Figure 10-13. Requesting the questions and answers from the web database
Finally, drag out a TinyWebDB.GotValue event handler. This event handler should look similar to
the one used in MakeQuiz, but here you want to show only the first question and none of the answers.
Try making these changes yourself first, and then take a look at the blocks in Figure 10-14 to see
if they match your solution.
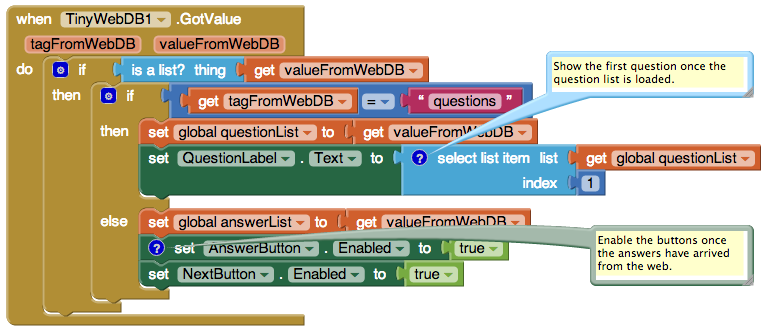
Figure 10-14. GotValue handles the data that arrives from the Web
How the blocks work
When the app begins, Screen1.Initialize is triggered and the app requests the questions and answers
from the web database. When each request arrives, the TinyWebDB.GotValue event handler is triggered.
The app first checks if there is indeed data in valueFromWebDB using is a list?. If it finds data,
the app asks which request has come in, using tagFromWebDB, and places the valueFromWebDB into the
appropriate list. If the QuestionList is being loaded, the first question is selected from QuestionList
and displayed. If the AnswerList is being loaded, the AnswerButton and NextButton are enabled so the user
can begin taking the test.
The Complete App: TakeQuiz
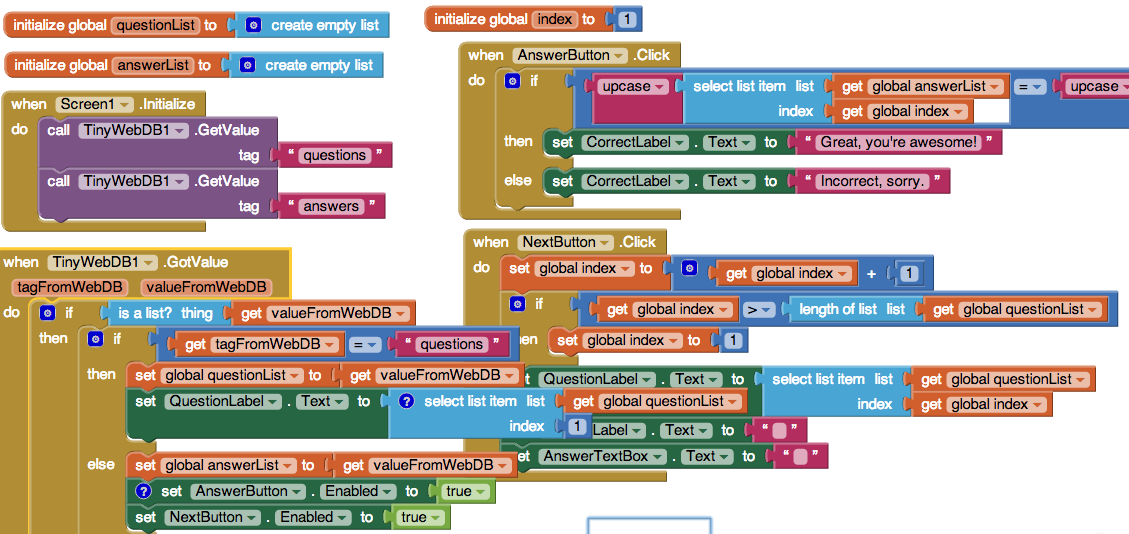
Figure 10-15 illustrates the final blocks for TakeQuiz.
Variations
Once you get MakeQuiz and TakeQuiz working, you might want to explore some variations. For example:
-
Allow the quiz maker to specify an image for each question. Of course, you (the app developer)
can’t preload these images, and there is currently no way for an app user to do it. So the images
will need to be URLs from the Web, and the quiz maker will need to enter these URLs as a third item
in the MakeQuiz form. Note that you can set the Picture property of an Image component to a URL.
-
Allow the quiz maker to delete items from the questions and answers. You can let the user choose a question
using the ListPicker component, and you can remove an item with the remove list item block (remember to
remove from both lists and update the database). For help with ListPicker and list deletion, see Chapter 19.
-
Let the quiz maker name the quiz. You’ll need to store the quiz name under a different tag in the
database, and you’ll need to load the name along with the quiz in TakeQuiz. Once you’ve loaded the
name, use it to set the Screen.Title property so that it appears when the user takes a quiz.
-
Allow multiple, named quizzes to be created. You’ll need a list of quizzes, and you can use each
quiz name as (part of ) the tag for storing its questions and answers.
Summary
Here are some of the concepts we’ve covered in this chapter:
-
Dynamic data is information input by the app’s user or loaded in from a data- base. A program that
works with dynamic data is more abstract. For more information, see Chapter 19.
-
You can store data persistently in a web database with the TinyWebDB component.
-
You retrieve data from a TinyWebDB database by requesting it with TinyWebDB .GetValue. When the web
database returns the data, the TinyWebDB.GotValue event is triggered. In the TinyWebDB.GotValue event
handler, you can put the data in a list or process it in some way.
-
TinyWebDB data can be shared among multiple phones and apps. Fore more information on (web) databases,
see Chapter 22.